How To Build a Wine Cellar or Wine Cellar Closet Yourself
OK, to be honest, this was not a cabin project. But, building a wine cellar can be a great DIY project, and if you are thinking about building a wine cellar, doing it yourself can save you a lot of money and provide the joy of doing it yourself. Besides, what goes better with a long weekend at the cabin than a few vintage reds from the south of France?
So, if you love wine and like building things, this may be the perfect project for you. Before we start, a little wine storage 101.

The Benefits of a Wine Cellar and Proper Wine Storage
If you like wine and are reading this, you probably understand proper wine storage and the benefits of a building a wine cellar. For those less familiar with wine storage, the bottom line is this: wine cellars provide the proper conditions for short and long term wine storage, providing the following benefits:
Benefits of properly stored wines:
- Proper wine storage conditions maximize the shelf-life and preserve the quality of stored wine.
- Proper storage conditions optimize the wine aging process.
- Wines stored at proper temps are ready to serve at or near their optimum temperatures.
Wine is a complicated and somewhat delicate compound. Excessive heat, large temperature swings and exposure to oxygen can quickly degrade wine. Ideal storage conditions help preserve a wine’s quality.
Also, most finer wines will change or “improve” with age, and storing wines under ideal conditions provides the proper environment for this slow maturation process to occur.
Lastly, storing and serving wine at cellar temperature, helps you to serve better-tasting wine. Wine is a complex mixture of organic compounds and alcohol, whose flavor profile is largely influenced by the temperature-dependent release of these aromatic compounds.
Wines served too warm (room temperature or above) tend to express too much alcohol and aromatics, leading to a “flabby” and unfocused taste. Wines served too cold (refrigerator temps) express too little alcohol and volatile aromatics and result in “tight” and restrained tasting wines.
Most wines are served too warm or too cold. Reds served at room temperature are generally served too warm and white wines served at refrigerator temps are generally served too cold.
Both red and white wines tend to taste more balanced, and as the winemaker intended, if served near cellar temperatures of 50 – 60 ℉. Wines served cool will warm as you drink them, allowing the flavor profile to evolve as they are consumed.
Ideal Wine Cellar Conditions
A good wine cellar provides the following ideal conditions for storing and aging of wine:
- Temperature of 55 – 60 ℉ (55 ℉ is ideal)
- Humidity of 50 – 70%
- Dark and vibration-free environment
- Horizontal bottle storage for continuous wine-to-cork contact
In addition to proper conditions, a wine cellar should be easy to use and in reasonable proximity to the areas where you will open and enjoy your wine. A good wine cellar should also operate at a reasonable cost.
To obtain the above ideal wine cellar conditions, you can either choose a location with favorable existing conditions (root cellar, unconditioned basement, etc.) or actively create these conditions yourself by building a wine cellar.
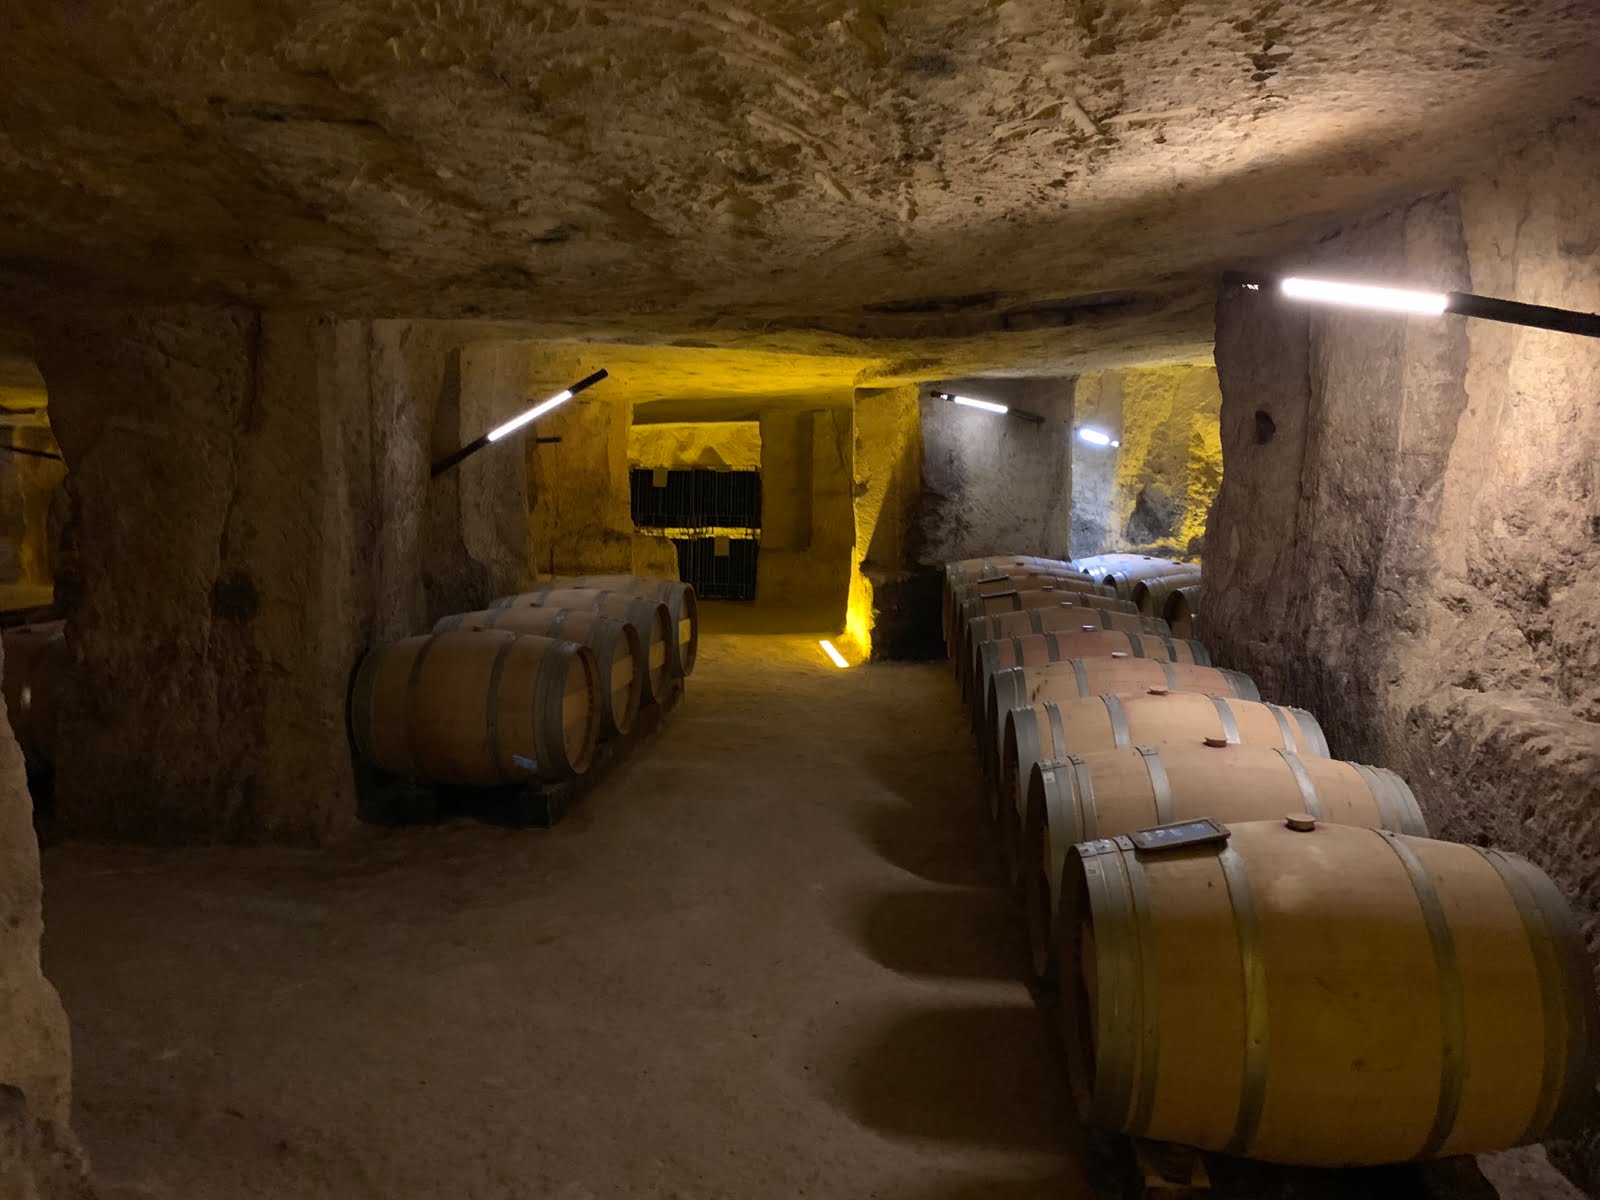
Early wine storage was frequently underground in wine caves, which naturally provided cool temps, high humidity and darkness. Today underground wine caves remain important for the storage and maturation of wine at wineries around the world.
Like the conditions of natural wine caves, the perfect wine cellar is cool, moist and dark. Consider a location for your new cellar that will help you achieve and maintain these ideal conditions.
When planning a wine cellar build, avoid locations that are too hot, cold or change temperature frequently.
Ideal locations to build a wine cellar are within the conditioned areas in your home. Consider ease of construction too when picking a place for your new cellar, finding a location with easy access to electricity, that is reasonably easy to seal, and insulate and somewhere that will allow you to install a through-the-wall or ducted wine cellar cooling unit.
Good locations to consider; an extra room in a basement, a spare basement closet, a basement under the stairs closet (the location I used) or a fresh build in the basement or ground floor of your home.
Bad locations to potentially avoid: an unheated garage or shed, a sunny room, an area that would be difficult to insulate and moisture seal.

Build a Wine Cellar to Provide Stable Wine Cave Like Conditions
A well-functioning wine cellar should mimic the conditions of natural wine caves – cool, moist, dark, vibration-free and stable.
To consistently deliver wine cave like conditions within your home, your wine cellar build will need to be very well insulated, air and moisture sealed, and built with moisture-stable materials.
The insulation and moisture barrier will need to extend completely around the cellar build – floor, walls, ceiling and door. The general layers from outside the cellar to inside are:
- Air/Vapor barrier (often polyethylene sheeting)
- Insulation (R-12 or greater)
- Air/Vapor barrier (optional inside)
- Moisture-stable wall finish
The performance of a wine cellar depends greatly on an air and moisture tight build and sufficient thermal insulation of the floor, ceiling, walls and door. Wine cellar cooling units depend on air-tight and well insulated spaces and will generally not provide adequate cooling without these conditions. And, operating a refrigeration unit without air barriers and insulation would be very wasteful and expensive and create excessive temperature variation.
The Importance of an Air Sealed Wine Cellar Build
Wine cellar builds should include a air-resistant and moisture-resistant barrier. The lack of an air/vapor barrier will allow warmer, higher-humidity air to enter the cellar space leading to moisture problems.
Warm air can hold more water compared to cooler air. As warm air moves into a cooler space, like a wine cellar, water vapor can condense forming liquid water once it hits its dew point temperature. This water release can quickly lead to structural damage and decay and mold growth. The lack of an air/vapor barrier will also create excessive water production from your cooling unit.
When installing an air/vapor barrier, install it on the warm side of the wine cellar walls, ceiling, and floor. This way, warm ambient air is prevented from entering the cellar or cellar wall or ceiling cavities where it could cool and release water. If the air barrier is placed on the cool side of the cellar, ambient air will be able to move to the barrier, cool and release water behind the barrier. For this wine cellar, I first installed a poly air/vapor barrier, then installed rigid foam insulation over it.
The More Insulation the Better for your Wine Cellar
Building a wine cellar without adequate insulation is also a common problem. Without sufficient insulation of the wine cellar ceiling, walls and floor, temperature changes will occur more frequently and tend to mimic the temperatures of the air surrounding the wine cellar.
In poorly insulated wine cellars, the refrigeration units will spend much more time on and cycle much more frequently, leading to higher electrical costs and more rapid temperature changes and larger temperature range swings.
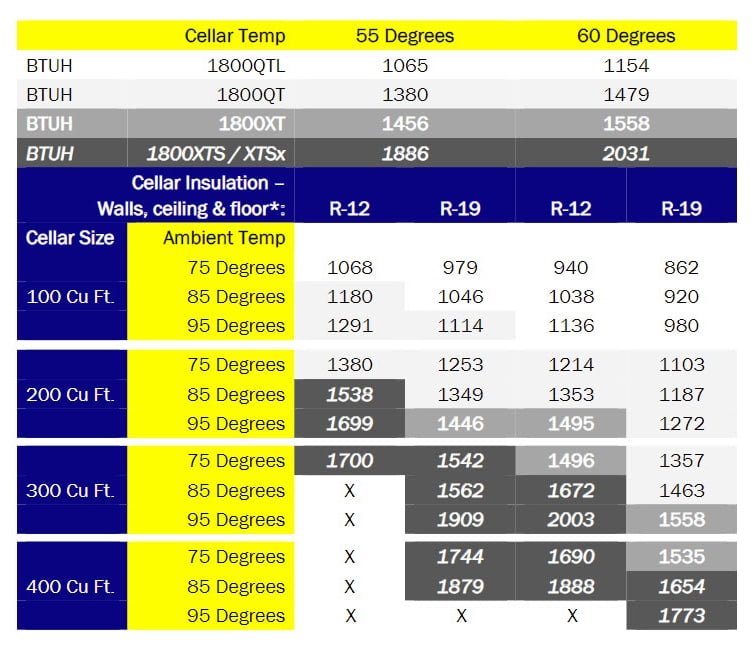
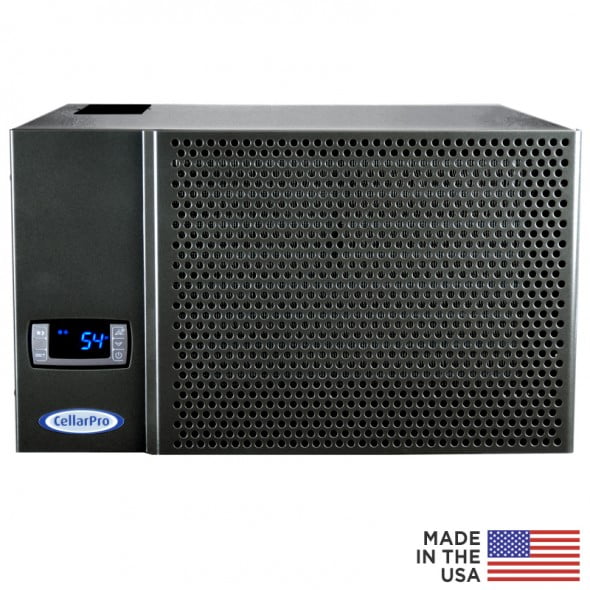
Also, insufficient insulation will make it less likely you will be able to reach a reasonable target temperature (55 – 60 ℉) for your cellar. Individual wine cellar refrigeration units typically have published thermal performance data each unit for cellar size, based on insulation, and ambient and desired target temperatures. Below is an example of such a chart for the CellarPro 1800 series of wine cellar cooling units (I used the CellarPro 1800 XT for my cellar).
Cover Your Wine Cellar Walls with a Functional, Durable Finish
Two consideration when choosing a material for the walls of your cellar; 1) mounting shelving/racks and 2) mold/moisture resistance.
To store wine in your cellar you will need some sort of wine racking. I used a commercial metal rack that is fastened with screws. Although you can use anchors and install these racks to drywall surfaces, driving screws directly into 1″ cedar boards is easier and sturdier. Cedar boards are naturally rot resistant and durable in higher moisture environments.
Drywall can be used for cellar construction, but standard gypsum drywall may not perform well in high humidity environments and you may want to avoid using it for the interior finish of your cellar. You could consider using a smooth tile backer board (like HardieBacker, or Wonderboard) which contain little or no gypsum or paper and are intended for use in wet environments.
Tile backboard can then be painted (smooth surface products) or finished with tile. Tile is great for high-moisture environments, but comes with the downside of additional complexity and cost to install and difficulty mounting fasteners for racks or shelving.
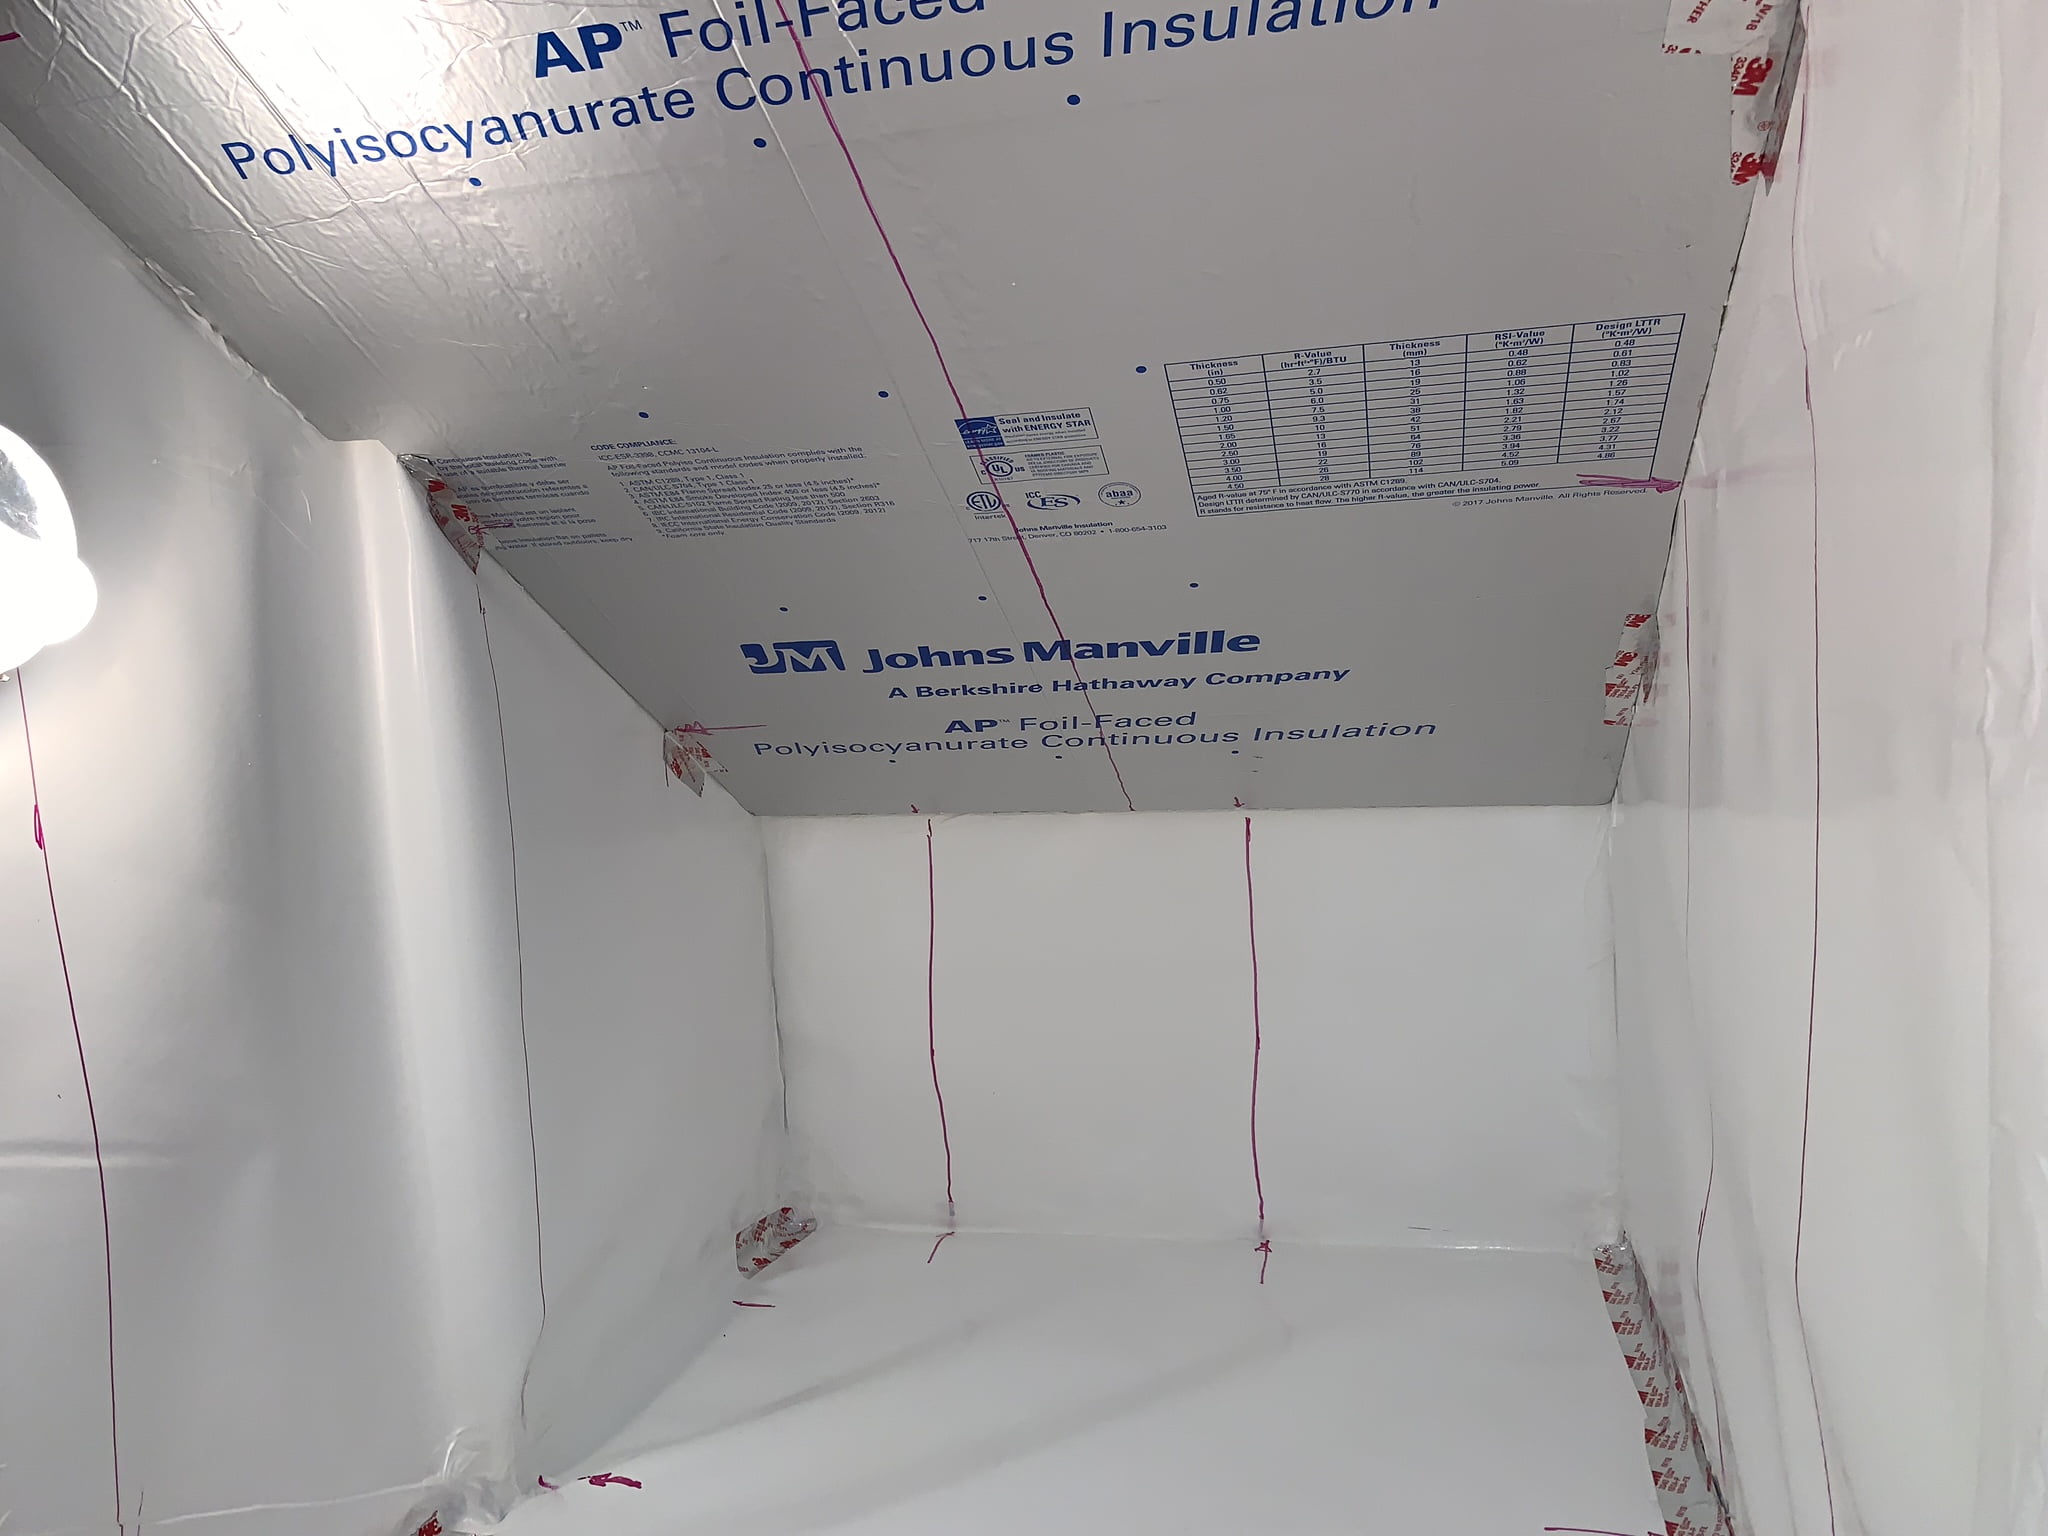
Another option is to use rigid foil-faced foam (polyisocyanurate) to insulate your cellar and as the finishing surface inside the cellar. I used this method for a previous wine cellar and it worked well as I had floor standing wine racks that did not require fastener attachment to the walls. If you use this method, you can seal the seams between panels with a foil tape for a more finished look and additional air sealing.

After considering the options, I chose to use rigid foil-faced foam insulation plus 1 x 12 solid red cedar board as horizontal paneling to finish my cellar walls and ceiling. Using solid cedar boards, I was able to mount them to the wall studs and then screw directly into them to mount my wine racks – flexible, simple, pleasing to the eye and slightly aromatic.

Wine Cellar Flooring
For the flooring of the cellar, pick a product that tolerates a high-humidity environment. Wood flooring may or may not be a good choice with the high levels of humidity within a typical wine cellar.
If you do install wood flooring, an engineered product (solid veneer bonded to plywood structural layer) may be a more stable choice. Tile will work, but again it’s more expensive and complicated to install – especially if you are adding insulation to the floor.
Vinyl products and continuous or tiled synthetic flooring would likely be good choices, but choose a product that does not have a strong odor. Some rubber flooring mats have a strong odor that would be unpleasant in your wine cellar.
I used foam gym tiles. These tiles are inexpensive, easy to install and readily available online or at local home improvement stores. The also add additional insulation value and not affected by water nor provide food for potential mold growth.

Wine Cellar Racks, Bins, Shelves and Cubes
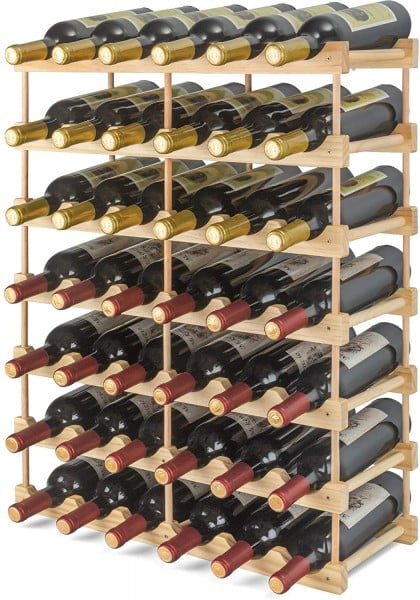
There are many options for wine racks for your cellar made from a variety of materials. Wood and metal products are common, and I favor metal products.
I like metal racks for their strength, versatility, relatively low cost and ease of installation. They also tend to offer designs with less structural material compared to wood, allowing more visualization of the wine bottles.
Wood racks tend to be more expensive and configured in traditional slot-style racks. Many of these wooden slot racks are typically built with small strips of wood that are nail-gun fastened together, giving them a cheap look in my opinion. They also tend to cost a lot more per bottle compared to metal racks. Even so, many like wood racking and don’t mind the limitations of wood wine racks.
I used metal racks for all of the 3 wine cellars I have built in the past.
In the first cellar, which was a passive basement cellar built in a small foundation block walled small closet where I could not easily drive fasteners into the walls, I used food service style metal wire wine racks. They are very strong, are stackable, allowing for easy shelf height adjustment and they are inexpensive.
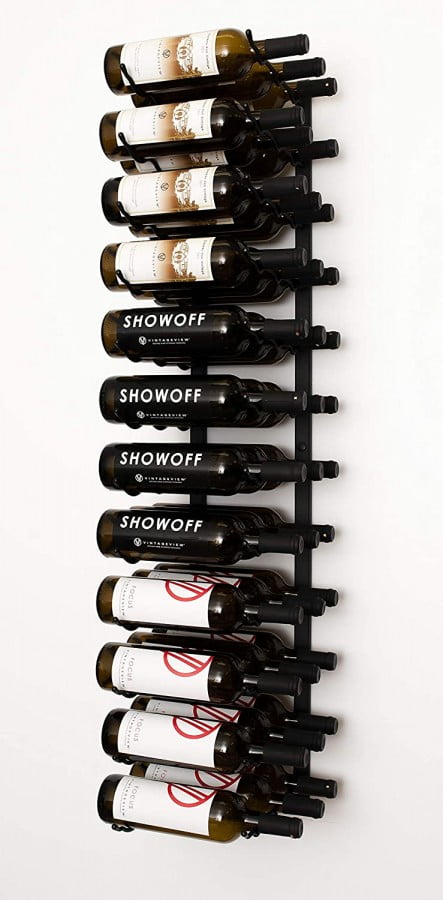
For my last two wine cellar builds, I used metal wall-mounted display-style racks by VintageView. These racks mount on the walls of your cellar and are offered in one to three bottle deep designs.
I like the VintageView Wall Series wine racks for several reasons; you can see the labels on the wine bottles, and they are not as deep and traditional wine racking making them much better suited for small narrow wine cellar build in small rooms or closets. My last two wine cellar builds converted old closets and these racks allowed me more efficient use of the narrow space. I also really like to visual presentation of the bottle labels.
Recommended Wine Racks

Once you have an idea of the type of wine racking/shelves/bins you would like to use, draw up a cellar rack plan. Use the plan to figure out what you will what and an estimate of what it will cost. There are many tools available from online wine rack sellers to help you design storage within your wine cellar.
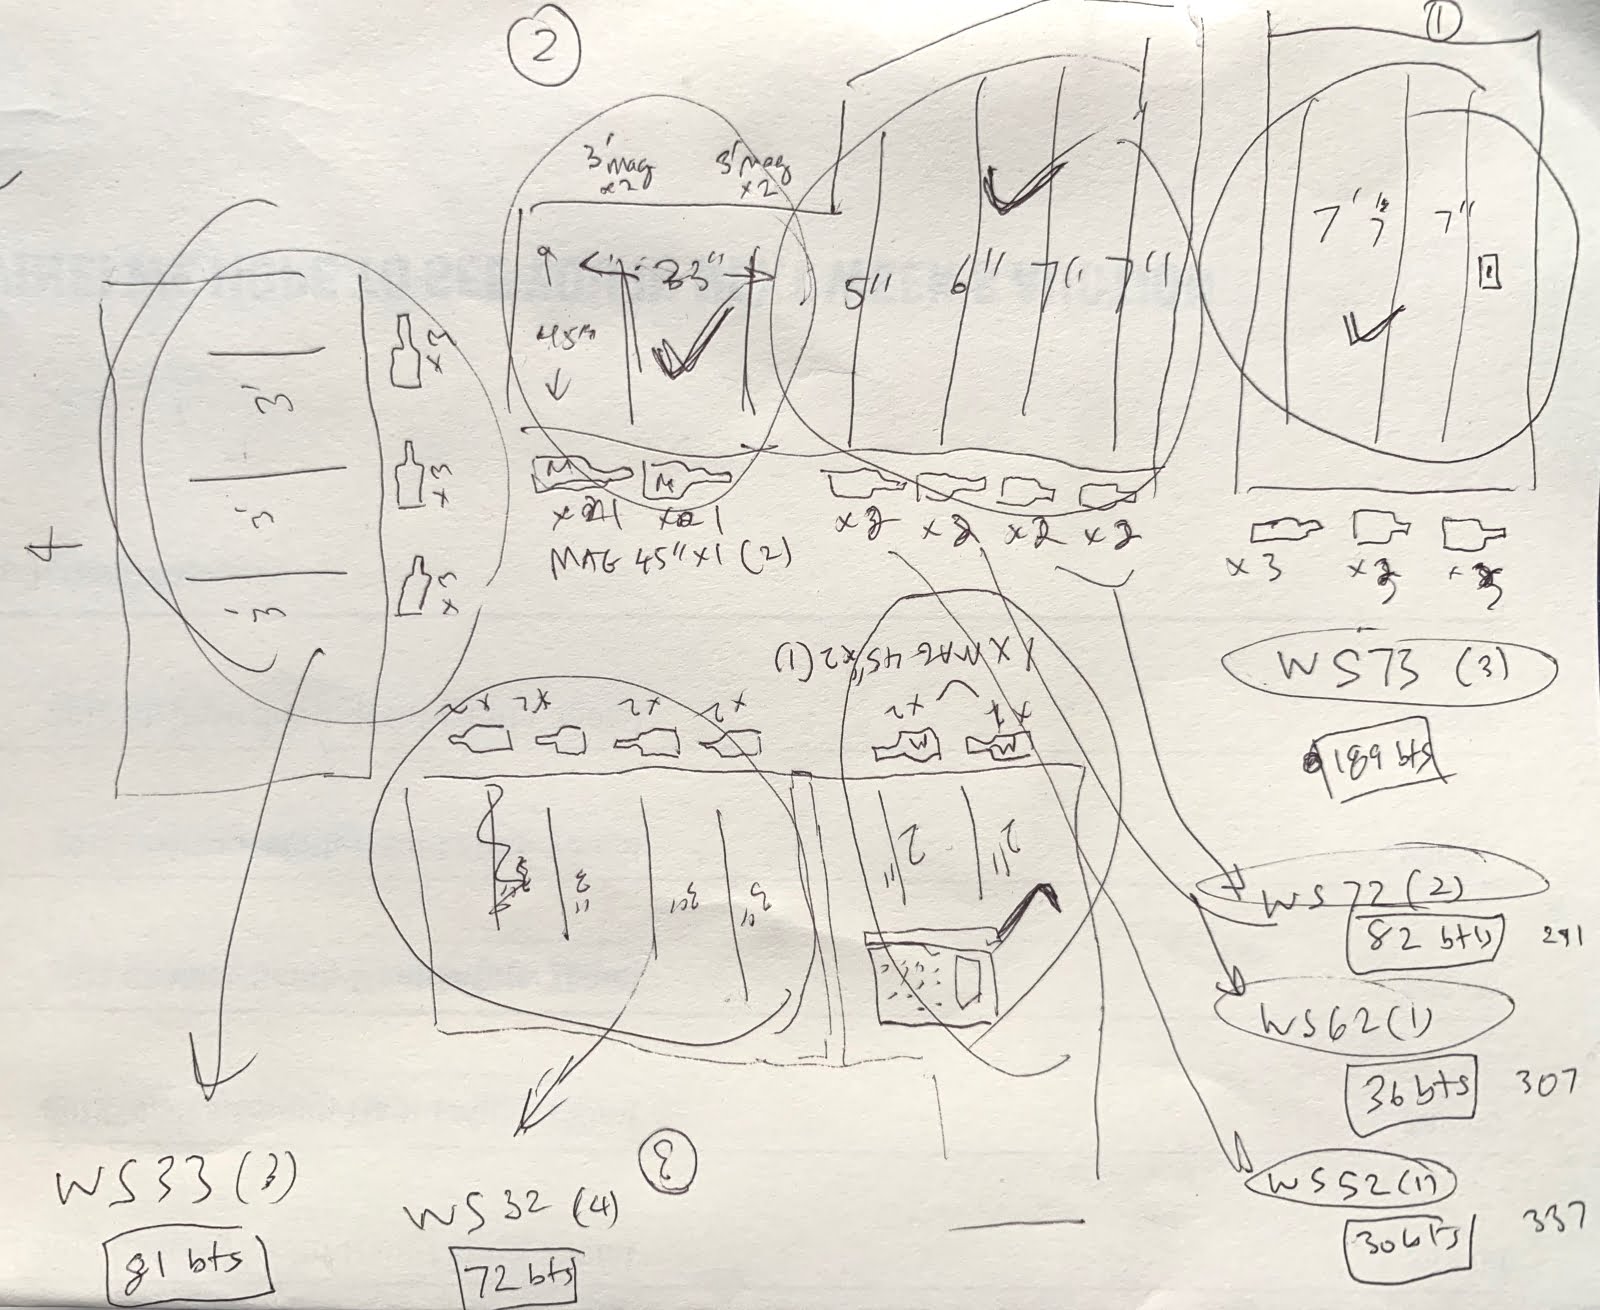
I knew I was just going to use VintageView Wall Series display racks, so all I needed to figure out was how many racks and of what depth racks to place of which walls (they have single to triple bottle depth racks). I also ordered some magnum bottle racks for bigger bottles (magnums).
A Note on Ordering VintageView Wall Series Racks
VintageView Wall Series wine racks come in one, two and three bottle depths. They also come in one, two, three and four-foot lengths. To create a 7-foot high rack, order one 3-foot rack and one 4-foot rack, for an 8-foot high rack, order two 4 footers. Some retailers will package them for you – example a WS7 for a 7-foot rack, while others will require you to order a WS3 and WS4 to create a 7-foot rack.
Either way, you order, a 7-foot rack will come as a 3 foot and a 4-foot rack that you will stack when installing. All of the racks come with connectors to attach one rack to another for stacking, even if not ordered to create longer racks. Hope this helps if you want to use VintageView Wall Series racks – and you should, they are awesome!
Wine Cellar Refrigeration Cooling Units
If you plan on actively cooling your wine cellar you will need to acquire a wine cellar cooling unit. As tempting as it is to use alternate methods to cool your wine cellar, it usually makes sense to invest in a cooling unit designed specifically for wine cellars. Using central air conditioning ducts to cool a wine cellar space tend to lower humidity levels too much, be difficult to control and may not deliver cool enough air for ideal conditions. Window unit air conditioners generally do not work well as they are not designed to maintain wine cellar levels of cooling.
Cooling units made specifically for wine cellar cooling are designed to efficiently produce proper wine cellar temperatures (55 ℉) and help maintain higher levels of humidity. If you are building a wine cellar that needs cooling, I highly recommend purchasing a wine cellar cooling unit.
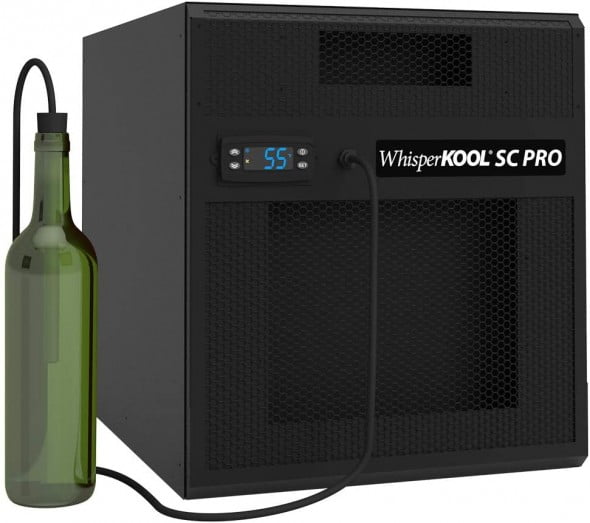
There are several different makes of wine cooling units. I bought and really like my CellarPro 1800XT unit. This was the first and only cooling unit I have purchased. I’ve had it since I bought it new in 2010 and used it without any problems since. I highly recommend CellarPro units.
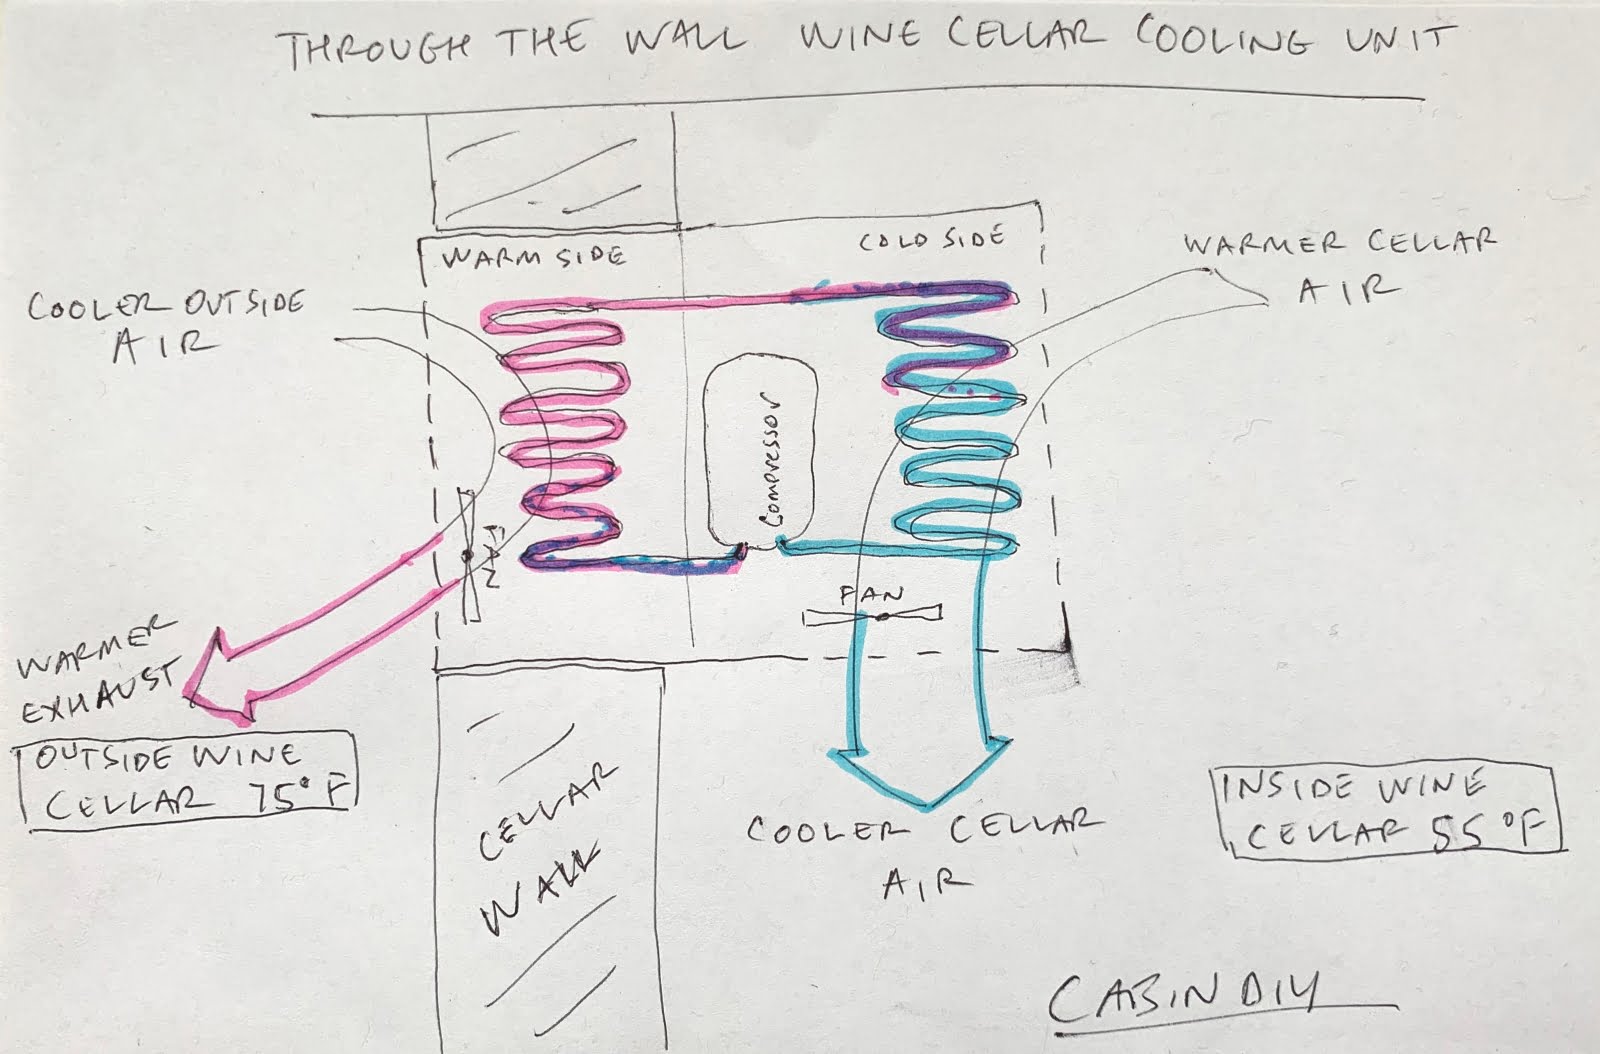
Most wine cellar cooling units are designed as one of two basic configurations: 1) Self-contained “Through The Wall” units and 2) Two-part “Split Systems”.
Through The Wall Wine Cellar Cooling Units
Through the wall wine cooling units contain all the components of a refrigeration circuit within the one unit and are mounted through or across the wine cellar wall.
The evaporator coils, which cool air, are located on the cellar (cold) side of the unit and cool the in-the-cellar air by circulating it across the cold evaporator coils.
The condenser coils, which remove heat from the refrigerant, are located on the warm side of the unit and release heat by circulating outside-the-cellar air across the warm condenser coils at the rear of the unit.
Some through the wall cooling units can be located a limited distance outside of the wine cellar (not mounted through the wall) with the addition of ducting for the cooling air circuit (evaporator coil) and the heat removal circuit (condenser coil).
The advantages of contained, through the wall cooling units include; the simplicity of installation, lower noise levels in the area immediately outside the cellar (unless ducted) and usually lower cost. The disadvantages of through the wall cooling units include; the look and noise of the cooling unit mounted through the wall of your cellar and the required ambient space around the cooling unit discharge side for heat removal.
Split System Wine Cellar Cooling Units
Two-part split system wine cooling units separate the evaporator coils and the condenser coils with the “split” units joined by a copper tubing set for the refrigerant circuit.
The cold evaporator coil unit is located within or ducted to the interior of the wine cellar to cool the cellar air and the warm condenser coil unit is located remotely to remove heat from the refrigerant. Refrigerant circulates between the two units by way of copper tubing.
The advantages of a two-part split cooling system include; remote location of condenser coil unit (less noise, no need for open space around the cellar, no rear-of-unit grill on cellar wall), and typically higher cooling capacity. The disadvantages of through the wall cooling units include; higher initial costs, HVAC professional services for refrigerant line connection and fill.

Consider your budget, the size and thermal load (several websites will calculate this for you) of the cellar build when deciding on what size and type of wine cellar cooling unit to purchase. Most well insulated (non-glass) wine cellars of less than 500 cubic feet should be able to use through the wall cooling units. If you are building a large cellar, plan to use a lot of glass or want a remote condenser coil/fan, consider a split system.
Qualtiy Wine Cellar Cooling Units
A well-functioning wine cellar should provide ideal temperature (55 – 60 ℉) and humidity levels (50 – 70%) within as small of range of temp and humidity swings as possible. Properly air sealing and insulating your cellar space is essential for stable, efficient wine cellar conditions. Understanding that warm air rises and cool air sinks, wine cellar cooling units should be mounted as high as possible with your cellar.
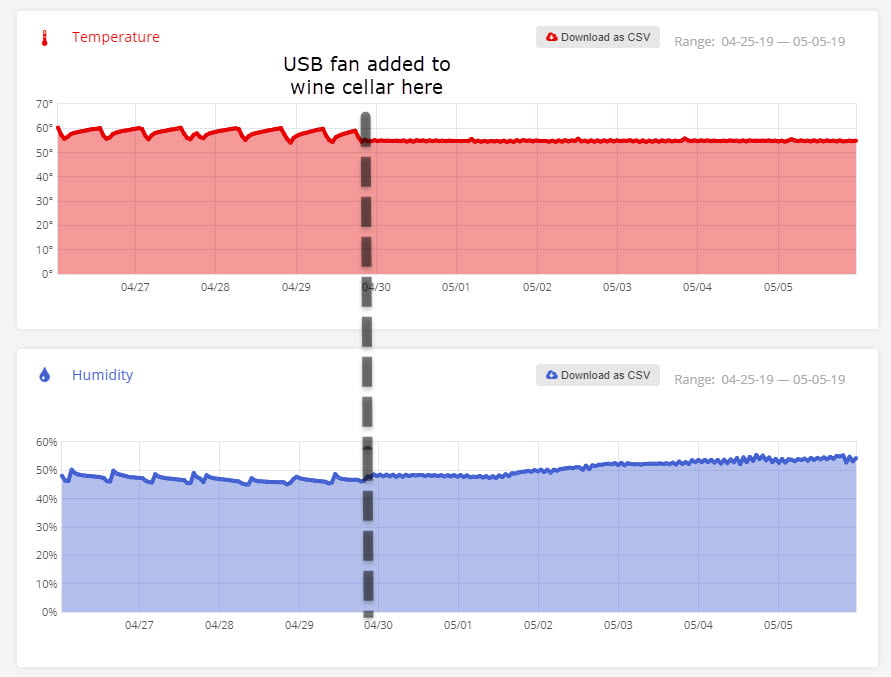
Unfortunately, my closet cellar space made it unpractical to mount my cooling unit high in the cellar and I had to settle for a midway location. To help create more uniform conditions within my cellar, I mounted a small USB-powered desk fan at the top of my cellar to help circulate and mix the air within the cellar. The results of this simple addition to the cellar have been impressive, greatly evening out temp swings and temperature stratification within the cellar.
Now that my wine cellar closet conversion is complete, I am very happy with the results. The temperature remains fairly steady at 55℉ with relative humidity just over 50%. I will watch the humidity levels as we move into summer (it is currently early May here in Minnesota). But, all things considered, I couldn’t more pleased with how this wine cellar turned out.
Every time I consider building a wine cellar, I hesitate knowing the work involved and the costs. Yet every time I finish a wine cellar and start using it I can’t imagine not having built it. For me, my wine cellar is one of my favorite places in my home and always seems to bring a smile to my face. If you love wine, you will love having a wine cellar of your own.
My wine cellar building summary points:
- Wines should be stored horizontally, in a dark, vibration-free environment at 55 – 60 ℉ with 50 – 70% relative humidity.
- Most wines should be served at cellar temperature and allowed to warm as you drink them.
- An ideal wine cellar is airtight, well insulated and equipped with a properly sized wine cellar cooling unit.
- Air seal the entire wine cellar space, including the floor and ceiling, on the warm side of the cellar.
- Add as much insulation as practical for your space – at least R-15. I highly recommend using tape-sealed, foil-faced polyisocyanurate insulation when insulating over existing walls (I used 2 layers of 1″ polyisocyanurate for this project).
- Use a properly sized wine cellar refrigeration unit to cool the space and help maintain adequate humidity levels.
- A small USB-powered fan can significantly even the temperature within a cellar and reduce cooling unit cycling.
- Cedar boards make excellent cellar walls/ceilings – they are an excellent fastener base for mounting racks and the look and smell terrific.
- I love VintageView display racks, especially for narrow (3′ wide closet) wine cellars.
- Install a motion-sensor light switch that will turn on when you enter, and more importantly, turn off the lights after a set delay. This way you will never leave the lights on in the cellar which could quickly heat up the cellar.
OK on to the building… keep reading for the details of my conversion of an unused basement closet into a high-performance wine cellar!
OVERVIEW | Build A Wine Cellar
SUPPLIES LIST | Build A Wine Cellar


TOOLS LIST | Build A Wine Cellar


 C10fcg 15 amp compound miter saw")


STEPS | Build A Wine Cellar
- Choose a location for your cellar or frame-in a new cellar space.
Pick a location for your new wine cellar. I used my under-the-stairs downstairs closet.
Consider ease of cooling (avoid sun-exposed exterior walls), size (cooling unit and insulation levels will limit the size of the space you can cool), and practical considerations (ability to install a through the wall cooling unit, access to electrical circuits, etc.) when picking a location for your new wine cellar.
A large closet has been a good location for me in the past and is the location I used for this project. If you plan on using a wine cellar cooling unit, check the cooling capacity of your specific unit compared to the size and insulation level of your new wine cellar space. You can also calculate a thermal load for your intended space to help you more properly size a wine cellar cooling unit for your space.
You can certainly start fresh and frame in a new space for your wine cellar. There are advantages to this approach, including customizing the space to your needs and access to wall framing for vapor barrier install, electrical circuit wiring, in-wall insulation, and others. The details of properly framing an interior wall are beyond the scope of this discussion. For further information see this excellent article on basement room framing by FamilyHandyman.com.
The following steps assume you are starting with an existing, finished space. You will need to frame, wire, insulate wall cavities for a newly framed space prior to proceeding as below. If you are starting with a freshly framed space, apply the air/vapor barrier to the outside (warm) side of the framed walls and ceiling prior to finishing them. If you are starting with a finished room, apply the air/vapor barrier to the inside walls as the first layer, before applying insulation to these inside-the-cellar walls.


- Assemble wine cellar materials and tools.
Measure your space and purchase sufficient quantities of the following materials:
- Air/Vapor polyethylene plastic sheeting and waterproof tape to seal seams
- I used 12 mil reinforced US-made poly from CrawlSpaceVaporBarrier.net
- Insulation and foil tape to seal seams – I used two layers of foil-faced polyisocyanurate rigid foam
- Flooring – I used EVA foam gym tiles
- Wall finish and fasteners – I used 1′ x 12″ solid cedar boards or tongue and groove cedar siding boards (cheaper and easier to install)
- Wine racks, bins, shelving – I used VintageView racks
- Wine cellar cooling unit properly sized for cellar specs – I used a CellarPro 1800XT
Assemble tools and create an area for cutting materials (outdoors is best).


- Install the air/vapor barrier in wine cellar space.
Install plastic sheeting of at least 6 mil thickness on the warm side of all walls, ceiling, and floors. If this is a fresh build with newly framed walls, wrap the outside of the cellar with plastic prior to finishing these walls.
If the cellar is an existing room with a finished wall, install the plastic first, as the most outward layer, followed by insulation.Complete the installation of the air barrier by sealing all seams with waterproof tape.
I used a reinforced 20 mil poly purchased previously for another project (crawlspace encapsulation). The poly I used was a bit heavy, so instead of using a stapler to install the plastic, I used drywall nails to hold the material up and heavy-duty waterproof tape (i used both aluminum foil tape and Gorilla brand clear repair tape).
Air and vapor sealing the cellar space greatly improves the performance of your cellar’s insulation and prevents the entrance of large amounts of warm, humid air. If warm, humid air is allowed to enter the cellar large amounts of water will be released within the cellar and possibly the cellar walls.
The cooling unit will also produce massive amounts of water drainage under these conditions. Make sure to use a stud finder and mark the stud locations on your air barrier prior to installing insulation over it – assuming you will need the stud locations later for paneling install or shelving.


- Install the wine cellar insulation.
Once the wine cellar walls are air/vapor sealed, install any additional insulation you are planning for your cellar build. If starting from scratch and framing in your new wine cellar, you can add insulation to the stud cavities and ceiling space.
If you are transforming finished walls into wine cellar walls it may be prohibitively difficult to add in-wall insulation if it is not already present (with the possible exception of blown-in products). Even with insulated walls, your cellar build will greatly benefit from the addition of 1 – 3 or more inches of foam insulation.
here are a few types of foam insulation available. I like using foil-faced polyisocyanurate insulation. It has the highest R-value per inch and is easily air sealed with foil tape. Although the additional air sealing of the insulation is not necessary if you’ve properly installed an air barrier as above, it will improve the performance of your insulation and serve as a redundant air barrier for the cellar.
To install the foam insulation boards, I first measured the area to be covered, then cut the insulation to fit. Cutting foil-face rigid foam insulation is easy using a push-up razor blade knife. A straight edge may help cut with straighter edges. Use a particulate mask when cutting and installing the product, as it tends to produce fine fibrous dust similar to fiberglass.
When installing the rigid foam, I tried to cut to fit fairly tight, so the panels would hold themselves in place before I could tape the seals with foil tape. I also would use a few screws, especially for the ceiling panels, to help hold the panels and to verify stud locations and marking prior to installing cedar boards.


- Install the wine cellar flooring.
Next, I installed the flooring. I chose EVA (Ethylene-Vinyl Acetate) interlocking gym tile squares for the flooring. They are easy to install, available at home improvement stores and add a bit of extra insulation on the floor. They are also moisture resistant, easy to replace and inexpensive.
To install start along a wall and assemble. Cut to fit with a sharp razor blade knife and framing square and a scrap piece of wood to cut on.


- Install the wine cellar cooling unit.
Following the manufacturer’s recommendations, install the wine cellar cooling unit. Most will have specific installations requirements/recommendations and generally include:
- Cooling units should vent through the cellar wall to a space at least as large as the cellar or have proper ducting to such a space.
- Mount the cooling unit high in the cellar to enhance cooling and uniform temps within the cellar as warm air rises and cool air sinks.
- Supply unit with dedicated 15 amp circuit – typically via standard AC plug. (My unit runs fine on a non-dedicated 15 amp circuit.)
- Connect a drain line to the unit for condensate drain water produced by the cooling unit. The line should run to a drain or receptacle.
- The condensate drain line should have a water-filled trap loop or similar to prevent outside air entering the cellar via the cooling unit and this line.
- Mount the unit slightly sloped toward the drain line (typically toward the warm side of the cellar) to encourage drainage.
- Insulate the gap with caulk backer or similar and seal the cooling unit to the walls of the wine cellar using flashing tape or foil tape.
Choose a location for the cooling unit and cut a hole through the wall for the cooling unit. Slightly oversize the hole to ease installation and insulate/seal around the unit. CellarPro recommends the cutout be 1/4″ oversized compared to the unit.
The cutout should be able to support the weight of the cooling unit, which typically means you should install 2″ x 4″ blocking between adjacent wall studs at the base of the cutout. I did this and also added a piece of plywood to support the cellar side of the unit, eliminating the need for braces under the unit.
Before installing the cooling unit, I covered the sides of the cutout and the plywood shelf with poly sheeting and foil tape. If the unit produces any condensate, I want the cutout and shelf as protected as possible.
To install the unit simply slide it through the cutout so that the warm side is flush or nearly flush with the outside wall. My unit condensate drain fitting was located on this side, so I left my unit slightly recessed so I could feed the condensate drain through the wall cavity and back into the wine cellar. Recessing the unit also allows me to attach the rear-mounted coil air filter and still add a flush grill to finish the wall.
With my unit mounted slightly recessed, I was able to add a rigid foam partition to separate the condenser coil intake (blue air filter area) with the warm air discharge duct. This was not something recommended by the manufacturer, but a modification I made to theoretically reduce mixing of the warm exhaust air with the cooler intake air to the condenser coil.
My unit needs a slight tilt toward the warm side to help drain condensate water. Check your documentation, and tilt as needed. Then, install the condensate drain line. This line will drain any condensate water produced by your cooling unit.
Depending on the conditions within your cellar, your wine cooling refrigeration units may produce condensate water. You can greatly reduce/eliminate condensate water production by completely air sealing your cellar. My experience is that well insulated and sealed wine cellars located in air-conditioned homes, do not produce much condensate water.
You will still need to connect the drain line, but for my cellar, I modified it by adding a ball valve to close the line if the unit is not producing any significant water. If you do this, you will obviously need to monitor water production very closely to avoid water accumulation and possible damage due to lack of drainage.
When you run the condensate drain tubing, you should create a trap for water by looping it or creating a sideways S-shaped curve. The curve should be deep enough to provide a trap of 1″ or so water height. The drain line should continue to an open drain or collection container.
Most systems should also have a vent tee after the trap. The vent tee will prevent negative pressure from emptying the water trap (just like a vent stack in your home plumbing). You may have to add water to the trap over time if your unit is not producing condensate water.
Most drain lines should also have a vent tee, depending on the length and height of the drain line as in use, a vacuum can develop within the line and can empty the drain line water trap. The condensate drain line can be run inside the wine cellar (as I did) or outside the cellar.
When mounting the cooling unit, make sure the bottom of the unit (or where ever the unit vents cool air) is free of obstruction. And, to encourage free cooling air flow from your unit, you should not place racking or other too close to the bottom of the unit.
Once the unit is in position, stabilize the unit and insulate and seal the opening to the unit. Some units have clips or brackets to secure the unit to the cellar walls. I was able to hold the unit securely with the ceiling the cedar boards.
Once secure, I pulled the units AC cord into the cellar (you can obviously connect the power cord on either side) and filled the gaps with air conditioning unit strip foam seal and foil tape. Your cooling unit may include such foam and sealing tape.
Finally, plug the unit into a grounded electrical receptacle. Check the power requirements for your unit. My unit draws 3 amps while running, and like most cooling units draws more at startup. I am using a shared 15 amp circuit without any issues.


- Install the wine cellar wall finish (cedar boards).
Decide on a finish for the interior of your wine cellar and install it. I like using 1″ solid red cedar boards. I used standard boards, you could use a grooved product like shiplap or tongue and groove siding to create joined edges.
Cedar boards are readily available at local lumber yards in a variety of lengths and widths. I used 12″ wide boards for this project in lengths long enough to prevent end-to-end joints. Unfortunately, the price of cedar lumber has risen considerably in the last several years.
You can save money by using cedar tongue and groove siding instead of standard boards. Siding is also easier to install and may perform better given the tongue and groove assembly which will allow for expansion and contraction better than edge-to-edge boards.
I like the look of flat cedar boards, so I used 1 x 12 cedar installed side to side starting at the base of the wall and working up. I used exterior-grade screws to fasten the boards to the underlying wall studs. I had previously marked the studs on the surface of the insulation.
You will need screws long enough to pass through any wall insulation and underlying drywall. My cellar walls are covered with 2″ of rigid foam over 1/2″ drywall. So adding it all up, I get 1″ cedar + 2″ insulation + 0.5″ drywall + 1.5″ stud penetration = 5″ of length or 5″ screws. Ideally, your screws should penetrate at least 1″ to 1.5″ into the wall studs.
Prior to driving screws through the cedar boards, I drilled 1/8″ pilot holes to help avoid splitting the cedar. I also created a small jig from a short piece of the cedar to help create uniform screw placement.
Continue adding the cedar boards, stacking and fastening them as you go. I used a compound miter saw for end cuts and a circular saw for ripping boards and performing longer angle cuts. Cedar boards tend to have sharp slivers. Wear gloves and lightly sand the ends/edges with a fine sanding block after cutting them.
After all of the cedar paneling is installed, you are ready to install the wine racks, shelves, and bins.


- Install wine cellar racks, bins and shelving.
After all of the cedar paneling is installed, you are ready to install the wine racks, shelves, and bins.
Organize and arrange your racking to prepare for installing it. Read and instructions and obtain any additional materials for the install. The VintageView WS wine racks I used came with all the necessary hardware to install them, but I used a different screw than the included screws.
I used a #8 1 1/2″ cabinet screw instead. The cabinet screws that I used by GRK had very sharp points and did not require pre-drilling before driving the screws to avoid splitting the cedar.
I also cut scrap pieces of cedar to use as spacers between the frame pairs (7 1/2″ wide) and rack sets (5 1/2″). Then, once I had the first frame installed, I can use the cedar spacers to gap the frames without having to measure and try and hold them steady while passing fasteners. These spacers worked great and made installing the frames super easy.
As noted above, when installing the VintageView rack frames, they need to be spaced properly. Each rack frame pair has a recommended spacing (7 1/2″ for standard bottle racks) between frame pieces. There is also a required spacing between installed sets of racks (5 1/2″).
If you haven’t planned rack placement yet, use the total width of the installed two-piece rack plus spacing between rack sets (8″ + 5 1/2″ or 13 1/2″) to figure out how many racks you can fit on a specific wall in your cellar.
Begin the rack install by first spacing the proper distance from the adjacent wall (2 3/4″) and installing the first frame. I found driving the top-most screw made it easier to install the VintageView frames plumb and level. After the first top fastener is in, use a beam level or magnetic torpedo level to plumb the frame, then install the remaining fasteners into the wall. Then gap the other frame of the rack set 7 1/2″ wide, level and install its’ fasteners.
I found placing the small torpedo level at the top of the two frames made it easy to locate the second frame at the correct height prior to installing it. I then used the cedar spacer I had made, sliding along the frame to perfectly locate the paired frame while fastening it to the wall.
To install the longer racks, use the included rack connector plugs. Remove installed plugs at the ends of the two frames you plan to connect and insert the connector. Then, push the two frames together and fasten as usual to the wall.
As I discussed earlier in the article, VintageView Wall Series racks come in one, two, three and four-foot lengths. Longer racks are created by connecting the shorter ones – for example, a seven-foot rack is created by connecting a three and four-foot rack.
Once the screws are driven and the rack frames are secured to the wall, supplied caps can be applied to the screw holes for a more finished look.
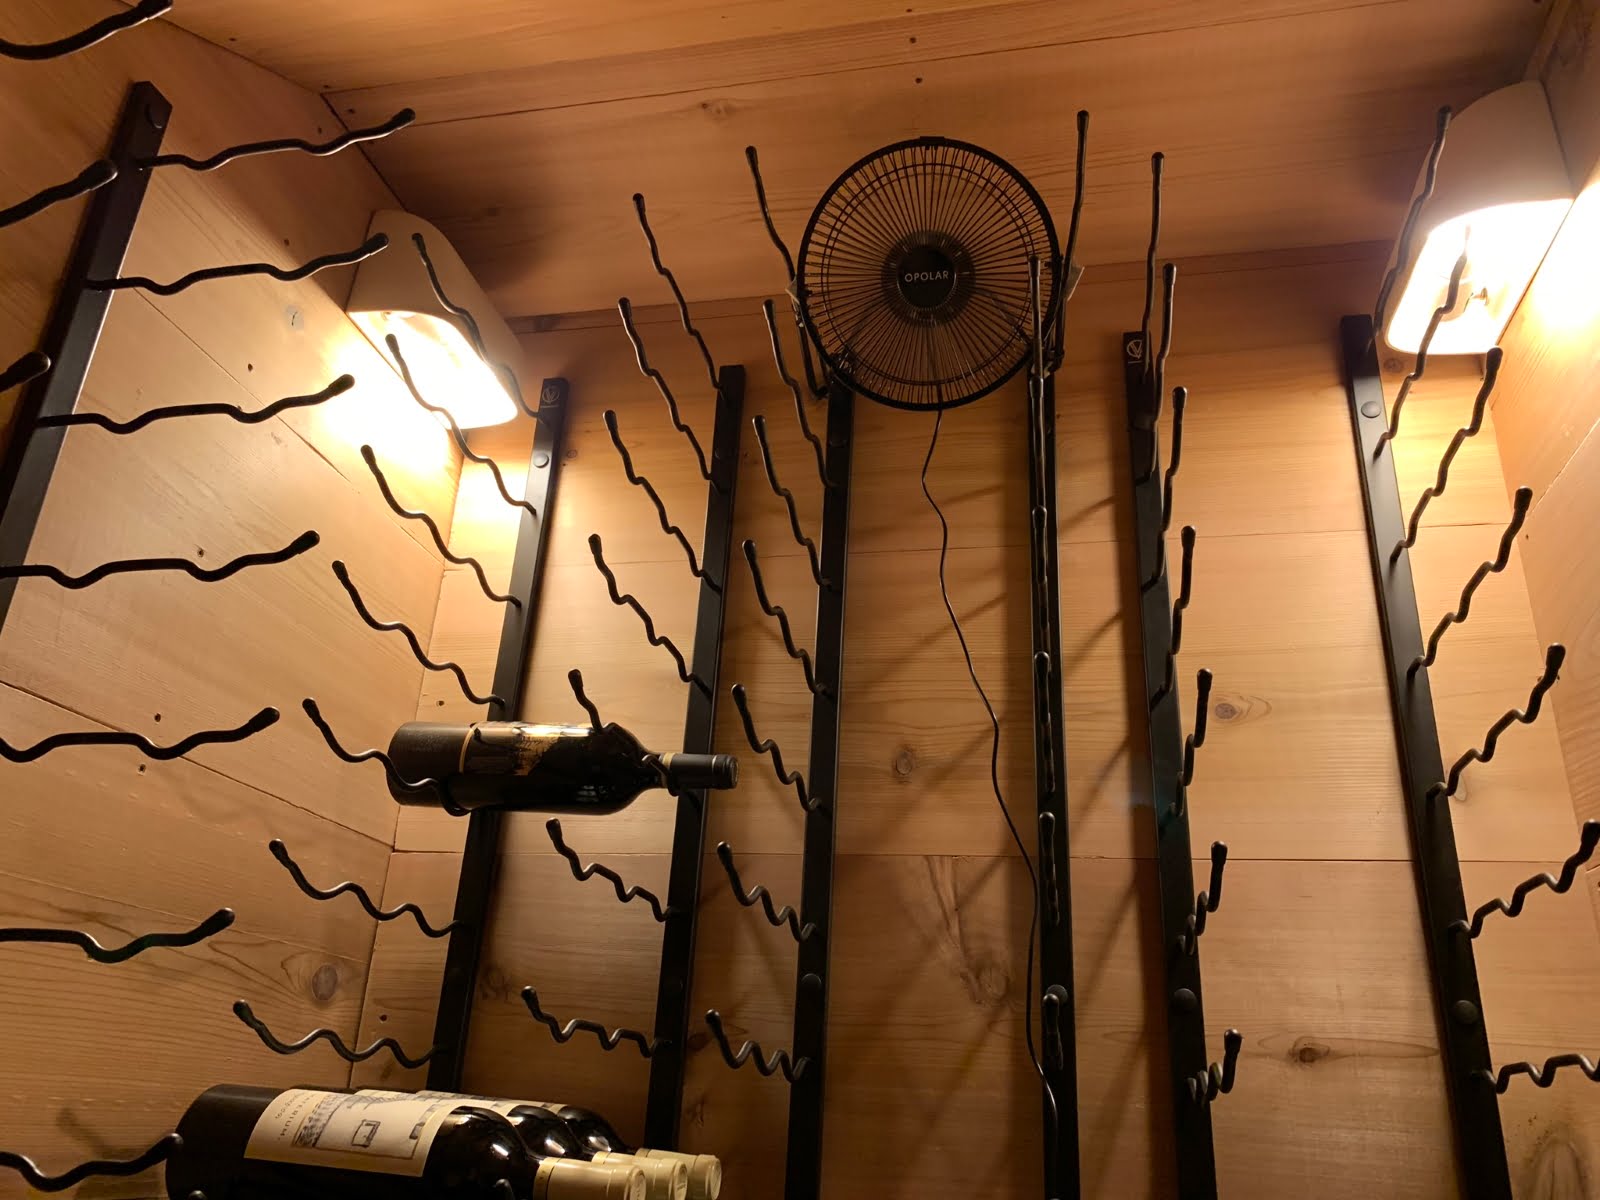
The following two photos show the installed VintageView racks in my new wine cellar. Notice the variety of the racks that you can mix using this system to accommodate narrow wine cellars. The top picture shows, near field to far, single bottle depth magnum bottle racks followed by double depth standard bottle racks and triple depth standard bottle racks along the far wall.
The lower photo shows a grouping of triple depth standard bottle racks and a group of double bottle depth racks. The total capacity of the installed wine racks is just under 500 bottles.


- Insulate and air-seal the wine cellar door.
The last thing I did for the cellar build was insulate and seal the door. Having a well-insulated wine cellar is key to a happy cellar, and the door is no exception. In fact, it will often be the most vulnerable areas of the cellar for heat loss and lack of proper air sealing.
The best way to create an air-tight well-insulated entry for your wine cellar may be to use a high-quality exterior door and frame. I’ve never done that, as it would be fairly expensive and might look odd, depending on the door.
What I have done is insulate the existing door with rigid foil and carefully weather-strip the door stops.
This closet, unfortunately, had double doors without a central stop (astragal), making it more challenging to create a dependable seal where the doors met when closed. I was able to solve the central seal problem by running a self-adhesive 3/8″ strip of weather stripping down the middle of the fixed door, allow them to seal when closed. I also added a 3/16″ self-adhesive foam weather strip to the door stops on all sides.
To insulate the doors, I attached 1 1/2″ foil-faced polyisocyanurate (Thermax) insulation with double-sided carpet tape. The sides were sealed and finished with foil tape. The 1 1/2″ Thermax will add almost R-10 to the door. To help with air-sealing the doors, I applied 3/16″ self-adhesive foam weather stripping to the door stops.
Adding the rigid foam insulation to the back of the cellar doors can be a bit tricky to line up correctly. What I did was cut the height of an insulation panel correctly and leave the width a bit long. Then I placed the cut piece behind the door and positioned it snuggly against the door jam. I then marked the width by tracing along the free door edge to mark the proper width on the insulation panel. I then cut along this line to cut the panel to the proper width.
Next, I again positioned the panel behind the door, closed it and checked the fit. The width should be just shy of the door free edge so it can close without catching.
If the cut panel is a bit proud in areas you can easily trim it back with an extended push-up razor blade knife. After you are happy with the fit, open the door carefully as to not move the insulation panel and apply double-sided carpet tape to the back of the insulation panel (or door). Then carefully close the door to make contact with the tape on the insulation panel and adhere it to the back of the door. Rub over the surface of the insulation panel to ensure good contact between the tape and the door.
The carpet tape works surprising well and sticks like crazy, so make sure the door and panel are properly aligned before taping the two together. After the insulation is secured to the back of the door, check that the doors still close properly.
If the foam is too tight against the door jam you may notice the door will not close completely. This happened to me with one the doors and I needed to trim the foam back slightly to get the door to close all the way. Once you are happy with the panel fit and the door(s) close, finish the edges of the foam by running a strip of foil tape down the panel and the door edge.


- Start wine cooling unit and add wine bottles to the cellar. Monitor wine cellar temperature and humidity.
OK! Now for the fun part! Fire up the cooling unit and add some wine.
Each cooling unit has a slightly different setup. The CellarPro 1800xt I used has settings for minimum set point temperature, temperature differential, and humidity. There are a few other features like a Quick Chill and Energy Saving function.As we’ve talked about, ideal wine cellar temps are generally 55 – 60 ℉ with humidity levels of 50 – 70%.
I set my unit for a minimum set point of 53 ℉, temperature differential of 5℉ and the highest humidity setting. This means that the unit will cool until its’ front-mounted temperature sensor hits 53 ℉, it will then let the temperature drift up to a 5 ℉ rise in temperature (58℉) and then cycle on to cool back down to 53 ℉.These settings are working perfectly!
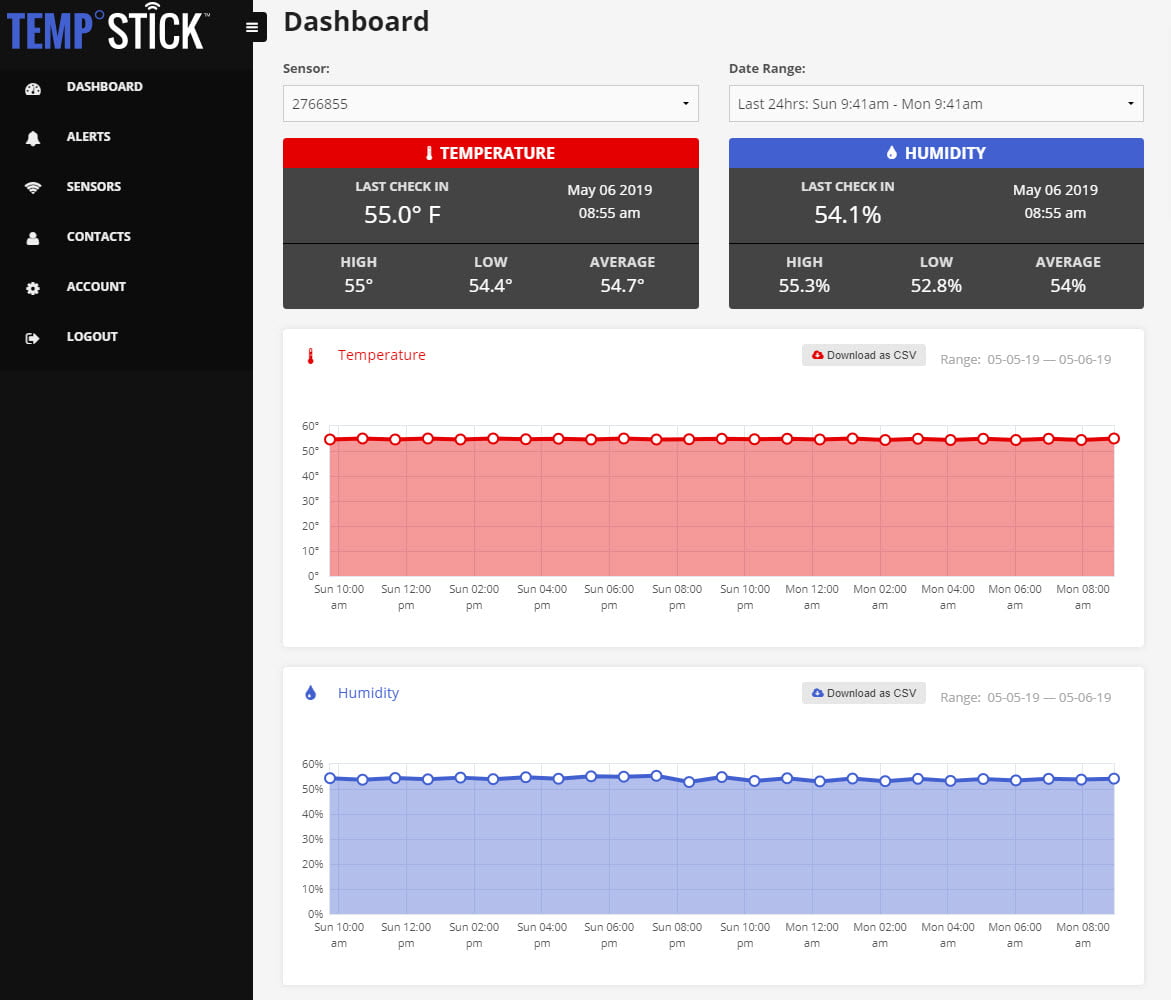
The average temperature at mid-height in the front of the cellar is 55 ℉. My humidity could be a bit higher, currently at ~ 54%, but summer is coming and it should rise with the season.


IMAGE GALLERY | Build A Wine Cellar


Thanks for this article. It’s incredibly helpful! I have a naive question. I have a subterranean closet that is finished in cinderblocks. It’s year round temp is about 60º and it has a good humidity. I’m thinking I could just finish it aesthetically and mount storage because a vapor barrier / air seal might actually be detrimental to its (nearly) ideal conditions. Does that sound right or am I way off?
Hey Michael!
Thanks for the question. I think you are right, depending on the actual humidity of the closet. Ideally you want a humidity close to 70%. Humidity level above this may encourage mold growth on the bottle labels. You can buy a temp/humidity monitor for $20 or so, or spend a bit more and have one that you can monitor remotely via wifi. I really like the Temp Stick unit I used in the article.
My first wine cellar was a concrete foundation block closet similar to what you are describing. I placed commercial wire racking (the stuff used in commercial refrigeration units) in the closet and filled it with wine. The conditions were fairly ideal – 70% humidity and temps ranging from 55 – 60 degrees. I think I covered the block walls with foil-faced polyisocyanurate insulation and taped the seams with foil tape – probably not needed, but I think I did it to give it a more finished interior. I know it might seem like tape sealed foil insulation would create a barrier to the ideal moisture (and temp), but the concrete floor wasn’t sealed (I think I used foam exercise tiles to cover it) and probably equilibrated with the floor/block humidity levels fairly readily. I think I have a photo – I’ll upload what I have.
Let me know how it goes.
This is incredibly helpful! We’re just starting our wine cellar project and this has everything covered. I was going to ask since I didn’t know how long ago it was published- if you still recommended the Temp Stick noted above? There are some cheaper options but didn’t know why this one was best, or what I should look for?
Hi Silvia!
Thanks! Having a wine cellar is such a joy, I’m happy for you guys – you will love it. I’m happy to help with any questions or issues. Richard Gold published an excellent and entertaining book How and Why to Build a Wine Cellar ( I just realized I never mentioned it in the article) for more reading. It is an excellent resource written by an enthusiastic scientist, DIYer and wine lover – a great read.
I really like temp stick, it’s worked well for me and offers a free (no subscription) website to access your sensor from the web without a phone.
A few words of advice as you start the wine cellar build:
Have fun and please feel free reply with any questions, and if you like upload a few photos of your project.
Gary
Thank you Gary! Reading the book now;-) I did also want to ask you, given you are drilling into the cedar and then the racks ontop, doesn’t that create penetration into the vapor seal? What do you recommend?
Hi Silvia,
I just noticed your question about fastening the cedar boards on the inside of the cellar. Yes, I first secure the cedar boards to the wall studs which does penetrate the vapor barrier. I then use shorter screws to secure the racks to the cedar boards.
It is true that the fasteners holding the cedar boards up are passing through the vapor barrier, but the end result is a very small total penetration surface area compared to the entire envelope. There isn’t a good obvious workaround. I guess you could install a strip of something like butyl flashing tape over the vapor barrier in the areas (over the studs) you intend to drive fasteners, in attempt to better seal the fastener track, but I don’t think its necessary.
I suspect this fastener through the vapor barrier question is very similar to adding sliding to a home. Home siding fasteners also pass through the building’s vapor barrier, but collectively do not significantly reduce the effectiveness of the barrier.
It is a good question, but my guess is not a significant problem.
Fantastic post, with both written and photo documentation. You’ve answered a lot of questions I had. For example, where to drain the condensate line when there is no plumbing available? Into a wine bottle of course! And your recommendation for sideways metal racking to display the bottle labels makes more sense than the traditional in-out wooden racking. After reading this I feel confident in proceeding with building my own cellar.
Thanks Donald for the nice comments. Let me know if anything comes up with your project – I’d be glad to help. Just an FYI, check out How and Why To Build a Wine Cellar by Richard M. Gold, Ph.D. if interested in some good wine cellar reading.
My father would like to have an underground wine cellar built on our house, which is why we’re currently looking for an excavation service. Well, thank you for sharing here that the two-part split system wine cooling units will separate the evaporator coils. We’ll also keep in mind to create a space that is dark and vibration-free.