A rainscreen wall is an exterior wall construction design that improves an exterior wall’s ability to manage water and stay dry. Rainscreen siding walls are best-practice for exterior wall construction and here is an overview of how we re-built our home’s exterior walls using the rainscreen system.

Rainscreen System - Why, How and What I Did
Rainscreen wall construction is thought to have originated with barn construction in Norway as a means to protect log barn walls from driving rains. Today, vented rainscreen systems have gained popularity in the United States and Canada for their ability to keep wall assemblies dry and healthy.
Water-related home damage has been on the rise over the last several decades. New building materials like synthetic house wraps and air-sealed building technique are a big part of the problem.
Almost every exterior wall, no matter how well constructed, will allow water into the wall assembly over time. Years ago homes were built using materials and techniques that allowed wet walls to breath and dry. Materials like traditional Portland cement based stucco and asphalt felt wrapped walls which were once standard in residential home construction allowed walls to breath.
Today, with the popularity of synthetic materials like plastic house wraps and synthetic stucco, walls no longer breath like they once did. The newer wall building materials used in contemporary homes are better at keeping water from entering wall cavities, but once inside the wall, water has a very difficult time escaping. Wet walls led to wood decay and rot.
Trapped moisture within wall assemblies promotes the growth of fungi, a.k.a. mold. Mold growth requires moisture and an organic food source. A wet wooden wall provides both.
Over time mold consumes and breaks down damp wood. Left unchecked, mold growth within wood walls damages structural components enough to lead to mechanical failure. Growing mold also produces unpleasant and potentially dangerous odors and allergens within living spaces.
Today, with a better understanding of the importance of building walls that can dry, the focus has begun to shift away from building water-tight walls to building walls that dry.
A well-built wall assembly should be forgiving, allowing any water entering the wall to drain and the wall to eventually dry.
Building Forgiving Walls – The Benefits Of A Rainscreen/Vented Wall Design
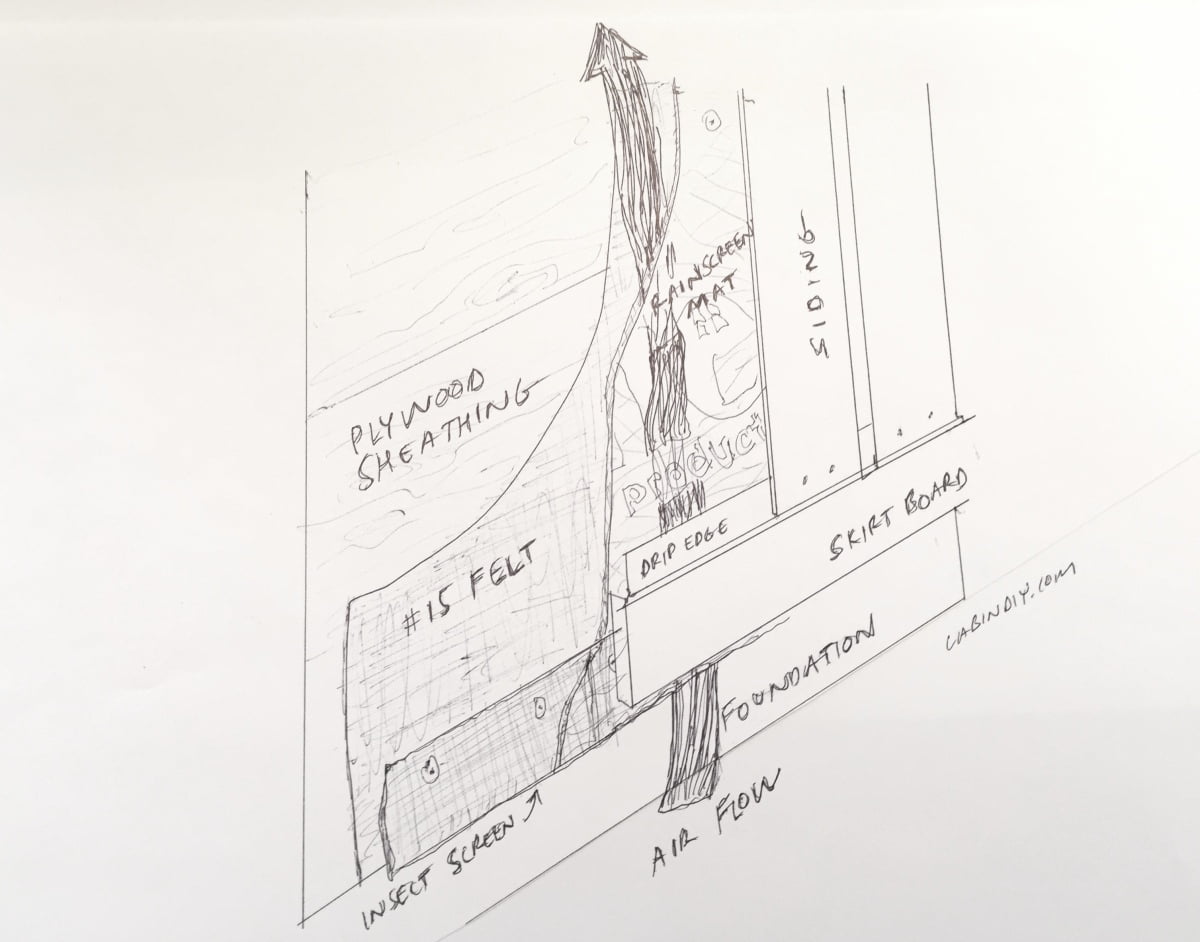
Rainscreen wall designs allow walls to dry. A rainscreen design incorporates an open space within the wall between the wall siding and wallboard sheathing. This airspace gap allows water to drain down the wall and air to flow through the wall, promoting drying.
In a rainscreen wall, a gapped vented airspace exists between the wall cladding (siding) and the wall sheathing (OSB, plywood, etc).
This gapped air space provides several benefits:
- a water drainage plane to allow water to drain down and out of the wall
- a capillary water break that helps limit water movement through the wall
- a ventilation space within the wall that helps keep the wall assembly dry
In addition to the drainage and drying benefits, a rainscreen system also provides the advantages of separating the siding from the weather-resistant barrier.
Separation of wall layers provides weather barrier redundancy and reduces natural forces that tend to drive water into wall structures.
Separating natural wood siding from the weather resistant barrier within a wall assembly may also improve the performance of these barriers.
Multiple studies have shown the ability of surfactants (soaps, tannin, wood extracts, others) to degrade the performance of house wraps and other weather resistant barriers. A rainscreen wall design helps eliminate surfactant contact with these barriers.
The Many Benefits of A Vented Rainscreen Wall:
- Allows drainage of water out of the wall
- Allows airflow through wall promoting drying
- Provides a “break” in the water path and disrupts capillary movement of water
- Creates a redundant weather shield – what gets through the first layer is stopped by the second
- Disrupts water vapor movement due to heat and pressure gradients
- Separates siding from weather-resistant barrier – limiting effects of tannins and surfactants
Rainscreen Wall Construction – The Layers
Building a rain screen wall system is fairly simple. It does require a bit of extra planning and work compared to traditional wall construction.
To build a rainscreen wall, simply add space between your siding and your weather-proof barrier covered sheathing.
CONVENTIONAL VS. RAINSCREEN WALL LAYERS (inside to out)
Traditional wall (redundant barrier):
framing | sheathing | weather-resistant barrier | sidingRainscreen wall (vented rainscreen):
framing | sheathing | weather-resistant barrier | vented airspace | siding
The secret to a rainscreen wall system is the airspace separation between siding and sheathing.
Traditional wall construction consists of an exterior siding (primary barrier) installed over sheathing. Between the siding and the sheathing is a suitable weather resistant barrier (asphalt felt, house wraps). This style of sandwiched wall design is known as a “redundant barrier” system; the siding being the first barrier and the underlying WRB they other.
A rainscreen system improves on the redundant barrier wall by adding a gap or airspace between the two barriers that provides drainage and ventilation for drying.
A rain screen airspace can be created by a variety of methods:
- Furring strips – thin strips of wood or other material can be installed horizontally (for vertical siding) or vertically (for horizontal siding) to lift the siding off the weather-resistant barrier covered sheathing. Furring strips can be created using 1/4″ or thicker material cut from sheathing material, strips of treated lumber or one of the many manufactured products.
Here is a list of available commercial furring strip products for building a vented rainscreen wall:- RainVent™ – plastic batten by DuPont
- VaproBatten – plastic furring batten by VaproShield
- Cor-A-Vent Sturdi-Strips – plastic boxed furring strip by Cor-A-Vent®
- CedarVent – plastic strip batten by DCI Products
- Rainscreen Spacer Mats – designed to add space between the sheathing and siding of the wall. Several manufactured spacer mats are available to create a rain screen wall using this technique.
Here is a list of Rainscreen venting mats:- DriWall™ Rainscreen – tangled polymer 3D rainscreen mat by Keene Building Products
- Home Slicker® – 3D polymer matrix mat by Benajamin Obdyke
- Cedar Breather® – 3D polymer matrix mat by Benjamin Obdyke
- Waterway – polymer entangled 3D mat by Stuc-O-Flex International
- Enkadrain – recycled polymer fused, entangled filament mat by Global Plastic Sheeting
- Draining House Wraps – these generally are not sufficient to provide a true vented rainscreen but may enhance water drainage within a wall. Designed with an applied spacer or with a textured or grooved surface, these products create additional space in front of the the wrap designed to create a drain path for water.
Here is a list of draining house wraps:- HydroGap® Drainable House Wrap – 1mm spacer surfaced house wrap by Benjamin Obdyke
- GreenGuard® RainDrop® – 3D draining house wrap by Kingspan
- TamlynWrap™ Drainable Housewrap – 1.5 mm spacer faced draining housewrap.
- WeatherTrek® – dimpled membrane house wrap by Barricade Building Products
- DuPont™ Tyvek® DrainWrap™ – a vertically grooved version of Tyvek house wrap
What I Used To Build My Vented Rainscreen Wall
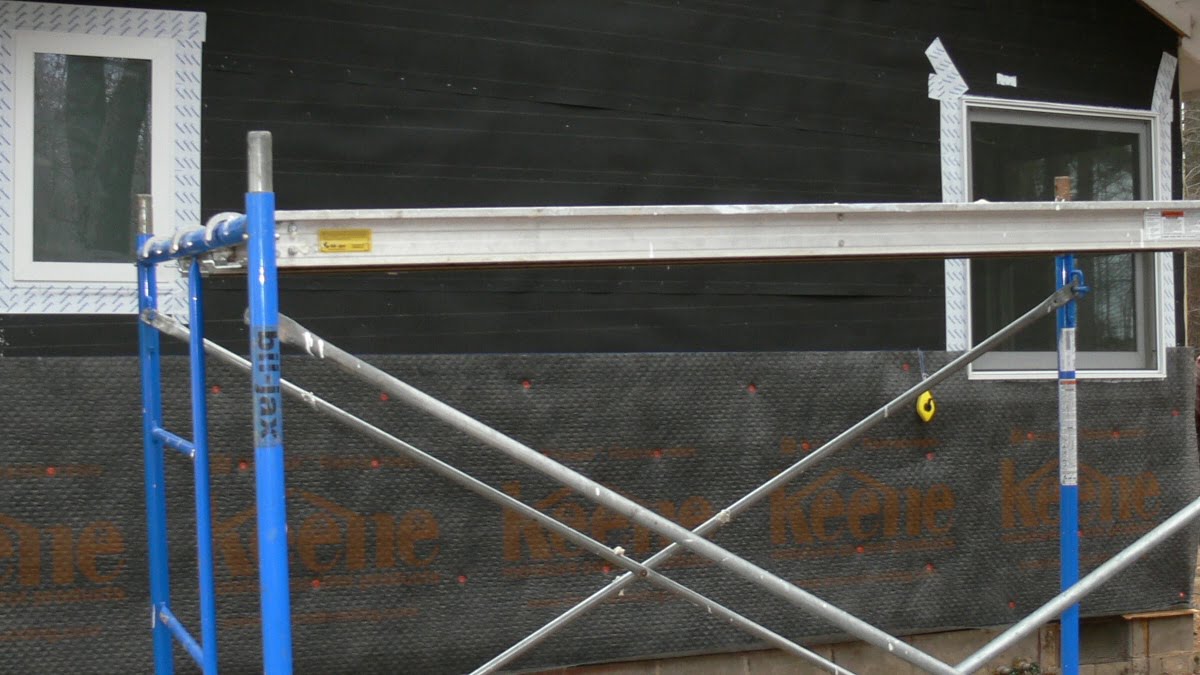
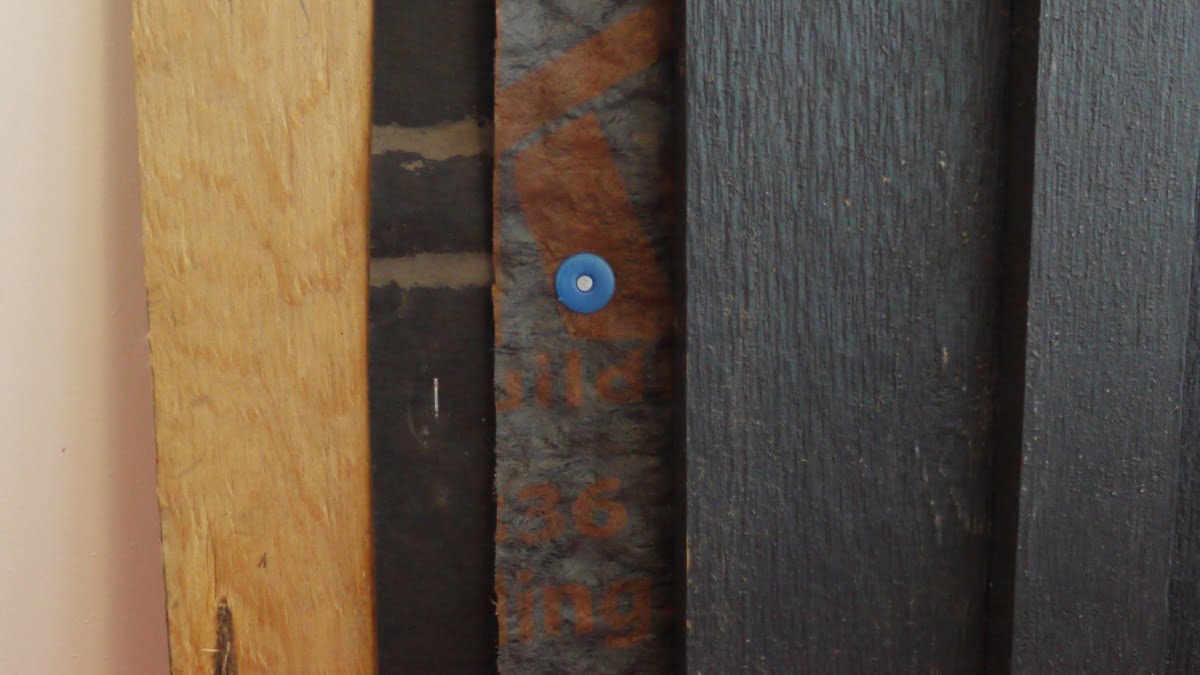
To build my vented rainscreen wall, I used a rainscreen mat installed over #30 asphalt-saturated organic felt. For the rainscreen mat, I used the Driwall™ rainscreen mat by Keene Building Products.
The Driwall Rainscreen mat is a three dimensional spacer mat available in several thicknesses which is installed over your weather-resistant barrier (#30 felt for me). The mat creates a space between the builders felt and the siding. Keene offers multiple thickness, I used the thinnest mat, which is 6 mm (0.25 inch) thick.
Because this was a remodel project, I first removed the old siding and wall materials prior to building my vented rainscreen exterior wall. Once down to the studs, I replaced the wall cavity insulation with fiberglass bats and replaced the old fiber board sheathing with 3/4″ plywood.
The layers I used to build my exterior wall (from inside to out)
- 2×4 studs 16″ oc
- R-13 Fibergalss batt insulation
- 3/4 CDX exposure 1 plywood
- #30 asphalt-saturated organic felt (tar paper)
- Driwall™ Rainscreen mat by Keene
- Cedar board and batten siding
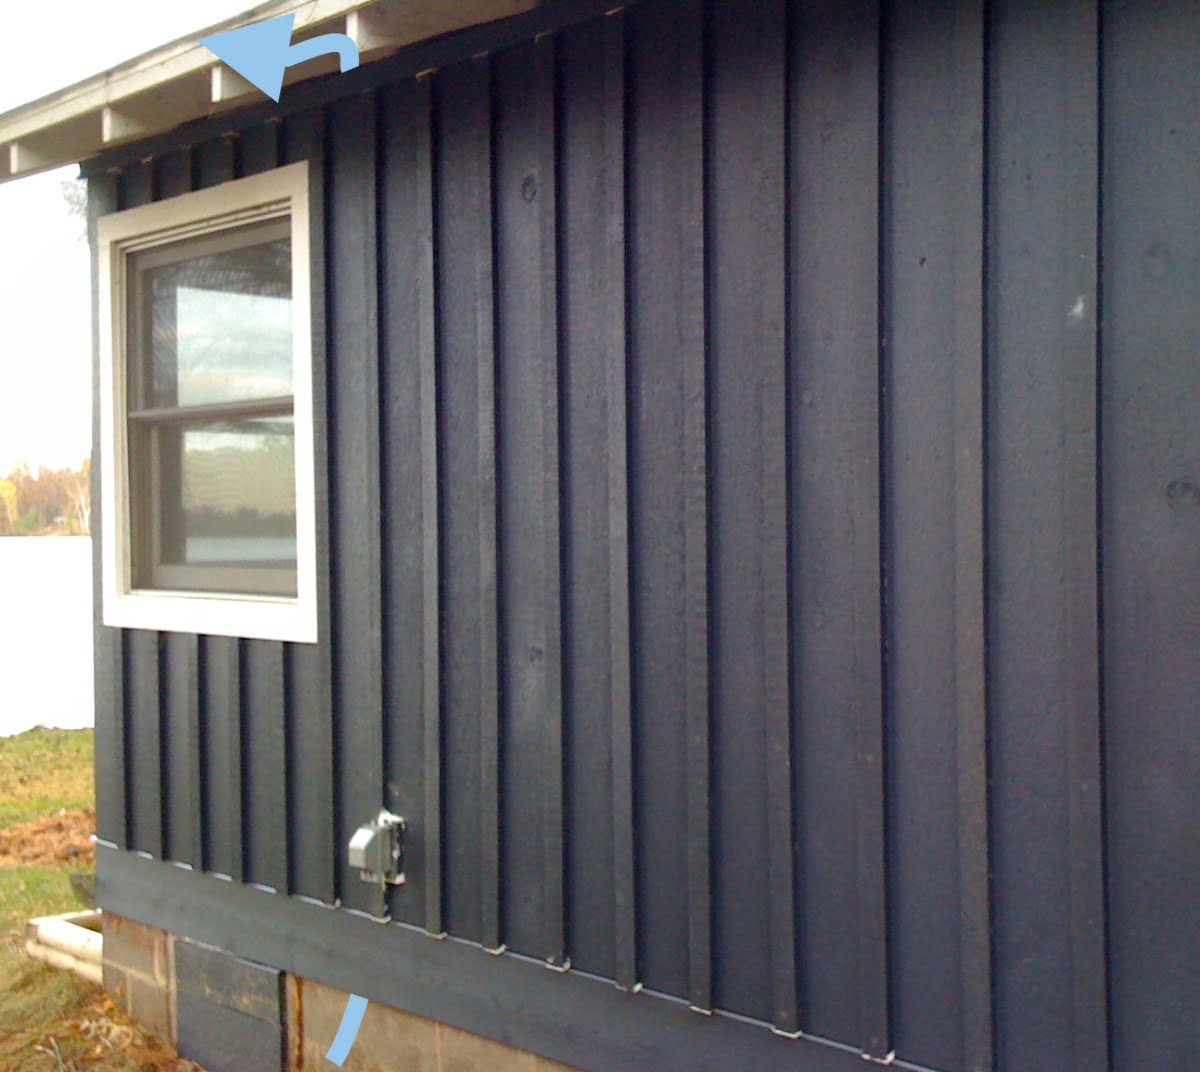
A Properly Built Rainscreen Wall Is Vented At The Top And Bottom
To ensure the proper air movement and water drainage of a rainscreen wall system, you will need to vent the airspace at the top and bottom of the wall. There are many ways to do this and some commercial products that can be used too.
Ways To Vent A Rainscreen Wall System:
- Three dimensional rainscreen mat – Use a 3D rainscreen mat behind the entire height of wall from skirt board to the eves and allow air to enter below bottom most board (skirt board or other) and exit at top by top gapping topmost board or other method. Here is a list of rainscreen mats (same as above):
- DriWall™ Rainscreen – tangled polymer 3D rainscreen mat by Keene Building Products
- Home Slicker® – 3D polymer matrix mat by Benajamin Obdyke
- Cedar Breather® – 3D polymer matrix mat by Benjamin Obdyke
- Waterway – polymer entangled 3D mat by Stuc-O-Flex International
- Enkadrain – recycled polymer fused, entangled filament mat by Global Plastic Sheeting
- Furring Strips + Top and Bottom Vents – Install furring strips in a fashion that allows vertical airflow from top to bottom of the wall. Add vented horizontal furring strips or similarly designed vent strips to allow bottom and top venting. Here is a list of commercially available vented furring strips or vents:
- VaproVent Strips – vents designed to work with VaproBatten system or other vertical furring strip.
- Cor-A-Vent System – plastic boxed screened vents and furring strips
- CedarVent – plastic strip batten by DCI Products
- RainVent™ – plastic batten by DuPont
If you are using a rainscreen mat like I did, you can vent the wall by simply carrying the mat the entire height of the wall.
Then install the water table, rigid flashing, and siding on top of the mat, leaving a continuous, uninterrupted airspace from the bottom to top of the wall. Vent the airspace at the top and bottom of the wall to allow free airflow within the wall that promotes drying.
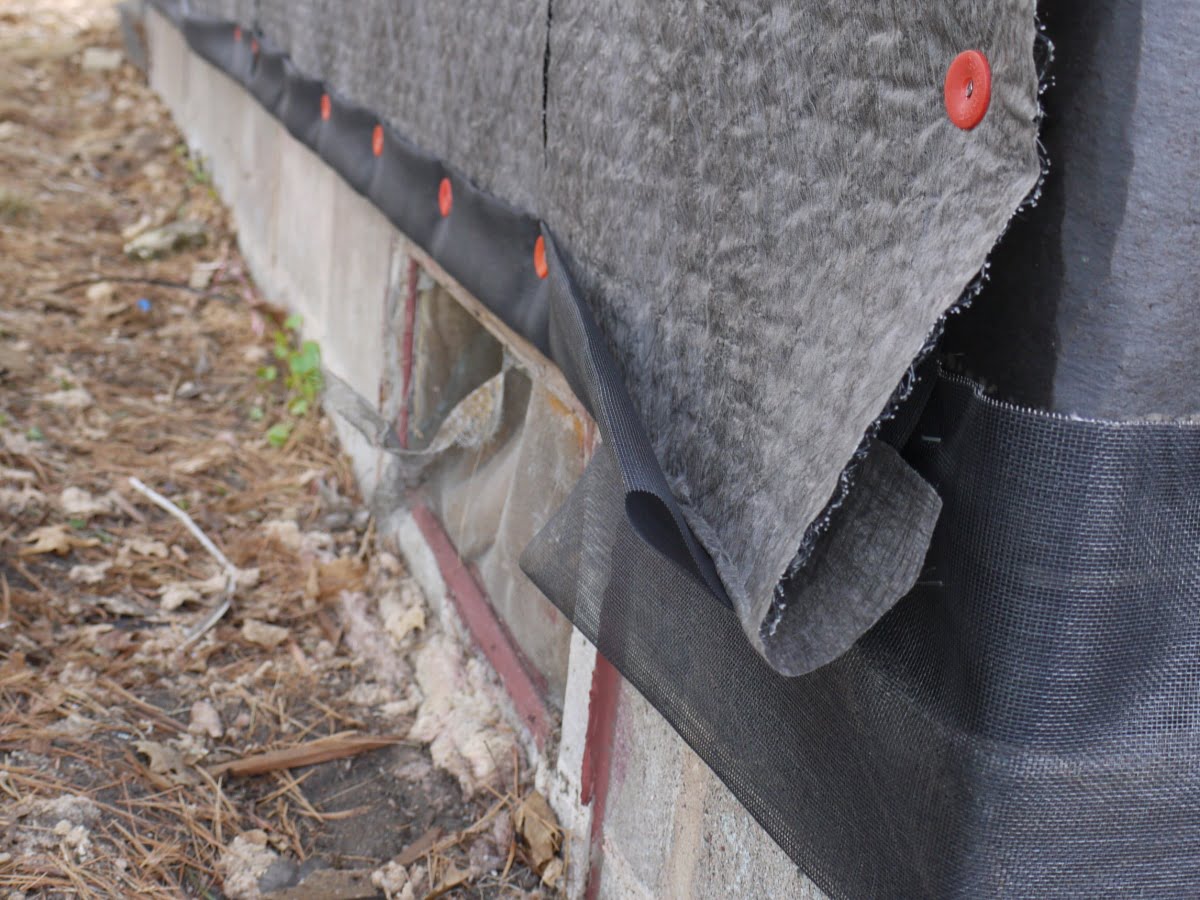
When planning your vents, consider wrapping mesh or screen over the cut end of the rainscreen mat to deter insects from passing into the airspace.
I did this at the top and bottom of the rainscreen mat using flaps of fiberglass screen. Most rainscreen mats have redundant mesh along one side of the mat to serve the same purpose.
Choosing A Weather-Resistant Barrier
If your project is new construction or remodeling you will need to choose a weather-resistant barrier. This typically means choosing from many different house wraps or asphalt felt (tar paper).
Weather-resistant barriers (WRB) serve three main purposes:
- Block water penetration (water resistance)
- Release water vapor (water permeability, ability to breathe)
- Block the passage of air (air permeance)
House wraps and asphalt felt (tar paper) have different blends of performance within these categories.
The perfect WRB would be impermeable to water yet allow any water behind the barrier to escape. However, like most things, WRBs offer trade-offs. Some are very water resistant but don’t breath or release water well. Others are not as impermeable to water, but breath well allow them to release water and dry quickly.
In addition to traditional WRBs, newer winkled, Textured, grooved and dimpled wraps are available. These house wraps aim to improve water drainage within the wall.
If you do not plan to install a vented rainscreen system, the use of a draining house wrap may be beneficial. While these wraps may not provide the range of benefits of a true vented rainscreen system, they may offer water drainage benefits compared to traditional house wraps.
Modern house wraps are constructed from woven or non-woven polypropylene or polyolefin polymers. Different manufacturing processes create a variety of water resistance and water permeability between wraps.
Some have natural permeability based on their manufacturing process, while some are perforated to provide permeability. Different products may also have differing durability and performance characteristics – resistance to surfactants and tannins for example.
Here is a table comparing properties of common house wraps and asphalt felt and paper.
Common House Wraps, Felt and Paper – Properties and Tests
| Product | Mfg. | Material | Vapor Perm | Water Resistance | Water Resistance | Air Perm |
| (ASTM E96) (perms) |
(ASTM D779) “Boat Test” (>mins) |
(AATCC 127-1995) “Water Column” (cm) |
(ASTM E1278) (mL/s/m2) |
|||
| Tyvek® | DuPont | non-woven, non-perforated, spunbonded polyolefin | 58 | 10 | 210 | |
| Typar | PGI | non-woven, spunbonded polyolefin with perforated coating | 11.7 | 10 | 865 | 3.2 |
| Weathermate Plus™ | Dow | non-woven, non-perforated polyolefin | 7 | 5 | >55 | 20 |
| R-Wrap® | Barricade | non-woven, non-perforated polyolefin | 59 | 5 | >220 | |
| FlatWrap®HP | Benjamin Obdyke | tri-laminate – top and botton non-woven polypropylene with middle micro-perforated film | 36 | 55 | 6.2 | |
| Pinkwrap® | Owens Corning | perforated woven polyolefin | 7.7 | 60 | 12 | |
| GreenGuard® Classic Wrap (Amowrap) | Kingspan | cross-woven polyolefin with perforated coating | 15 | 60 | ||
| GreenGuard® Max™ | Kingspan | cross-woven polyolefin with coating | 16 | 120 | >600 | 0 |
| CertaWrap™ | CertainTeed | woven polypropylene with perforated coating | 11.7 | 10 | 865 | 3.2 |
| WeatherSmart® | Fortifiber | non-woven, non-perforated polyolefin with single side coating | 8 | 10 | >60 | 2.5 |
| Two-Ply Super Jumbo Tex® 60 Minute | Fortifiber® | Two-ply asphalt-saturated kraft paper. 12 lbs/100 sq ft | 10 (dry) | 150 | ||
| #15 Asphalt Felt (tar paper) | Multiple | asphalt-saturated organic felt | 5 (dry) 60 (wet) | ~50 | ||
| Asphalt Kraft Paper (Grade D Paper) | Multiple | asphalt saturated kraft paper | 5 |
Water Resistance (ASTM D779, “Boat Test”)* = boat shaped piece of material floated on water, time to water passage through material into “boat” recorded in minutes. The higher the value, the longer it takes for water to “leak” through the WRB boat-shaped testing bowl. Higher value = more water resistant material. (* note: that some highly permeable materials (Tyvek) may falsely test low for water resistance using this test. This test uses a indicator power that changes color with water vapor and therefore can give an artificially low value (meaning low water resistance) for highly permeable materials that will quickly pass water vapor and trigger an indicator color change even though they are highly resistant to liquid water passage and have not yet passed liquid water.)
Water Resistance (AATCC 127-1995, “Water Column Penetration Test”) = Hydro-static pressure resistance test. Measures height of water column in cm need to penetrate material. Higher numbers mean more water pressure is required to “push” water through the WRB tested. Higher value = more water resistant material.
Permeability Rating (Perm Rating) (ASTM E96) = measure of water vapor passage in a 24 hour period stated in perms. Also known as the Water Vapor Transmission. Higer numbers mean more permeability. Higher value = more breathable material. Permeability categories: ≤ 1 perm = impermeable, 1 – 10 perm = semi-permeable, > 10 perm = permeable.
Air Permeance (ASTM E2178, “Air Permeance of Building Materials”)= Determines the volume of air in liters (L)* that passes through a flexible or rigid piece of 1 meter x 1 meter material in 1 second. Lower value = less air through material (better air barrier). *Note: values below recorded in milliliters for easier comparison.
The beauty of Old School Asphalt Saturated Felt
After considering the many choices for a weather-resistant barrier, including the multitude of house wraps, I decided to use good old fashioned asphalt saturated builders felt (or what my dad called tar paper).
Not only has asphalt felt been successfully used for the last 100 years, it is still chosen by some of the leading building scientists. Paul Fisette, Professor of Buidling & Construction Technology at the University of Massachusettss, Amherst, in his article Housewraps, Felt Paper and Weath Penetration Barriers (bct.eco.umass.edu. 2001), endorses asphalt saturated felt as a weather-resistant barrier. He also notes that he has felt on his own home and if he had to choose again he would choose felt. He continues to explain that house wraps can trap water that finds its way behind the weather-resistant barrier as they only are permeable to water vapor, not liquid water. Asphalt saturated felt, in comparison, can absorb liquid water and dry quicker than house wraps.
Felt is unique in that it can absorb liquid water, and once wet, dry faster due to its’ unique quality of increased water vapor permeability when wet.
Long ago, asphalt felt was made from recycled cotton rags saturated with asphalt. It was used as an inexpensive and quick water resistant roofing material. Today the “felt” is no longer made from cloth, but from asphalt saturated recycled cardboard and sawdust.
Asphalt felt is available in #15 felt (Type I) or #30 felt (Type II). These numbers refer to the original weight of the product per 100 sq ft (a roofer’s square). As the cost of petroleum increased the amount of asphalt added to these products decreased, and today many of these products weight only half of the originals. With this change, the names where changes to “pound” to “number” – today referred to as number 15 (#15 or No. 15) and number 30 (#30 or No. 30) felt.
The ASTM (American Society for Testing and Materials) has two standards for asphalt felts – a standard ASTM D 4869 and a more demanding ASTM D 226. With these standards, minimum weights for Type I (#15) and Type II (#30) asphalt felts are published. In general, rated, heavier weight felts suggest better quality and more asphalt used in manufacturing the product. Unrated, typically lighter felts, are also readily available.
Asphalt Saturated Felt Minimum Weights for ASTM Standards*
| Standard | No. 15 Felt (Type I) | No. 30 Felt (Type II) |
| weight (lbs.) / 100 sq ft | weight (lbs.) / 100 sq ft | |
| Not ASTM Rated | less than 8 | less than 13 |
| ASTM D 4869 | 8 | 13 |
| ASTM D 226 “ASTM Grade” | 11.5 | 26 |
*(ASTM D226/D226M − 09 and ASTM D4869/D4869M − 05)
Asphalt Felt vs. Grade “D” Builders Paper
The is a fair amount of confusion and when speaking of asphalt saturated weather-resistant barriers. With this confusion, it is good idea to briefly discuss the differences between asphalt-saturated felt (Roofing Felt) and asphalt-impregnated kraft paper (ASK).
Both asphalt felt and asphalt paper are used as weather resistant barriers. Asphalt felt had it’s origin as a roofing underlayment that became popular as a wall underlayment as well. Asphalt kraft paper started as a wall underlayment and is still used as such, especially for stucco.
Asphalt kraft paper is generally made from thinner, new paper stock rather than thicker, recycled material used to make felt. Asphalt paper is typically more pliable than felt and promoted as easier to bend around corners.
Asphalt paper is often called Grade “D” builders paper referring grade of water resistance required for this product according to UBC Standard 14-1. Despite this minimum water resistance rating of 10 minutes, many building paper makers manufacture higher performing papers rating for 60 minutes or more of water resistance.
In general, asphalt felt is considered to be more durable and less prone to rot. This may not be true for some higher quality paper products like Fortifiber’s Tex line of asphalt papers.

Asphalt Felt or Paper?
Considering the differences of asphalt felt or paper, which one should you use? Well, like most questions, it depends.
In most cases, felt is probably better. That assumes equal quality products. I would much rather use a 60 minute asphalt kraft paper of high quality (like the Fortifiber Two-Ply Tex pictured above), than some unrated crappy lumber yard felt.
Asphalt Saturated Felt vs. Asphalt Impregnated Kraft Paper
| #15 or #30 Asphalt Felt | Grade “D” Asphalt Paper | |
| Made from | recycled cardboard / sawdust | new kraft paper |
| Benefits | more durable, thicker | more pliable, thinner |
| Common Use | roofing, exterior wall underlayment | exterior wall underlayment (stucco) |
For my siding project, I used a quality #30 felt. I chose the #30 instead of a #15 felt as modern product has a similar asphalt weight as the older, heavier #15 used for more than 100 years in domestic construction.
Pick a Sheathing Material
If this is new construction or you plan to replace your sheathing, you will need to decide which type of sheathing material to use. For structural sheathing, you basically have two choices; OSB (oriented strand board) or plywood.
Oriented Strand Board or OSB
OSB or oriented strand board is a manufactured wood panel made from layers of oriented wood strands compressed and bonded with heat and glued to form a sheet. OSB panels, similar to plywood, are made up of several layers, typically with alternating wood strand orientation. This is unlike waferboard, which is made up of randomly oriented wood strands in a single layer.
OSB performs similar to plywood and is essentially interchangeable with plywood. There are some exceptions. Both OSB and plywood are building code approved wood structural panels for sheathing roofs, walls and floors. Both have similar strength, fastener holding and weight. OSB performs better under shear force, and is commonly used for manufactured trusses. Despite their similarities, they do have a few important differences.
For one, OSB and plywood handle water differently, and this may be the biggest negative of OSB products. OSB is more water resistant and less water permeable than plywood. This may sound like a positive, but with these characteristics, once OSB gets wet it is much slower to dry and tends to swell, especially at the edges.
This tendency of OSB to expand at the edges can lead to telegraphed panel borders known as “ghost lines” that can show through roofing and wall finishes. For this reason, some product manufacturers and associations advise against the use of OSB under their products, especially for flooring (Tile, Vinyl) and roofing materials.
In attempt to panel edge swelling, OSB manufacturers now seal panel edges with wax or paint. This obviously does little to prevent swelling at cut panel edges unless those are sealed after cutting. If you are considering OSB, check the recommendations of the finishing product you will be using over it to ensure compatibility and warranty compliance.
The second difference between OSB and plywood is price. OSB is typically much cheaper than plywood, often by a difference of up to 50%.
Plywood
Plywood is a manufactured wood panel made from multiple thin sheets of wood compressed and bonded with heat and glue to form a panel. The wood plies used to made plywood are thin veneers of wood stripped from rotating logs. These plies are assembled with alternating grain directions to improve strength and dimensional stability.
Plywood as noted above tends to handle water better. Wet panels tend to dry quicker and retain the panel dimensions, assuming exterior grade products. Some perceive benefits with fastener holding, but tests suggest similar performance compared to OSB.
Approved for all wood structural panel applications, plywood is commonly used as sheathing for roofing, walls and floors.
For my project, I used plywood.
Plywood vs. OSB
| Plywood | OSB | |
| Made from | glued layers of cross-oriented wood veneers | glued layers of oriented wood strand |
| Cost | $20 (19/32″ ext 4’x8′) | $11 (19/32″ ext 4’x8′) |
| Use | structural panel – roof decks, walls, subfloors | structural panel – roof decks*, walls, subfloors* |
| *Use exceptions | roof decks with some products roof decks in Dade County, FL subfloors with tile, vinyl, laminates |
|
| Positives | water handling, perceived quality | shear strength, lower cost |
| Negatives | higher cost, slightly heavier | water handling / panel swelling |
OVERVIEW | Rainscreen
SUPPLIES LIST | Rainscreen


TOOLS LIST | Rainscreen

")


")


STEPS | Rainscreen
- Order materials and supplies, organize tools.
Plan for and order the necessary materials and supplies. Diagram and measure your exterior walls to generate a bill of materials. Remember to order 10% or extra for waste.
For my cabin exterior wall rebuild, I measured the square footage of wall surface and came up with an estimate of around 1,100 sq ft.
I was replacing the existing insulation with fiberglass batts, replacing the existing sheathing with 23/32″ plywood, covering this plywood with #30 asphalt roofing felt (tar paper), and installing a 3D rainscreen membrane (Keene Drywall). My bill of materials included enough of each of these to cover 1,100 sq ft plus waste of the following:
- Rainscreen mat
- Fiberglass batts
- Plywood sheathing
- #30 Asphalt felt
- Peel and stick flashing tape
In addition to the materials, I was planning on using my framing nailer and 2 1/2 ring shank nails for the sheathing, galvanized staples for the roofing felt and cap nails for the rainscreen mat. So, before starting any demo, I ordered and organized everything I would need once the wall was pulled apart.

- Demo existing wall as needed for planned project.
With materials on site and everything organized, start to remove the existing wall siding, sheathing and insulation.
Our cabin walls were constructed in the 1950’s and sheathed with a wood fiber board – Temlok by Armstrong. Wall cavities were insulated with a wood fiber insulation “Balsam Wool”. These panels do not contain asbestos. Confirm the product you are working on does not contain asbestos prior to removing it.


- Replace wall cavity insulation (if replacing).
After removing the old wall cavity insulation, I replaced it with fiberglass batts.
I realize there are better wall insulation products available, but given my interest in inexpensive, reasonable performance insulation I went with fiberglass batts. The R-13 fiberglass batts I installed were a significant improvement compared to the existing R-3 wood fiber batts from the 1950s.
I also wanted to maintain the ability to run additional wires and possibly pipes through the walls cavity as needed, somewhat ruling out spray foam wall cavity insulation.

- Install new wall sheathing (if replacing).
After replacing the wall cavity insulation, re-install the wall sheathing.
I decided to use plywood sheathing for my new exterior walls. I chose plywood over OSB mainly for the moisture forgiveness of plywood. I also decided to use thicker plywood and beef up the exterior walls.
I really like the easy structural gain for the building simply by adding thicker (23/32″ in my case) plywood. It is an easy relatively inexpensive way to fortify the exterior walls.
When installing plywood sheathing, cut so the panels start and end on a stud. Panels should be carried the entire height of the wall – from rim joist to top plate if possible. This will tie together and reinforce the entire wall frame. Start the bottom of the plywood panel just above the bottom edge of the rim joist and above the block to help prevent water wicking from below.
Prior to fastening sheathing, locate and protect and wiring and plumbing passing through framing members or within the wall cavity with the appropriate shields and nailing plates. In addition, I like to take several pictures of the wall cavity prior to installing the sheathing as a reference while nailing the panels.
Fasten the plywood panels to the wall frame using appropriate fasteners and an appropriate spacing schedule. Local building codes may require certain fastener size, style and schedule – this is especially true in Florida and other hurricane or earthquake prone locations. In general wood panel sheathing should be fastened with 8d – 10d equivalent nails spaced 6″ at the edges and 8 – 12″ in the field.
When driving fasteners, it is important to not over-drive the head of the fastener. Nails and screws with heads that penetrate the sheathing panel are known to loose significant holding power. Just set the head flush to the sheathing surface when fastening sheathing.
Coated, galvanized, ring shank, spiral shank and other specialized nail designs typically have better holding characteristics compared to plain smooth shank nails. I used 2 1/2″ galvanized ring shank nails to fasten the plywood with 6″ edge spacing and 8″ field spacing. I did not use adhesives or caulk between the panels and framing.


- Install weather-resistant barrier over sheathing (if replacing).
With the new plywood sheathing installed, install a weather resistant barrier (WRB) over this sheathing. There are many different WRB to chose from (see the options in some detail in the beginning of this article), but it’s hard to beat old fashioned asphalt saturated felt (a.k.a. tar paper).
For this project I used #30 Asphalt Roof Felt as my WRB. No matter which WRB you use, always install it horizontally from the bottom to the top of the wall. Horizontal seems should overlap by several inches and vertical seams by 8 – 12 inches or more. Use a level and chalk line to help install the WRB sheets level.
Fasten the barrier with approved fasteners (galvanized staples for my roofing felt). Continue the WRB around wall corners and overlap the adjacent wall barrier by 8 – 12″. If the barrier you are using tends to crack when folded over corners, use flexible peel and stick flashing tape to reinforce and seal corners.

- Seal windows and penetrations with flashing and flexible flashing tape.
Reseal windows and doors to the weather-resistant barrier (WRB) using flexible flashing tape and other recommended rigid flashing.
For this project, on my single story cabin with generous roof overhangs, I used only peel-and-stick flashing tape and did not add rigid flashing above my windows or doorways.
If you have windows and door openings that will likely see water from above, consider adding rigid flashing above these openings. One consideration when installing rigid flashing is the position of this flashing in regard to any rainscreen plane of the wall.Traditional rigid flashing is tucked under the WRB. Flashing tucked under the WRB will interrupt the rainscreen drain plane if you are using one. When installing rigid flashing in a wall with a rainscreen layer, some recommend installing the flashing above the rainscreen mat or layer. This way, water will tend to stay above the rainscreen and keep the drain plane cavity un-interrupted.
For my project, I re-sealed the windows to the WRB using peel-and-stick flashing tape.
Peel-and-stick flashing tapes are, in general, one of two types; asphalt-based or butyl-based. Certain flashing tapes will work best with certain WRB or house wraps. Typically, using products from the same manufacturer is a good idea, as they are often designed to work together (Dupont flashing tape with Tyvek, for example). Check with the manufacturer of the WRB you plan to use to determine if certain flashing tapes are recommended.
As you can see, I am using asphalt roofing felt as a WRB and found that both Dupont flashing tape (butyl rubber tape) and WindowWrap (rubberized asphalt tape) worked well. I did find that the WindowWrap tape seemed to have a better initial stick to the asphalt felt, which may make sense as it is also an asphalt-based product.
To seal a window using peel-and-stick flashing tape, apply strips of flashing tape to the sides and top of the window in a layered, shingle-style fashion. The bottom of the window should not be sealed with flashing or caulk to allow for water escape the bottom of the window and drain above the WRB.
If you are installing new windows, wrap the house wrap or WRB inside and through the window rough opening per the recommendations of the window manufacturer.
Then flash the sill rough opening with 9″ flashing tape or one of the pre-made window sill flashing products. Run this sill flashing up the sides of the bottom of the window opening 6″ – 12″. If possible, slope the sill pan toward the outside of the home to encourage drainage in that direction.
Once the sill is flashed, you may also apply a strip of flashing tape at the bottom of the window rough opening, overlapping the sill flashing prior to installing the window. Next, install the window, with the side and bottom nailing fins above the WRB or as directed by the manufacturer.
If you are sealing existing windows to a new WRB (like I am with this project), you will not have access to the rough opening to flash the rough sill. Instead, allow the bottom window nailing fin to be above the WRB barrier if possible. No flashing tape should be applied to this bottom nailing fin for existing windows.
Next, for both new and existing windows, apply a strip of flashing tape on both sides of the window, taping over the nailing fin and WRB. These strips should extend several inches beyond the bottom and top of the window.
Then apply a strip of flashing tape to the top of the window, again covering the nailing fin and underlying WRB. This top piece will layer over the side flashing and should extend beyond both sides covering the side flashing strips.
Prior to installing flashing tape, take some time to thoroughly clean the outside frame of the window were you will apply the flashing tape. Remove old caulk with a utility knife. Use denatured alcohol or similar to create a clean surface to help create a permanent water tight seal between the window and the flashing tape.
When installing flashing tape start at one edge and smooth the flashing tape into the corner between the window frame and the wall without rounding off this corner. If you round the corner, the flashing tape may be higher than the wall surface, lifting the edge of siding installed over it and possibly pulling the flashing tape loose.


- Install rainscreen matt or rainscreen furring strips.
With the WRB is installed and all windows and wall penetrations are properly sealed with flashing tape, it is now time to create the vented airspace of the rainscreen wall.
As mentioned above there are many ways to create the air space drain plane between the WRB and the siding of a rainscreen wall. A variety of commercial products are available including dimpled house wraps, 3D rainscreen mats and natural wood or synthetic furring strips.
No matter what system you use, the goal is the same; create a space between your siding and WRB.
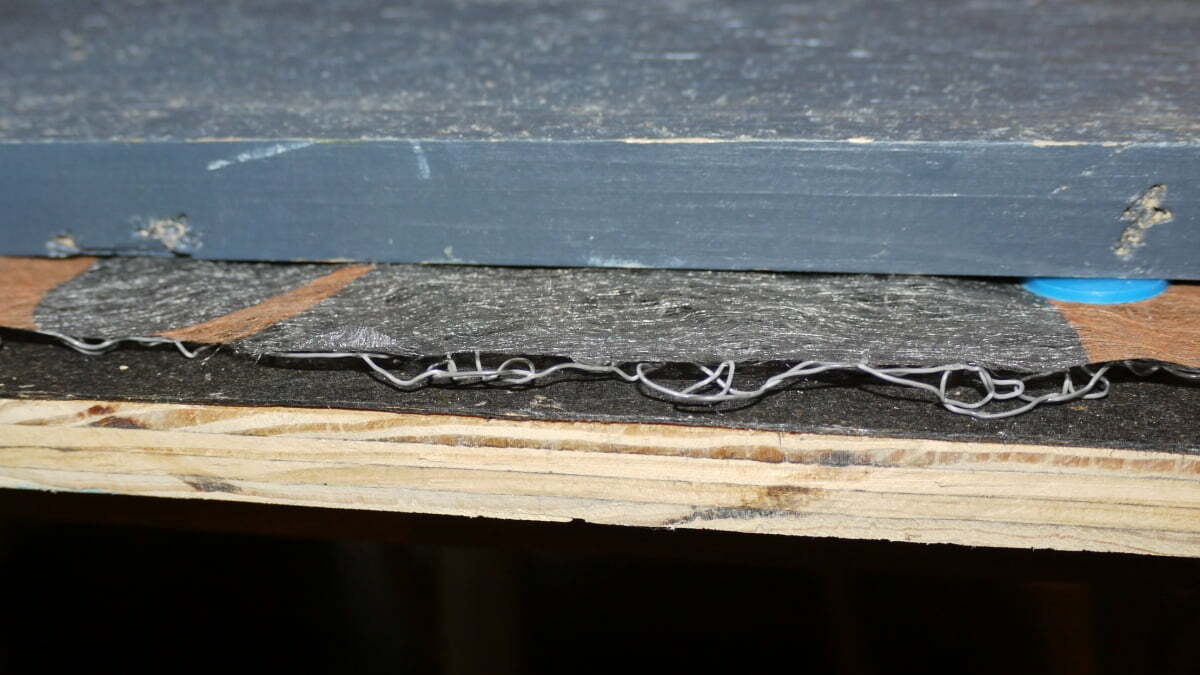
To create my drain plane, I used the Driwall Rainscreen 020-1 mat by Keene Building Products. This product is rolled onto the exterior wall over the weather-resistant barrier (#30 felt in our case).Once in place the sliding is simply installed over this mat. The mat creates a breathable air space under the siding, between the #30 felt and the back of the siding boards.
Before we install the rainscreen mat, we need plan for bottom and top venting of our rainscreen wall and consider installing insect screens at the bottom and top edges of these vents over the bottom and top edges of the rainscreen mat.
The Keene Driwall mat is covered with a fine, insect proof mesh that is overhung on one edge of the mat. This mesh is overlapped at adjacent rows, but also can be wrapped over the top and bottom edges of the mat to serve as an insect screen. In addition, many will add additional screen at the top and bottom edges of the drain plan for better insect protection.
I did add extra insect protection by wrapping the bottom and top edges of the rainscreen mat with fiberglass screen. I installed the back edge of this screen to the WRB before installing the rainscreen mat. Then once the mat is installed, I simple wrapped the screen around the rainscreen mat and fastened it to the front of the mat using cap nails.
To install themat, simply roll the mat onto the wall over your WRB. Do not overlap the 3D portion of the mat. Use plastic cap nails to hold the mat in place prior to installing your siding. Most mat products will have a finer mesh skin that can overlap adjacent rows (see above photo showing mesh from top row overlaped and nailed to lower row).
Fasten the rainscreen mat to the wall over the WRB using plastic cap nails. Use care not to over drive the cap nails, as you do not want to crush the mat and loose the drain plane gap the mat creates.


- Install water table board and drip flashing.
For the water table around the base of the wall, I will use the same material I will be using for the boards of the board and batten siding – 10″ x 1″ cedar.
I did order some longer 16′ boards and will try and use these to limit the seams along the water table. Prior to installing the water table board, I used a router to cut a drip angle along the bottom of the board.
After routing to create bottom drip angle, I primed and repainted the cut edge. Then I installed the board at the base of the wall as the water table, aligning the bottom back edge of the board with the bottom of the insect screen wrapped rainscreen mat which was just covering and positioned at the bottom edge of the rim joist.
When installing the water table over the rainscreen mat use care to not overdrive fasteners and crush the rainscreen mat below. If properly installed, the water table board should allow continuation of the rainscreen airspace and drain plane behind the water table allowing ventilation and draining from behind, entering below the water table.
With the water table board installed, next install a drip edge flashing piece above the water table top edge. This flashing piece should be installed above the rainscreen mat and not under the WRB as is traditionally done with non-rainscreen wall construction.
The drip edge flashing is installed in this manner to prevent interruption of the drain plane behind the rainscreen mat. Flashing material passing through the rainscreen mat would block the up and down flow of water and air that an un-interrupted drain plane airspace would allow.


- Vent to and bottom of rainscreen wall.
Ideally, a vented rainscreen wall will be vented at the bottom and top of the wall to allow for free airflow through the wall.
Installing the siding, water table and drip flashing above (on top of) the rainscreen mat, I was able to vent the bottom of the wall through the entire bottom edge of the wall water table. Air can easily enter behind the back bottom edge of the water table and flow up through the rainscreen air space.


- Create your own rainscreen wall.
There are many ways to create a rainscreen wall. The above documents a simple way to build a vented rainscreen exterior wall finished with vertical wood siding (board and batten — for details read more here). No matter the specific used to create a rainscreen, the basic concepts are the same; build a vented space into your wall assembly to help block water movement and allow water that has entered the wall a way out.
The system I used of a 3D rainscreen mat installed over #30 roofing felt was easy to install and seems to work well. This wall system and siding has been in service now for nearly 7 seasons and the performance of my new walls has been flawless.
Our home (cabin) is warm and comfortable and feels incredibly solid. The siding has shown no evidence of warping, deterioration or excess moisture. Prior to the rebuilding of our walls as above, the old siding routinely showed dampness and evidence of trapped moisture on the exterior and interior of the walls.
This was the first rainscreen wall I have built and I’m glad I did. If you are building or remodeling exterior walls, I highly recommend taking the extra time and spending a bit extra to build a rainscreen style wall.
Now that I’ve built a rainscreen sided wall and have seen the results, I see why some building jurisdictions are moving toward requiring rainscreen style wall builds. Time will ultimately tell if the rainscreen wall catches on, but so far I am totally impressed.


IMAGE GALLERY | Rainscreen


Thank you! This is a really comprehensive and easy to follow breakdown of what to do and the order in which to do it. I’m rebuilding a rotten addition in Southeast Alaska, ripping off the old stucco (right there is the problem) some sheathing and reframing where needed. I started looking at all the possibilities of the newer products and was thinking I needed to go with poly house wrap, exterior insulation, (closed cell or rock wool) some kind of cement board or pvc siding etc. etc. Then I ran in to an old friend who’s been building forever, started explaining my plan-and he looked at me like I was speaking in tongues! He said fir out the 2×4’s, interior insulation, asphalt felt and wood siding. I added rain screen, he said “sure”. We are still arguing about an interior vapor barrier, but it’s code, so really no argument there.
I’m glad I was able to come across your article, it helped confirm that I needed to get back to the basics.
I am having trouble with how to trim around windows with the rainscreen adding to the thickness of the wall and stopping water. Very fine explainations and pictures. The window trim/rain screen detail is perplexing. Can you help?