I love motion sensor switches. Here is an overview on the removal of a traditional light switch and replacement install of a dimmer motion detector switch in our garage.

Motion senor switches are efficient, energy-saving and easy to install
Motion sensor light switches are great for certain rooms – bathrooms, closets, basements and garages. In those rooms, I usually want the lights in the room to turn on when I enter. I also want the lights to turn off, even if I forget to turn the light switch off.
With occupancy sensor light switches lights will come on when you enter the room and go off after you leave. These occupancy sensor dimmer light switches are not only convenient, but they save energy as well. Installation of motion sensing switches is relatively easy, is inexpensive and takes less than an hour to do. Read on for a simple, step-by-step of how to wire a motion sensor to an existing light.
Choose The Right Switch For Your Needs
There are several types of motion sensing light switches, choose the specific model based on your needs:
- Single pole (single switch for single circuit), multi-pole (multiple switches)
- Switch (dimmer) power capacity in watts (add total lighting watts to be controlled by switch)
- Dimmable for CFL / LED
- Other features – WiFi controllable, etc
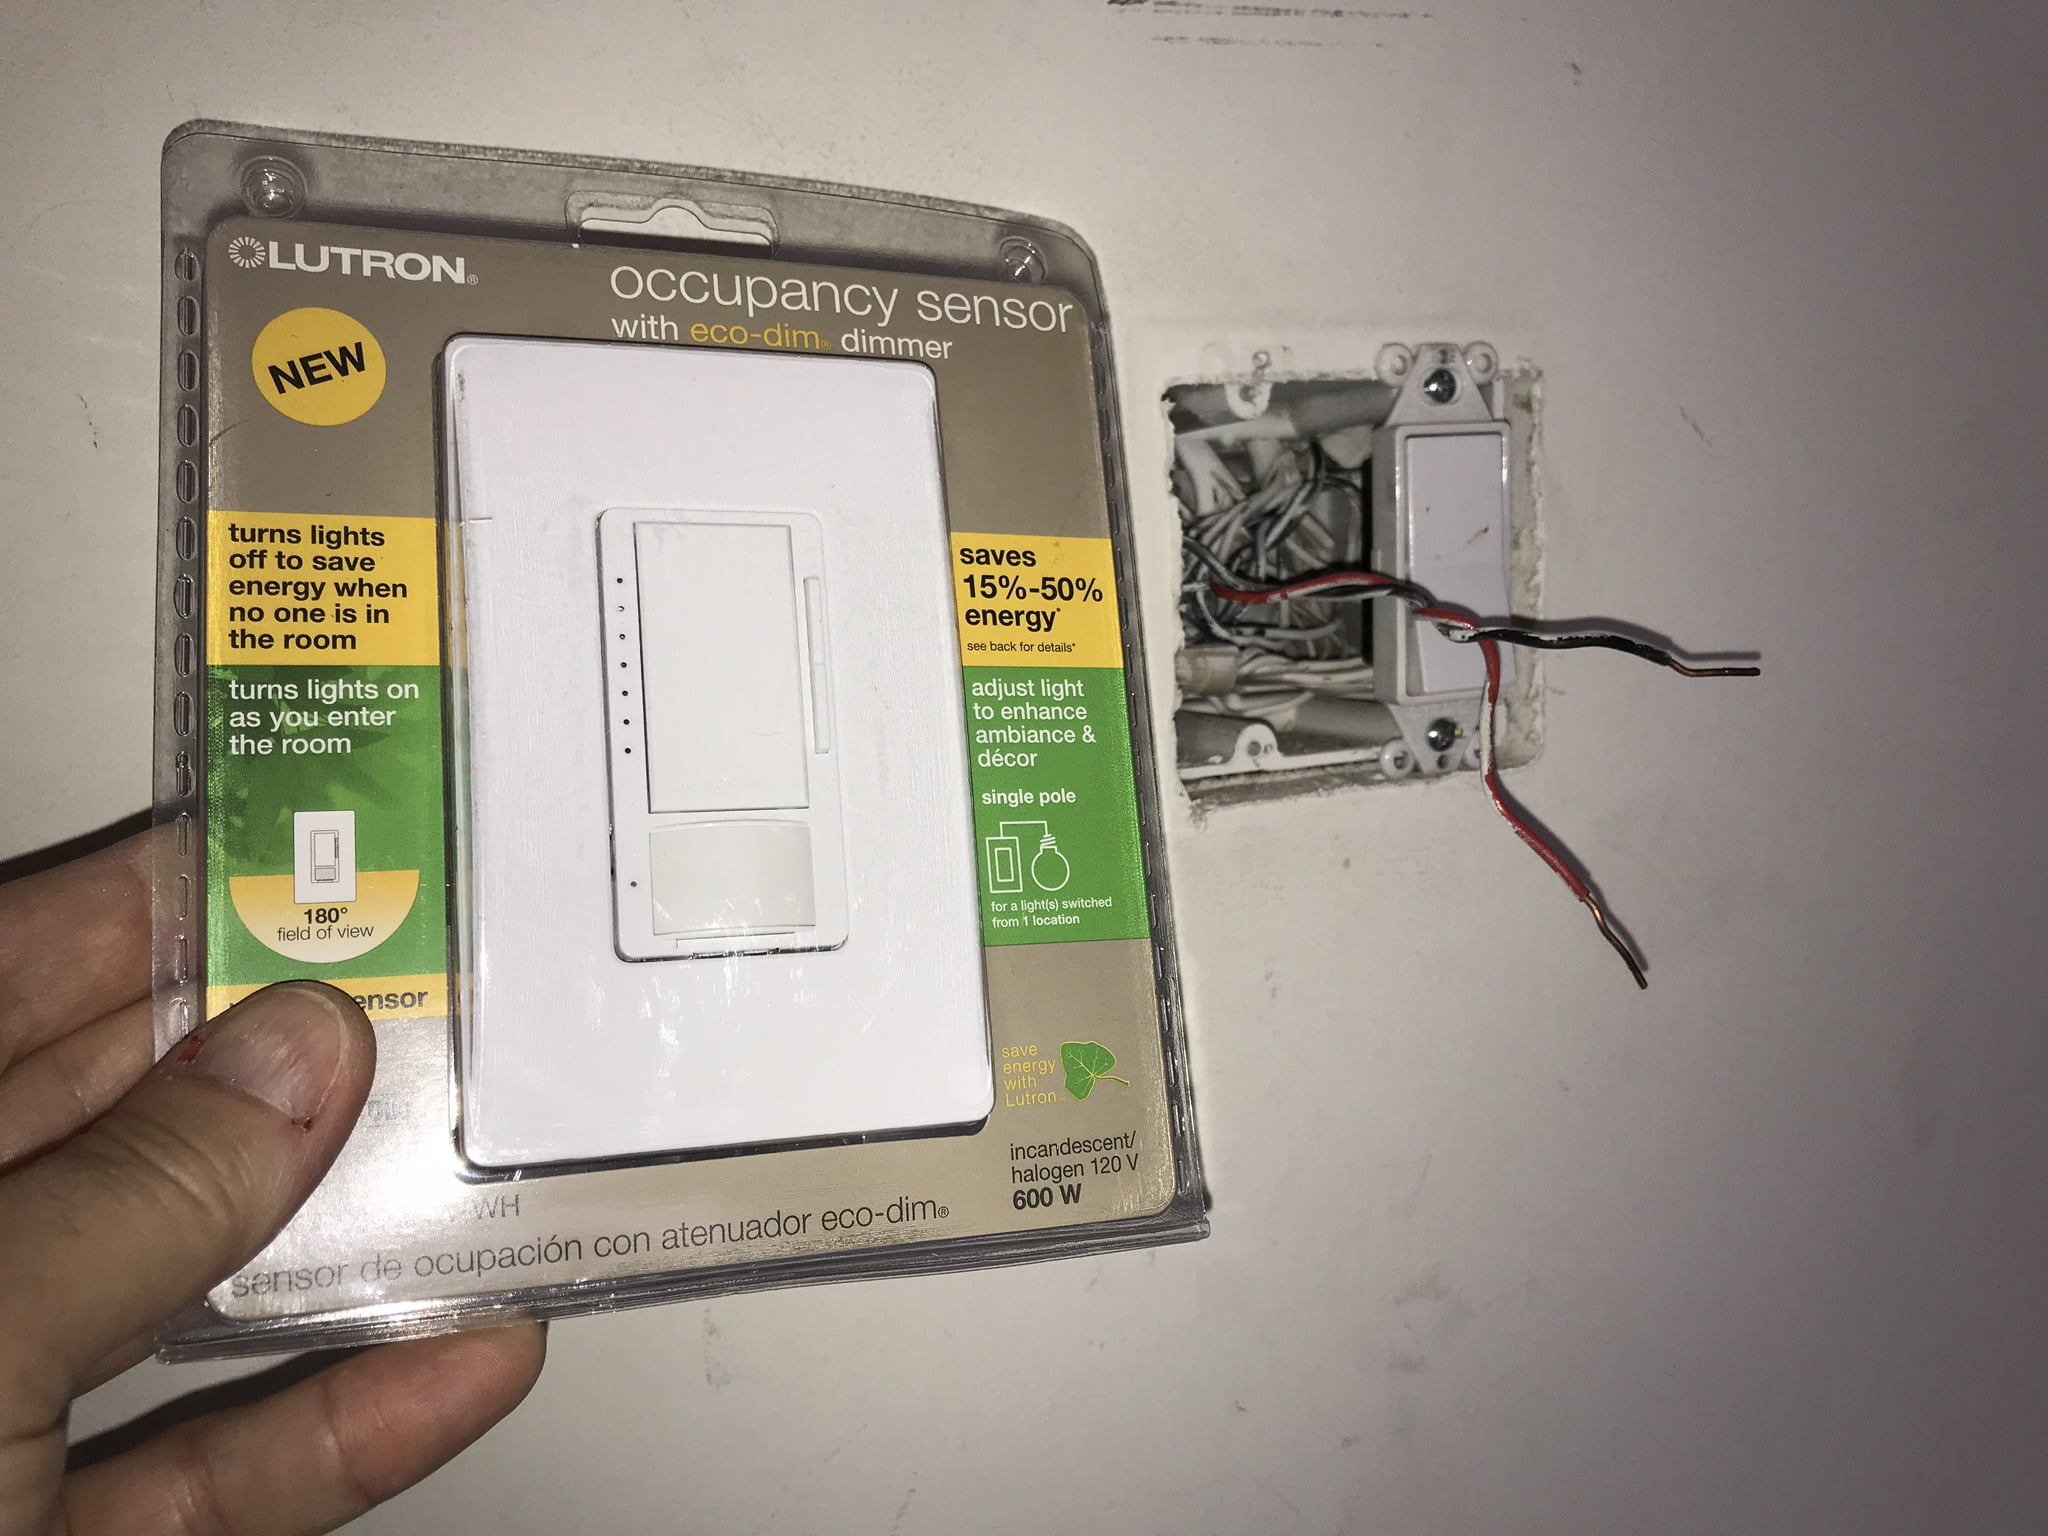
All switches have a rated power capacity – usually listed in Watts on the packaging. Watt ratings will be different for incandescent vs. CFL or LED lighting. The switch I used is rated for 600 watts of incandescent lighting (example; six 100 watt incandescent light bulbs) or up to 150 watts of CFL or LED lighting.
The power capacity of these switches may change if multiple switches are used together mounted adjacent in the same electrical box. Lutron dimmer switches mounted together may require removal of aluminum head sink tabs that will reduce the cooling ability of the switch and decrease the power handling of such modified switches. The package insert for the dimmer switch contains a “De-rating Chart” to use if the dimmer is modified.
OVERVIEW | Motion Sensor Light Switch
SUPPLIES LIST | Motion Sensor Light Switch


TOOLS LIST | Motion Sensor Light Switch


STEPS | Motion Sensor Light Switch
- Assemble motion sensing light switch and tools
Gather the tools you will need – typically a standard screw driver and a Philips screw driver, a wire stripper and a voltage tester.

- Turn off the power to the switch box!
Locate circuit breaker supplying power to lighting circuit you are working on. TURN CIRCUIT OFF prior to any work on this circuit. Also turn off any power circuit with connections in the electrical box you will be working in.

- Remove the switch plate.
Remove switch plate from the light switch you would like to replace with the motion sensor switch. Most switch covers are fastened with top and bottom small standard slot machine screws. Remove screws to remove plate.
Some switch plates are screwless and are connected using locking tabs between the top finish plate and the mounting plate below. Use a standard screw driver to gently pry open the top plate by pushing locking tabs to unlock top finish plate.

- Check that the power is off to the switch box.
Prior to doing any work in the electrical box, double check the power is off and that there are no live wires in the electrical box you are working on.

- Remove the existing light switch.
Loosen mounting screws (top and bottom) on existing light switch. Once the screws are loose, pull the switch out of electrical box, exposing its connections.
Once the switch is pulled out and the connected wires are exposed, check the type of connections to the light switch you would like to change out for a motion-sensor light switch.
If the wires are connected to the screw terminals, use a screwdriver to remove the wires by turning counter clockwise and loosening the screws.
If wires mount directly into small holes in the back of the switch, the wires are connect via a quick-connect mechanism, requiring the depression of small tabs under the connection holes. To depress these tabs and release the wires, insert a small standard screwdriver into the release tab near the connection hole and pull the wire out while the tab is depressed.
These two wires that you just removed from the old switch are the two wires you will connect to the new motion sensor dimmer light switch. Both wires will typically be black or one black and the other red.
One of these two wires is the “line” or hot wire (connected to the electrical service) and one is the “load” (connected to the light fixture) wire. The switch simply alternates between connection or disconnection of the electrical supply line to the light fixture load.
In addition to the two black wires (the line and the load), there may also be a green or plain copper ground wire connected to the switch ground terminal, if so disconnect this wire to.
If the light switch is wired for a single lighting circuit, it will only have two screw terminals and a ground terminal. If the switch is a three-way switch it will have additional terminals – see the package insert for more details regarding three-way circuits.


- Connect the new motion sensor light switch to the wires.
Connect the same two black wires and any ground wire that you removed from the old light switch to the new motion sensor light switch.
Prepare the wires to be re-connected to the new switch by straightening, re-stripping and looping wire as needed. If using the quick-connect terminals at the back of the switch, you will need a straight, stripped end of the wire of proper length. The is typically a wire length guide molded into the back of the switch body.
I do not recommend using the quick-connections, but rather securing the wires to the switch using the screw terminals. To prep the wire for connection to the screw terminals, you will need a bare copper hook or loop at the end of the wire. The loop can be made with needle nose pliers or using the loop holes at the sides of most wire strippers.
If the old switch did not have a ground wire attached, you will need to attach the existing ground wire connected to the new motion sensor switch to the ground wires within the box. Locate the ground wires (typically bare copper wires twisted together) and connect to the switch ground wire.
Connect the green switch ground wire to the existing ground wires by removing the wire nut (turn counter-clock wise), adding the new ground wire and re-tightening the wire nut. Wire nuts have limited wire capacity and adding an additional wire may require using a larger wire nut.


- Mount the new motion sensor switch in the switch box.
Pack the switch wires back into the switch box and mount the new motion sensor switch back into the box.
If you are installing more than one switch or installing it next to another dimmer switch, you may need to remove the aluminum cooling wings at the side of the switch. If you do remove one or both sides of the cooling wings, you will need refer to the “de-rating” chart in the switch package insert to check on the power handling capacity of the modified switch, as removing the cooling fins decreases the ability of the switch to cool and in turn, limits it’s power handling capacity.


- Install the switch plate cover and test the new motion sensor switch.
After the switch is mounted within the wall box, install the wall plate cover. The wall plate installs with screws above and below each switch or it you are using a Decora screwless cover, a base plate is attached by screws and the top plate snaps onto the base plate.
Once the switch cover is installed, turn the power back on. The switch should now be working. If you are using the same Lutron dimmer motion sensor switch as I did, you will notice the green LED illuminated to the left of the switch.
The motion sensor LED will also illuminate when motion is detected. You should be able to turn the light on and off by pushing the switch button. Double click to turn off. The light intensity can be set using the rocker on the right of the switch. The brightness level will be recalled with motion activation of the switch.

- Adjust the motion sensor switch settings (optional).
The Lutron Occupancy Sensor Dimmer Switch has multiple settings that can be adjusted. The switch will function out of the box, but can be adjusted.
Here are the available features that can be adjusted (the default value is in parenthesis):
- Time Out (5 minutes)
- Motion Detection Sensitivity (High)
- Auto-On When Occupied (On)
- Occupied Light Level Adjustment (100%)
See the package insert of the product you are using for feature adjustment options.

IMAGE GALLERY | Motion Sensor Light Switch


GIPHY App Key not set. Please check settings