This is the second article in our Building a Shower series and in it we will walk through the process of building a custom shower pan using the traditional technique of a sloped mortar base with a sandwiched vinyl shower liner.
Before you begin building the shower pan, you should have framed shower walls and subfloor with drain plumbing and supply plumbing in place – both of which are covered in our first article How to Build a Shower: Framing and Plumbing.

Shower Pan for Tile: What it is and how to Build One
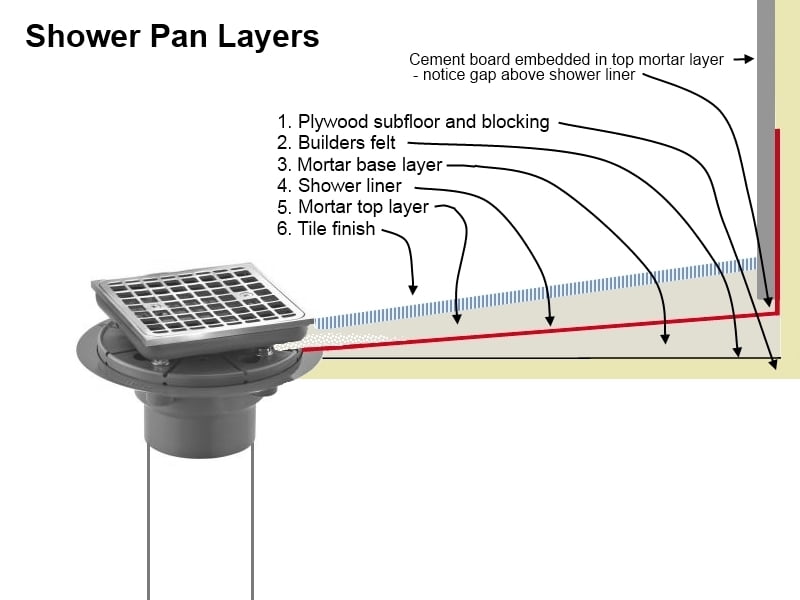
A shower pan is the sloped base of a walk-in shower that forms the shower floor. The shower pan usually is built around a specialized floor drain which is sealed to the waterproof layer of the shower pan.
Traditional shower pans where built using dry-pack mortar (concrete) with an embedded waterproof membrane or layer that is sealed to a specialized shower drain that allows water to drain into the main drain opening as well as side weep holes.
The finished shower pan forms the slight-sloped floor of the shower and is often finished with a tile surface. A shower pan is traditionally constructed in two layers with an embedded water-proof membrane or layer in the middle.
This middle layer serves the special purpose of redirecting any shower wastewater that has passed through the surface of the shower floor back into the drain.
The Shower Pan Serves Two Primary Functions
- To quickly direct shower wastewater into the shower drain by way of a sloped-to-the-drain surface.
- To redirect any water that has passed through the shower floor and contained by the water-proof shower liner, back into the side weep holes of the shower drain.
While the sloped surface of a typical shower pan handles a majority of shower wastewater, proper functioning of the water-proof middle barrier or shower liner (#2 above), is crucial for a properly functioning, dry, mold-free, leak-proof shower build. Mortar is water resistant but readily water permeable. Because of this, some water will find it’s way through the shower floor and if this passed water is not stopped, will result in a leaky shower.
So Why Build a Traditional Mortar Shower Pan?
Although there are many ready-made shower pan systems available, it’s hard to beat a traditional hand-made mortar shower pan. Hand-built mortar shower pans are inexpensive, long-lasting and, if done right, reliable and leak-free for decades.
While off-the-shelf pre-made shower pans offer speed and ease of installation, they often lack the rigidity, strength and flexibility of a hand-poured mortar pan. Packaged systems (Kerdi, others) get expensive and complicated without offering compelling advantages over hand made shower pans. But, hand-made mortar shower pans do require a bit of patience and work.
How Do You Build a Mortar Shower Pan? Its All About the Layers…
A hand made shower pan is built in layers around a shower drain assembly.
Shower Pan Layers in Steps:
- Frame the shower walls, install subfloor and shower curb
- Add wall blocking to create shower pan “box”
- Install the shower drain assembly through shower subfloor
- Cover shower subfloor with asphalt saturated felt (tar paper)
- Place the first mortar base layer, sloped from walls and curb to drain base
- Install the shower liner and seal and clamp to the shower drain
- Install tile backer board on shower walls gapped above shower liner
- Place the top mortar layer over the shower liner, sloped from walls and curb to drain
- Finish the top mortar layer – typically with tile
Building a mortar shower pan is a relatively simple task of assembling these layers. It will take a bit of time and some work, but the reward will be a long-lasting, leak-free, durable shower base.
Start With A Strong, Stable Base
A new shower built with a mortar shower pan, concrete backer board and tile is heavy. Before you begin, ensure that you have adequate sub-flooring, framing and appropriate shower drain plumbing in place. More information regarding the prep and finish work of the shower pan can be found in the other shower construction articles:
- How To Build a Shower Article 1 – Shower framing and plumbing
- How To Build a Shower Article 3 – Shower tile installation
If you are ready to build your own shower pan, read on. Prior to starting on the build, you should have a properly framed and plumbed shower rough-in (covered in the first article of this series).
If all of this is in place, get your tools and materials ready to build a shower pan…
OVERVIEW | Build a shower Pan
SUPPLIES LIST | Build a shower Pan


-
 Asphalt Felt 15#
TARCO STD15 36x144#15
Much cheaper to purchase locally because of shipping costs.
Asphalt Felt 15#
TARCO STD15 36x144#15
Much cheaper to purchase locally because of shipping costs.

-
 PVC Shower Liner Cement
HH-66 PVC Vinyl Cement Glue
Do not use PVC pipe cement!
PVC Shower Liner Cement
HH-66 PVC Vinyl Cement Glue
Do not use PVC pipe cement!

-
 Shower Bed Guide
Goof Proof Shower STE-201 and EXT-202 kits
Pre-Pitch guide for first mortar layer and Quick-Pitch guide for top mortar layer
Shower Bed Guide
Goof Proof Shower STE-201 and EXT-202 kits
Pre-Pitch guide for first mortar layer and Quick-Pitch guide for top mortar layer
-
 Shower Bed and Curb Guides
Goof Proof SSK-401 kit
pre-pitch, quick-pitch and Kirb-perfect kits
Shower Bed and Curb Guides
Goof Proof SSK-401 kit
pre-pitch, quick-pitch and Kirb-perfect kits

TOOLS LIST | Build a shower Pan
")


STEPS | Build a shower Pan
- Prepare subfloor and drain plumbing.
Prior to placing mortar for your shower pan build, your subfloor should be flat and suitably strong. I used 3/4″ plywood over reinforce floor joists. You will need to install the lower portion of the shower drain assembly installed (see How to Build a Shower: Framing and Plumbing for shower drain install details)
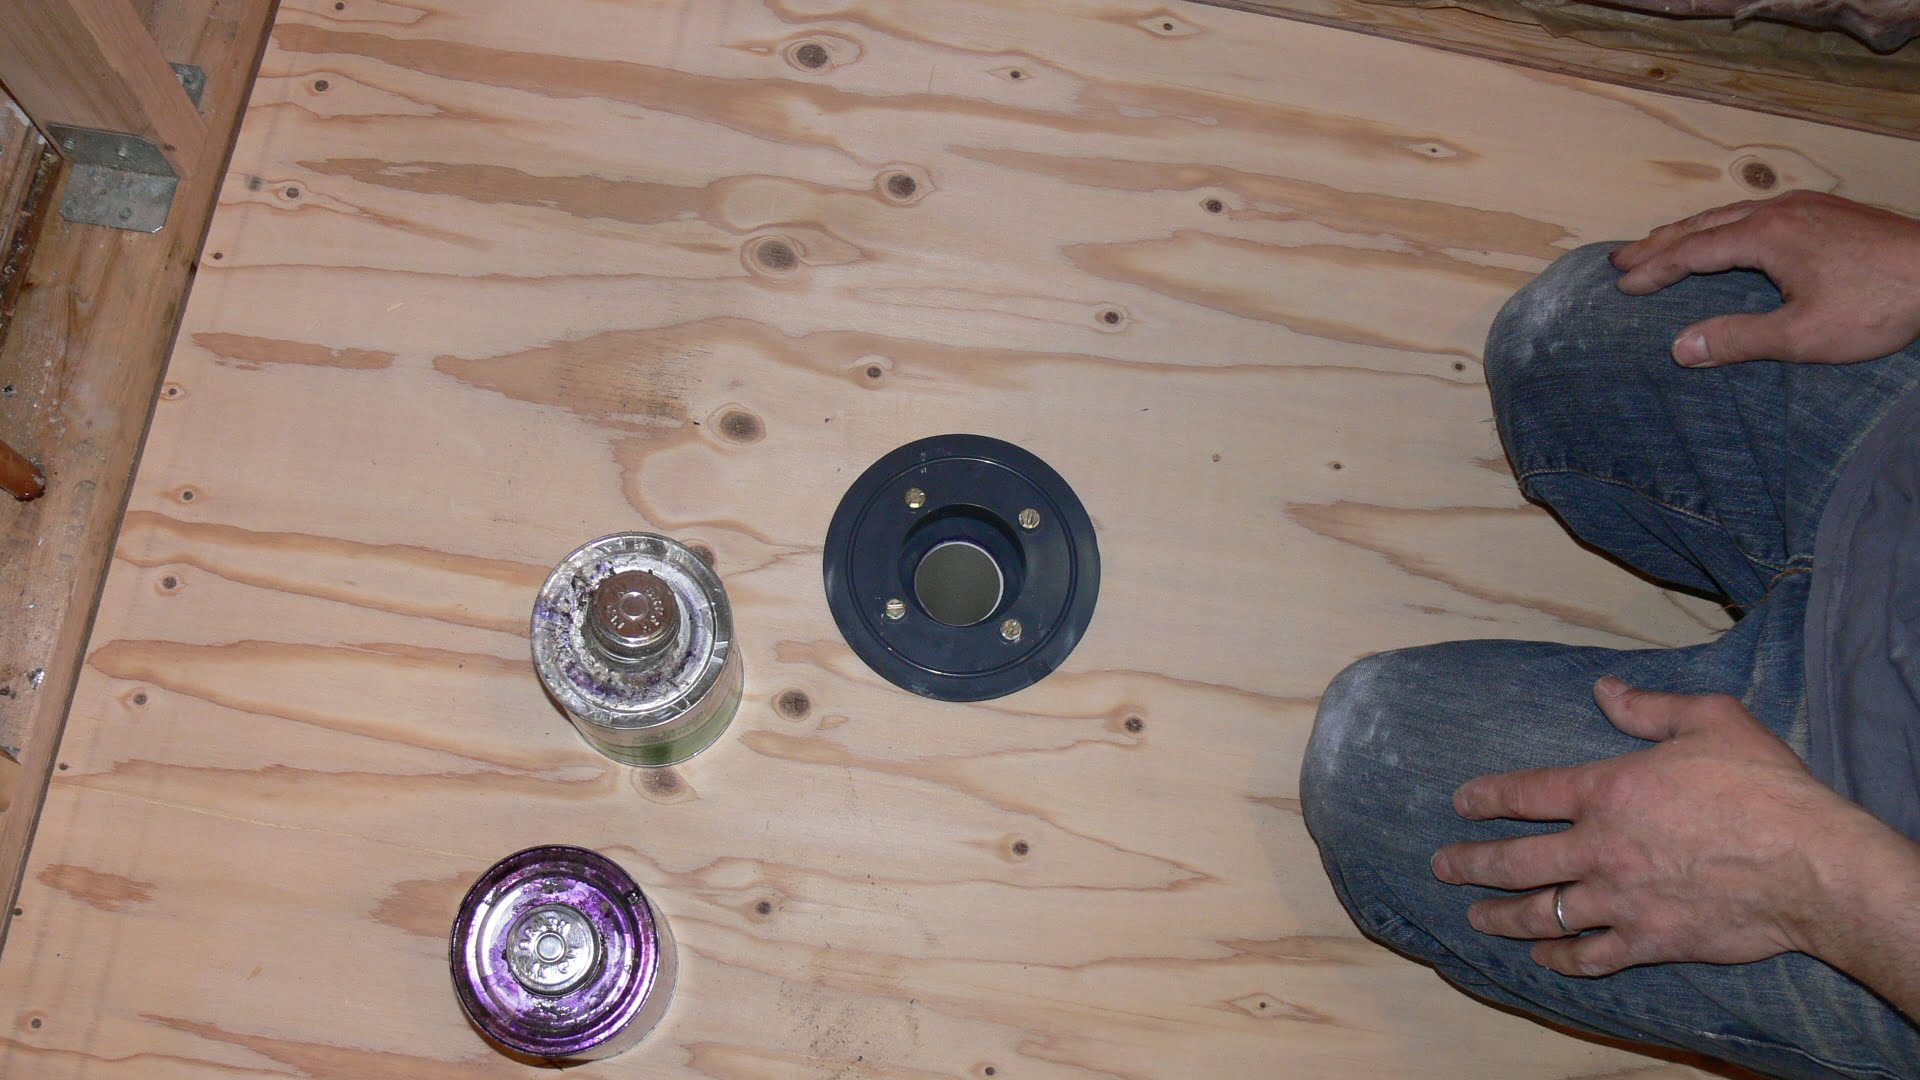
Before you build your shower pan, you should have a solid subfloor and properly installed drain base. 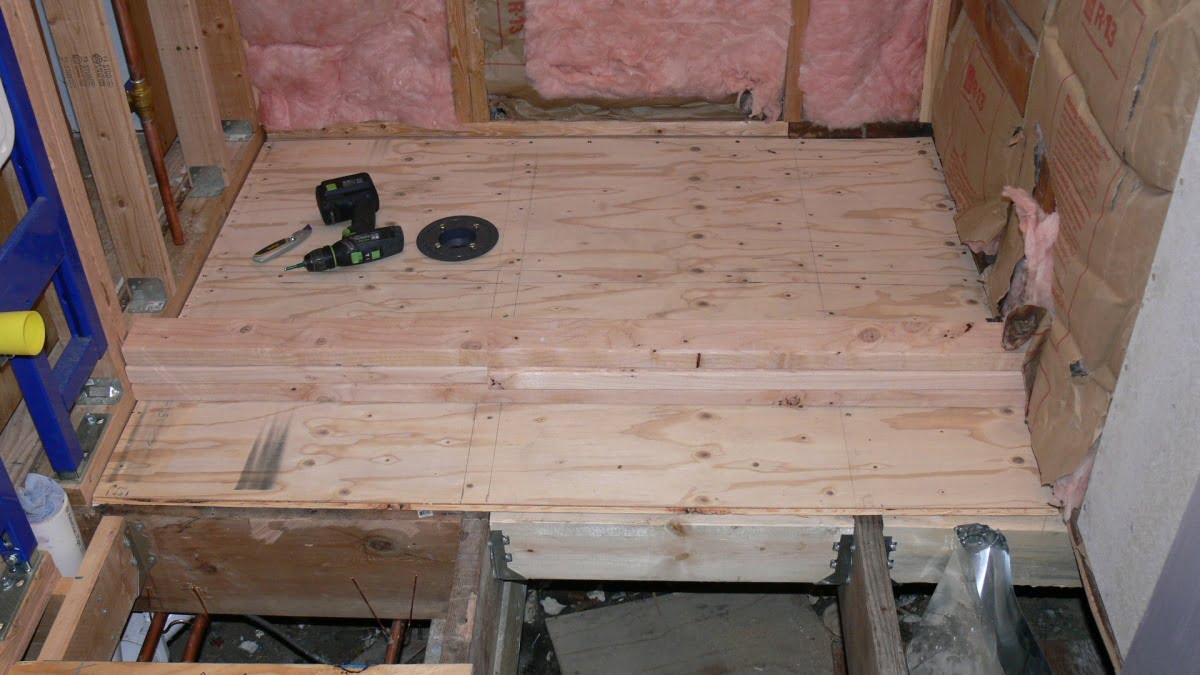
Stable subfloor base of 3/4″ plywood for shower pan. - Frame the shower curb.
If building a shower curb, you have two main options:
- Use lumber (stacked 2x4s or 2x6s) or blocks as a curb core.
- Use forms to pour a concrete curb.
I used option #1, using 3 stacked 2x4s to form a curb. To do the same, stack and fasten several (I used 3) 2x4s sequentially to the subfloor. First, screw the bottom 2 x 4 to the subfloor, and then screw the second 2 x 4 to the fastened first 2 x 4 and repeat to desired curb height.
Then fasten metal mesh to the lumber curb to help hold mortar to it, which will be applied with the first mortar layer. You may also skip attaching mesh and a first layer of mortar to the curb lumber and simply wrap the shower liner directly over the 2 x 4s, skipping the bottom mortar layer on the curb and just applying a top, final, mortar layer on top of the shower liner.
Stack 2 x 4s to create a curb frame. 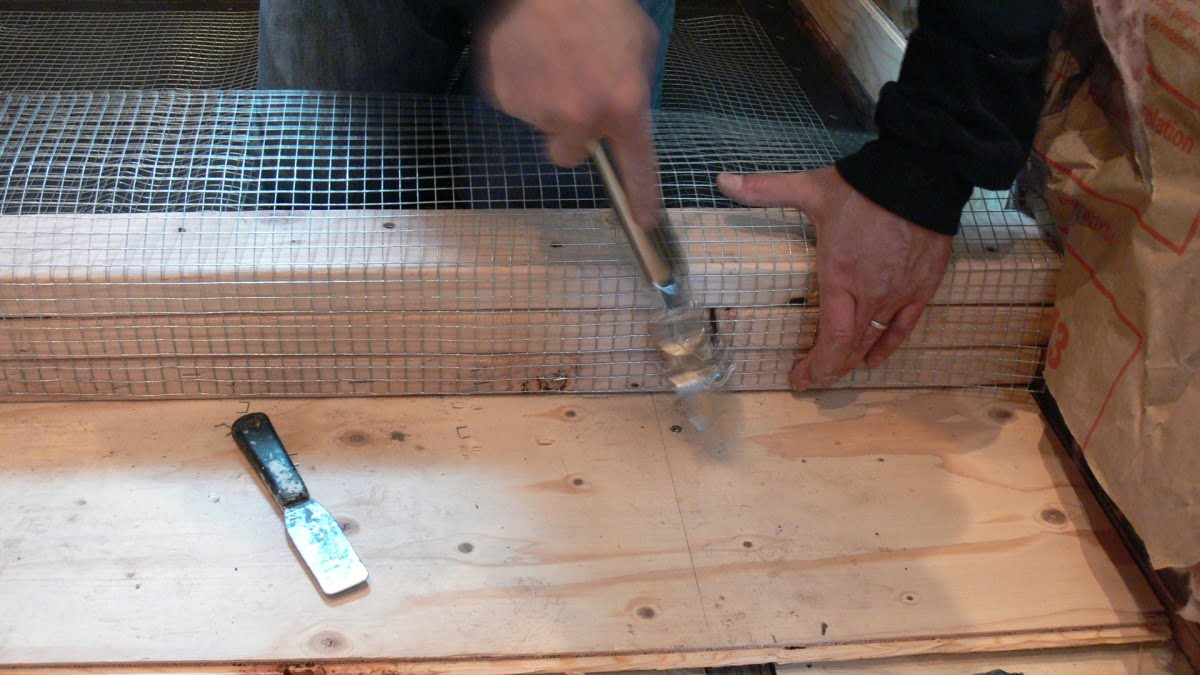
Wire mesh secured to wood shower pan curb with staples. Do this to mud over the curb frame prior to laying the shower liner. Optionally, you can install the shower liner directly over the curb lumber and skip the mesh and first layer of mud for the curb. - Form the shower pan box frame with blocking between the studs.
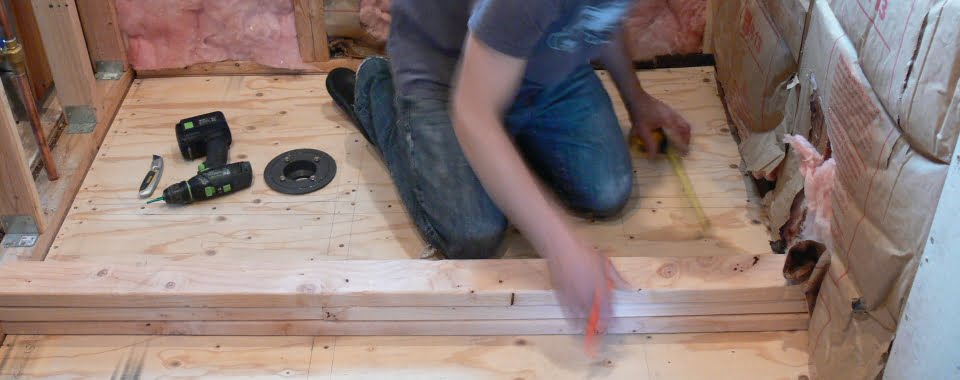
Create the shower pan “box” form by installing blocking between wall framing members. Use framing pieces or sheathing material as blocking. I used scraps of the leftover 3/4″ subfloor plywood. The blocking should be at least as high as the shower curb.
Build a shower curb frame using stacked 2 x 4s. Add blocking between wall studs to form shower pan “box”. - Prepare shower pan for the first mortar layer.
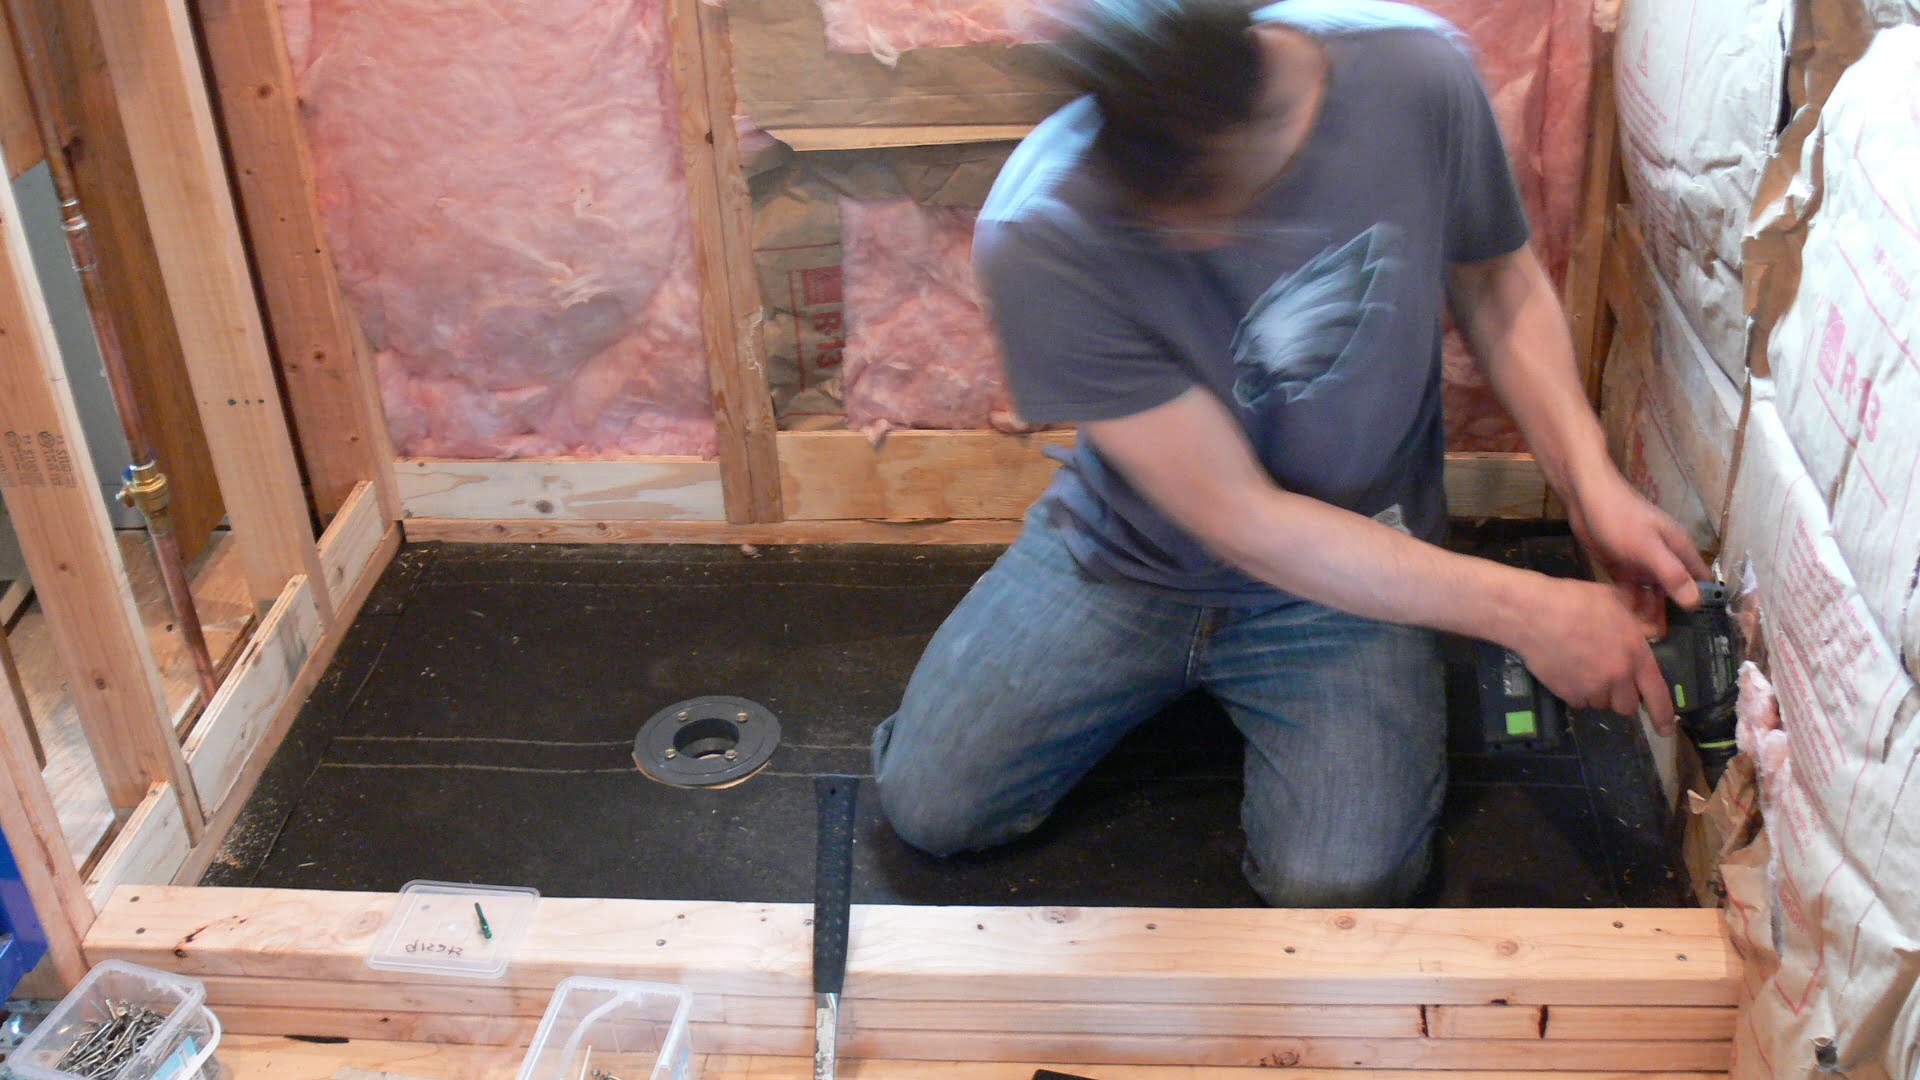
Prepare the bottom of the should pan box for the first mortar layer by installing a layer of asphalt felt over the subfloor plywood. This felt layer will serve as a moisture barrier for the first layer of mud helping the mortar to retain moisture while curing. It will also help to isolate the subfloor from the shower pan. Install the asphalt felt to cover the entire bottom surface of the shower pan, cutting an opening for the drain. Secure with several staples.
Over the asphalt felt, install a layer of mortar reinforcement mesh. Use galvanized hardware cloth (metal mesh) or a plastic or synthetic reinforcement mesh. If using a metal mesh, bend to create slight waves in the material to improve embedding of the mesh within the mortar layer. If using metal mesh, use care to avoid sharp edges above the mortar layer that could damage the to-be-installed shower liner which will lay above the first reinforced mortar layer.
If using a slope guide system like the Goof Proof Pre-Pitch (STD-201) guide, you would typically not use a reinforcement mesh.
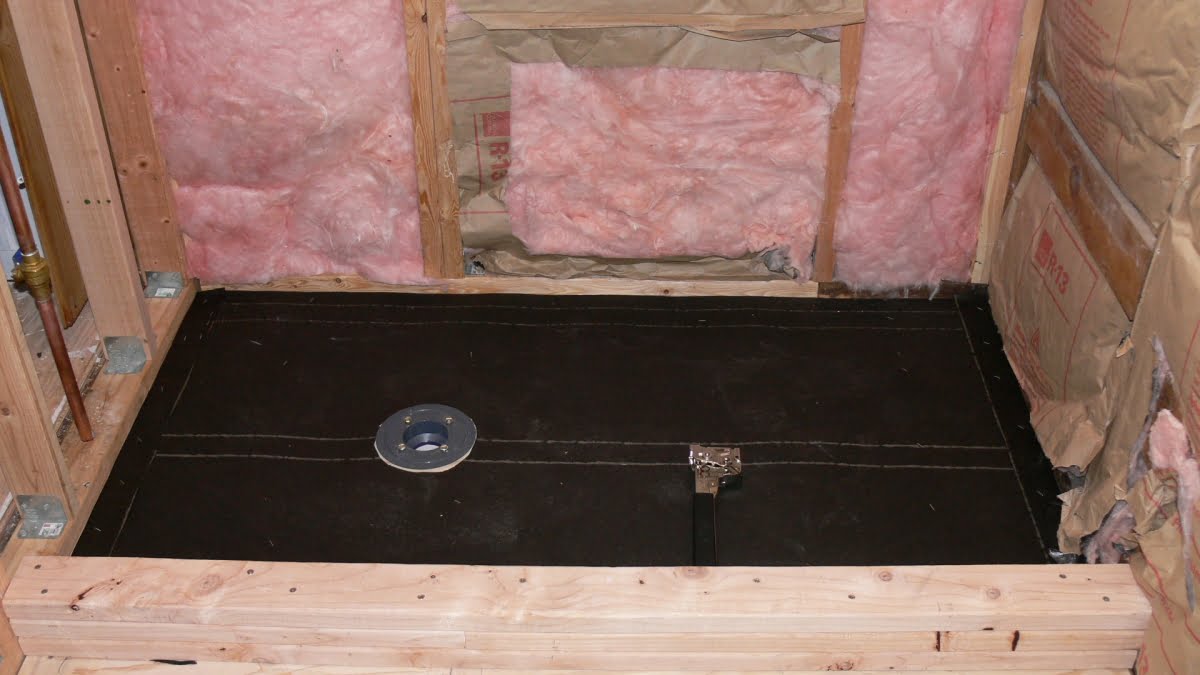
Cover subfloor plywood with layer of tar paper. 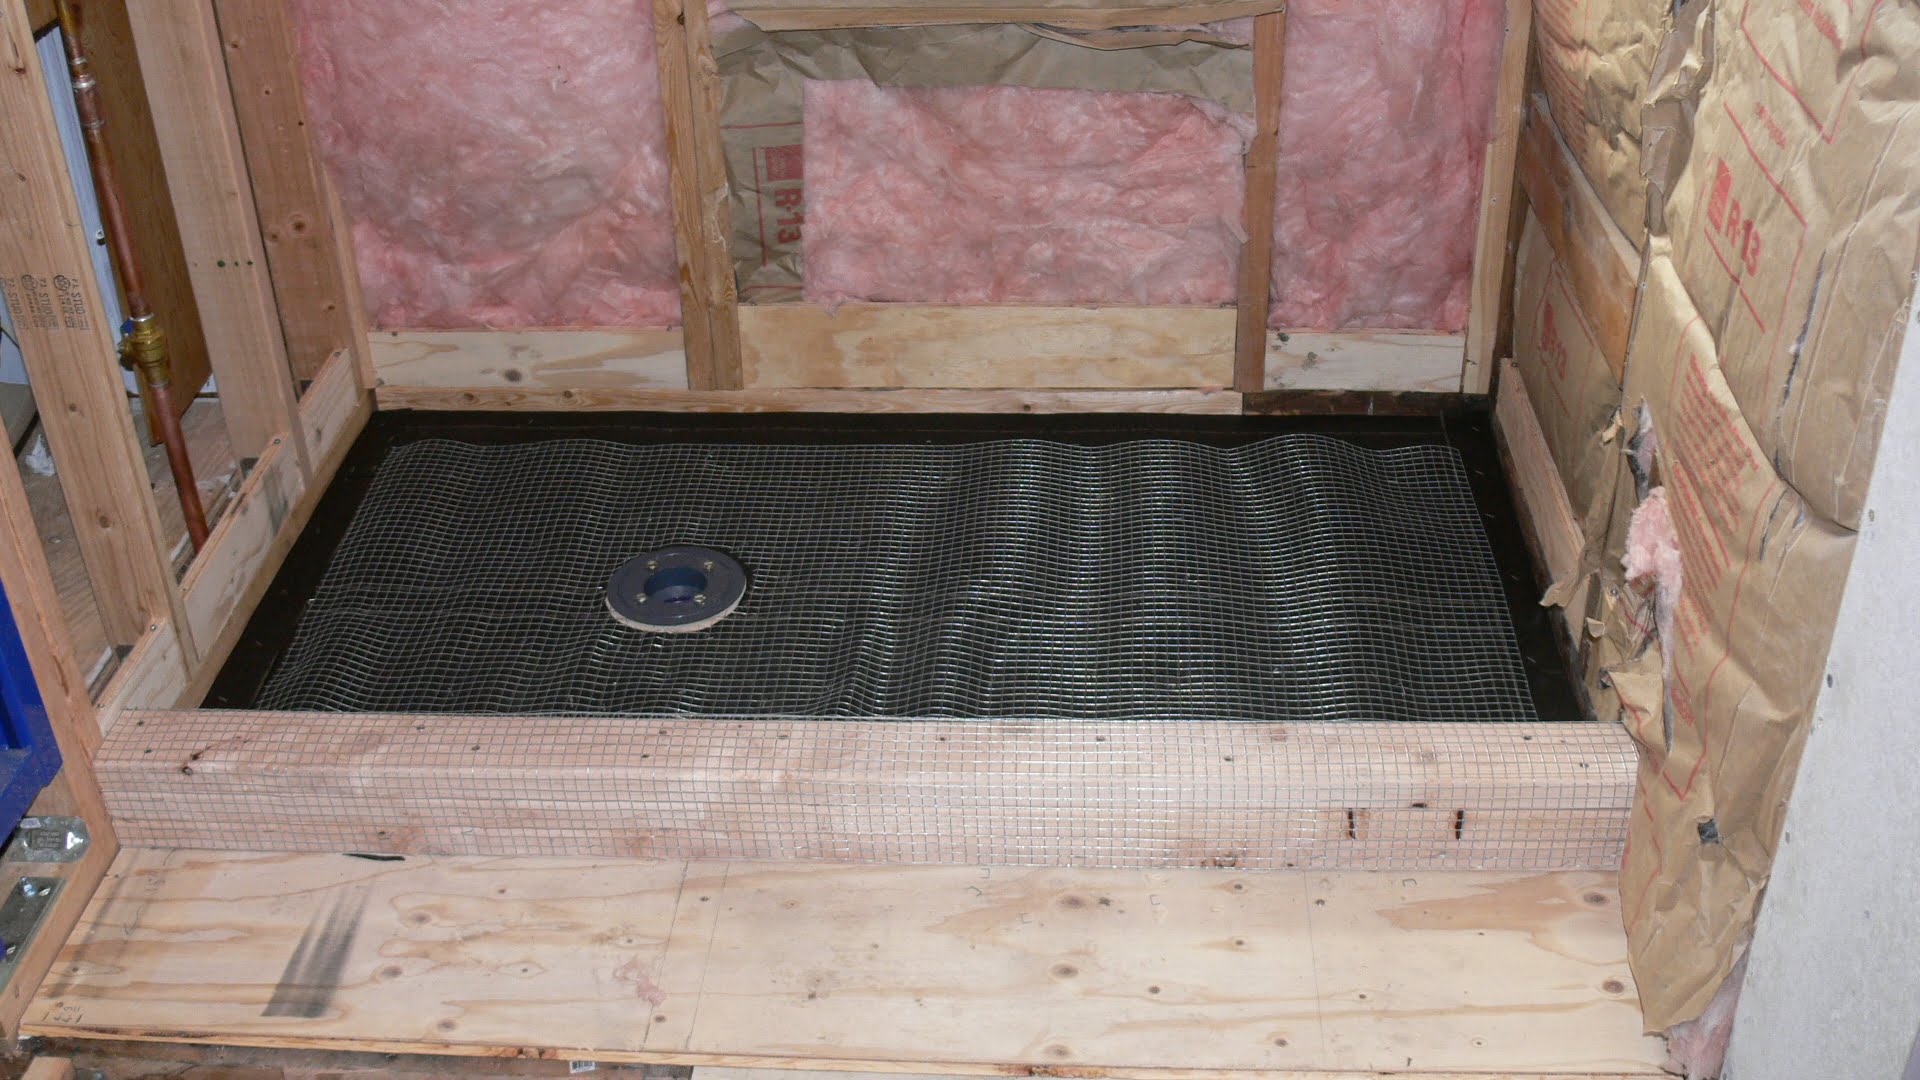
Add stucco wire or galvanized wire mesh to reinforce the mud mortar. Notice waves in mesh to help embed in mud pour. - Mix and place the first mortar layer.
Traditional floor mix mortar (floor mud, deck mud or dry-pack mortar), which is used to build mortar shower pans, is a 4 – 5 to 1 mixture of sand and Portland cement plus water. When making floor mix mortar, add just enough water to hydrate the mix. Excess water will weaken the mortar. Limit the amount of water by adding just enough water to create a thick, clay-like mixture that just holds its shape when packed. Once packed, you should not be able to squeeze water out of the mix.
A latex concrete admixture can be added to the mortar mix to improve compressive strength, flexibility, durability and adhesion of the mortar mix. Follow the directions of the specific product you plan to use. Generally, latex admixtures are substituted for some of the water in the mix. For my mortar mix, I used a 50:50 mix of water and latex admixture to hydrate the mortar.
To make the mortar, begin by dry-mixing the mortar mix (even if from a premixed bagged product) thoroughly with a hoe to ensure proper sand and cement contact. Next, add water (or a water plus latex admixture blend) using only enough water to create a mix that will hold its shape when squeezed in your hand, but not release excess water. Drier mortar mixes create strong, stable concrete with less shrinkage and higher compression strength.
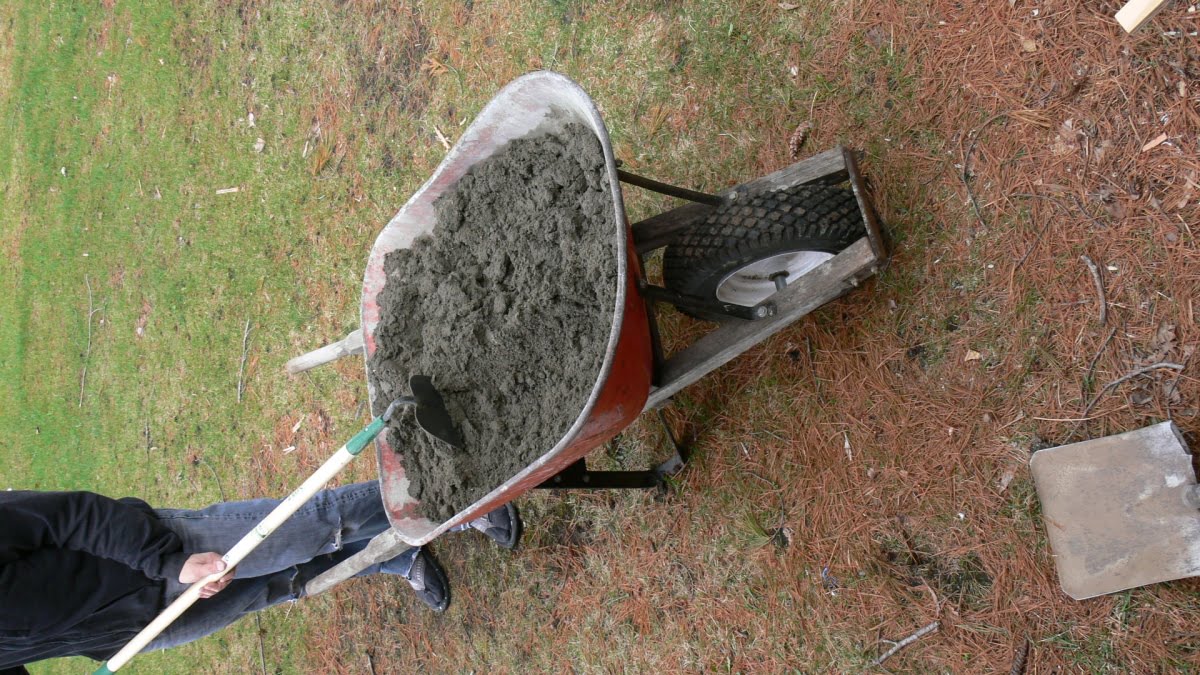
Dry-pack floor-mix mortar prepared by adding just enough water to hold a ball shape when compressed. With the mortar mixed, place the first mortar layer. Slope the mortar bed with a 1/4″ – 3/8″ slope from the walls to the drain location. Prepare for the slope by marking the walls of your shower with a mortar level that will provide the desired slope to the drain. Calculate the amount of height needed at a wall by multiplying the distance to the wall from the drain in feet by 1/4″. For example, if the is 3 feet from the drain, the wall mortar level should start 3/4″ of an inch above the drain edge level. To draw wall mortar height guides around the shower, measure any point, add the amount of needed rise and use a level to continue that line around the perimeter of the shower.
You can also use a commercial slope guide (like the Goof Proof kits) to help easily create a uniform pitch mortar bed.
With your shower walls marked and/or a slope guide set up, place your mixed mortar into the shower pan and begin forming your base (“pre-slope”) mortar layer. Add mortar to the pan starting at the rear of the shower pan. Use a straight edge or similar to screed the mud from the wall mark to the edge of the drain base and continue adding mud until the entire pan is formed. If using a pitch guide, like the Goof Proof products, the tops of the plastic struts will form the top layer of the mortar bed and serve as screen guides while forming the mortar bed.
Next, add mortar to form the base mortar layer of the curb. If using 2 x 4s as I did, add mortar to the outside surface of the lumber with its’ attached wire mesh and smooth. If using forms, commercial or your own, fill them with mortar and tool smooth.
Allow the shower pan and curb mortar to cure at least overnight.
Base mortar layer (pre layer) pitch guide. - Install the shower liner.
Next, install the shower liner over the base, sloped, mortar layer of the shower pan and the curb. The shower liner is waterproof and will provide a permanent, waterproof barrier for the shower pan that is sealed to the shower drain. It is very important that the shower liner is installed on a properly sloped mortar bed. Un-sloped shower liners will hold water and cause all sorts of moisture-related problems including mold growth. Do not install a shower liner on a flat subfloor or flat base mortar layer!
Installing the shower liner by first measuring and cutting it to the proper size.
Unfold and spread out the shower liner over the shower pan and around the shower curb. Allow the an additional 8 to 12″ of liner at the shower walls to allow you to carry the liner up the walls well above the level of the shower curb. Before cutting the lineer, be sure to thoroughly flatten the liner along the surface and corners of the pan and shower curb. Liners installed without sufficient slack can stretch and fail.
Prior to laying the shower liner on the shower pan, clean the cured mortar surface of the pan to remove any potential abrasive debris that could damage the shower liner. In addition to cleaning the shower pan base, some will add a layer of roofing felt (tar paper) over the mortar shower base to help protect the liner from abrasion of the mortar base.
The liner should be one continuous piece, covering the entire pan, up the walls and over the curb. The liner is the waterproof barrier for the shower pan – think of it as a pool liner that will need to hold the entire volume of water contained with the pan up to the shower curb. Do not leave it too short when running it up the shower walls and don’t cut or penetrate the liner within this “pool” area.
Once you are satisfied with the position and lay of the liner, use a marker to mark the desired cuts on the liner. Do not cut the shower line at the corners or as it passes over the curb. Instead, fold the liner at corners (similar to wrapping a gift) and tuck them into the wall cavity at corners.
If you must cut the liner at the curb or for complex corners, use commercially available patch kits with the proper liner adhesive to cover the cuts.
To accommodate the thickness of the shower liner against the lower walls of the shower, some will shave some material from the face of the lower portion of the shower studs. This step can help ensure the to be installed backer board will lay flat over the area were the shower liner passes up the shower walls.
With the liner marked, remove the liner from the shower and cut the liner using a scissors or similar. Then, place the liner back into the shower to confirm the proper size and fit. Next, smooth the liner over the shower pan and into the corners. Fold the corners and tuck the fold toward the wall cavity or against corner studs if present. Secure the top of the liner and top of the folds with roofing nails or exterior grade screws only the the very top edges of the wall portion of the liner. You may also use liner adhesive or silicone caulk applied to the field of the shower pan for added stability.
It is essential that you do not penetrate the liner below the level of the shower curb as accumulated water can pass through fastener penetrations leading to leaks.
Finally, secure the liner to the to the shower curb using liner adhesive or silicone caulk applied to the shower side and top of the mortar curb. Do not use nails, staples or other penetrating fasteners on the shower side or top of the curb if possible. The top of the shower curb should provide a continuous, waterproof path back to the shower pan and shower drain. Holes made by fasteners along this path will compromise this barrier.
To finish the shower liner over the curb, trim the liner at the front top edge (as I did – see above photo) or fold it over the top edge to the front face of the curb if you may benefit from waterproofing the front face of the curb (if you do not plan to install a shower door or glass for instance).

Shower pan liner install. Carry the liner up the walls 8 – 12″ and avoid penetrating the membrane with fasteners below this level. - Seal the shower liner to the shower drain.
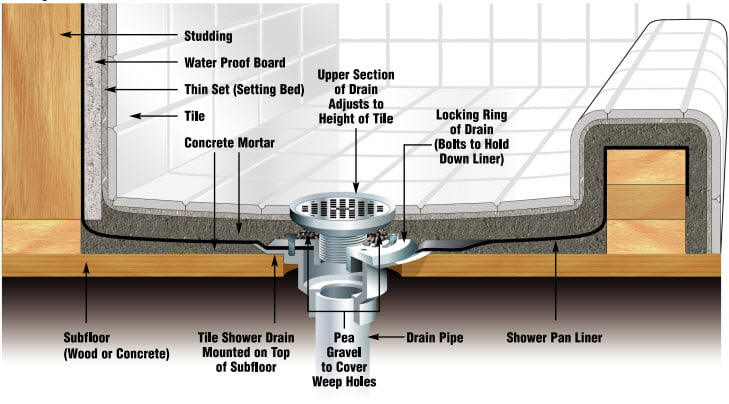
Shower drains are specialized drains with a clamp mechanism used to seal to shower liners. Shower drains also have weep holes in their sides, just above the liner clamp to allow weep water to re-enter the shower drain. This way, any water stopped by the shower liner will flow downhill along the shower liner and back into the shower drain.
To connect and seal the shower liner to the shower drain clamp, first cut out the portion of the drain liner that lies directly under the shower liner. In addition, make very small slits over the drain base bolts to allow the bolts to pass through the shower liner. Next, run a bead of silicone caulk or specialized shower liner sealant under the cut edge of the shower liner at the cutout for the shower drain. Now install the top drain clamp over the shower liner and tighten the mounting bolts to seal.
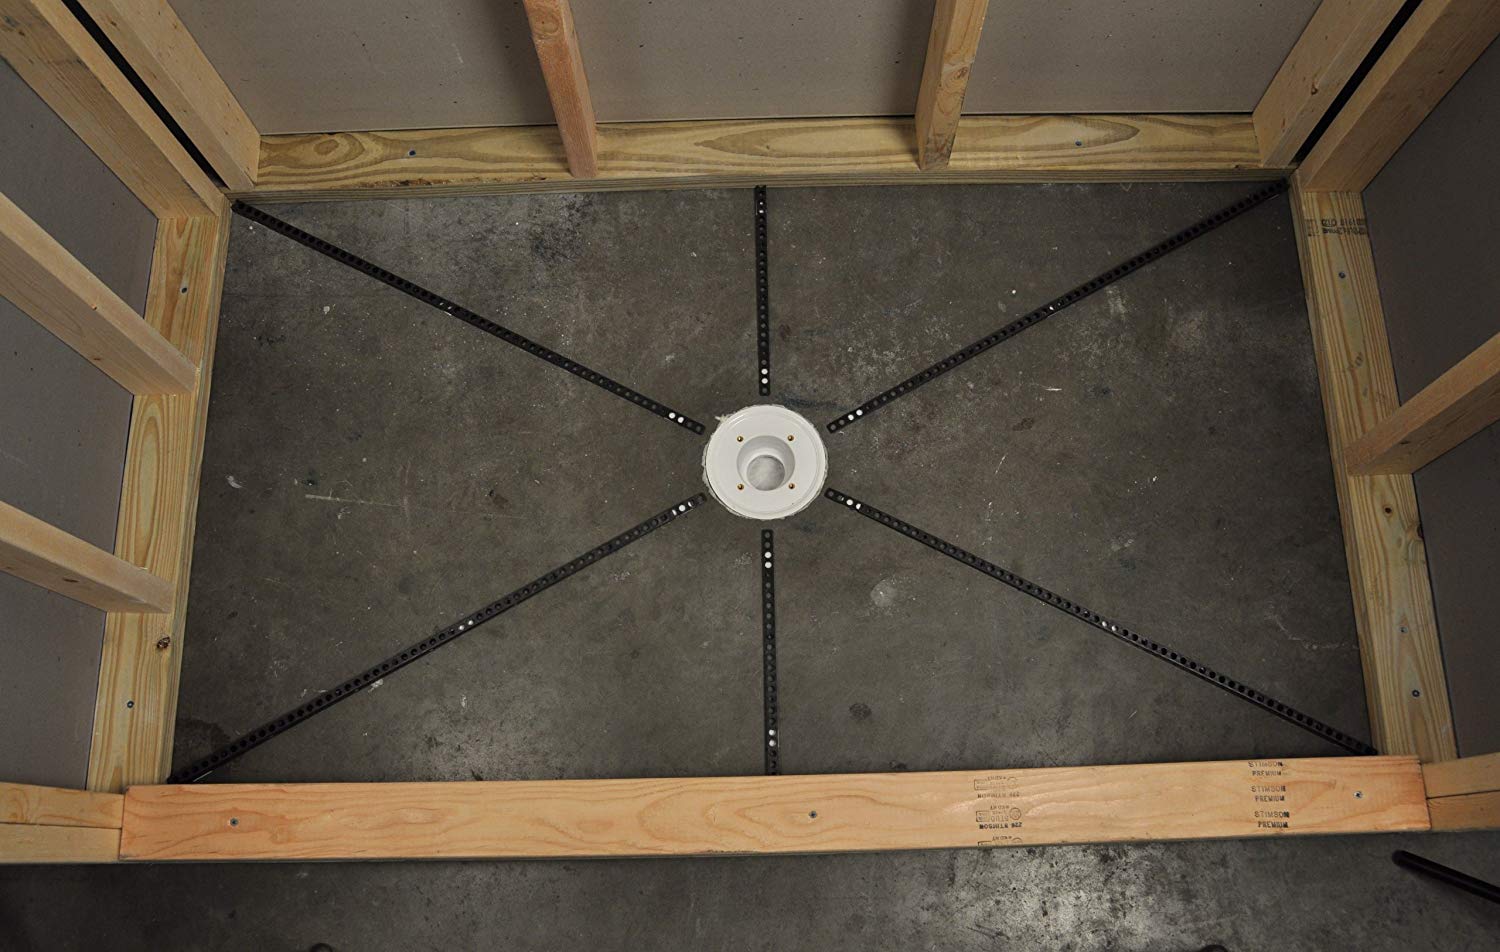
Once the shower drain clamp is in place, install the remaining drain riser piece into the drain throat. Most shower drains have thread on both the drain riser and drain throat to allow height adjustment of the drain level. Adjust this level to match your planned mortar thickness and tile thickness of the top shower pan mortar bed.
With the shower drain sealed to the shower liner, you should have a waterproof shower pan which can be flood tested once the sealant used under the liner clamp has cured.
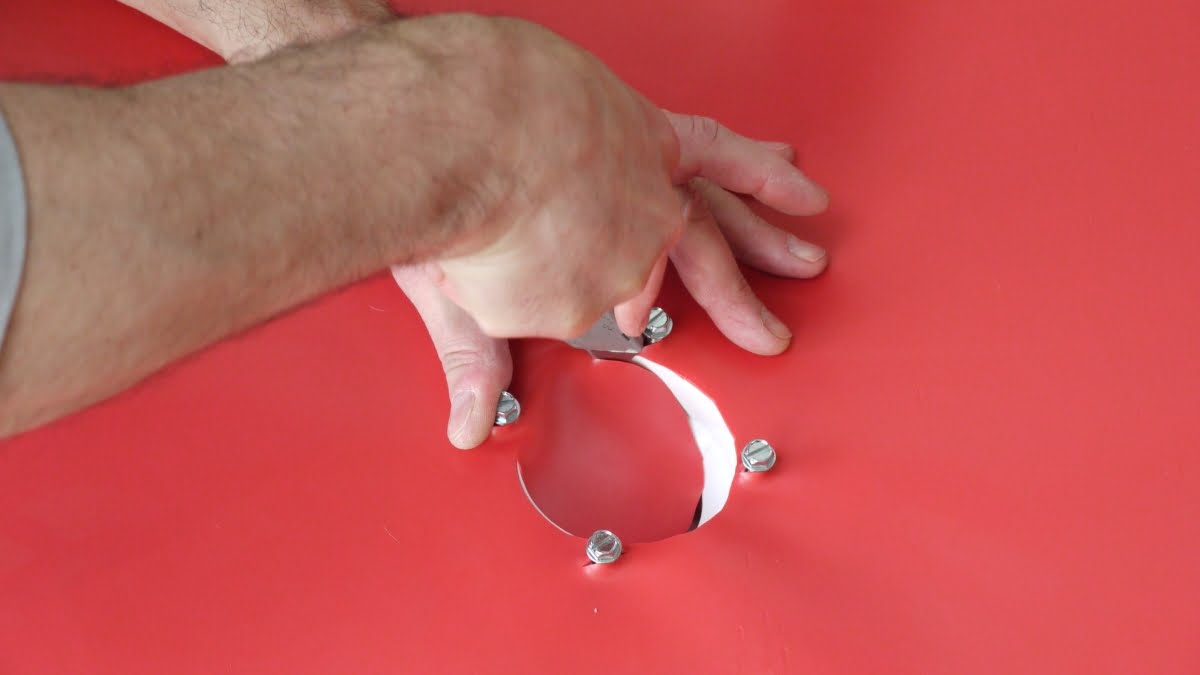
Using sharp knife carefully cut the liner to match the inside contour of the drain hole. 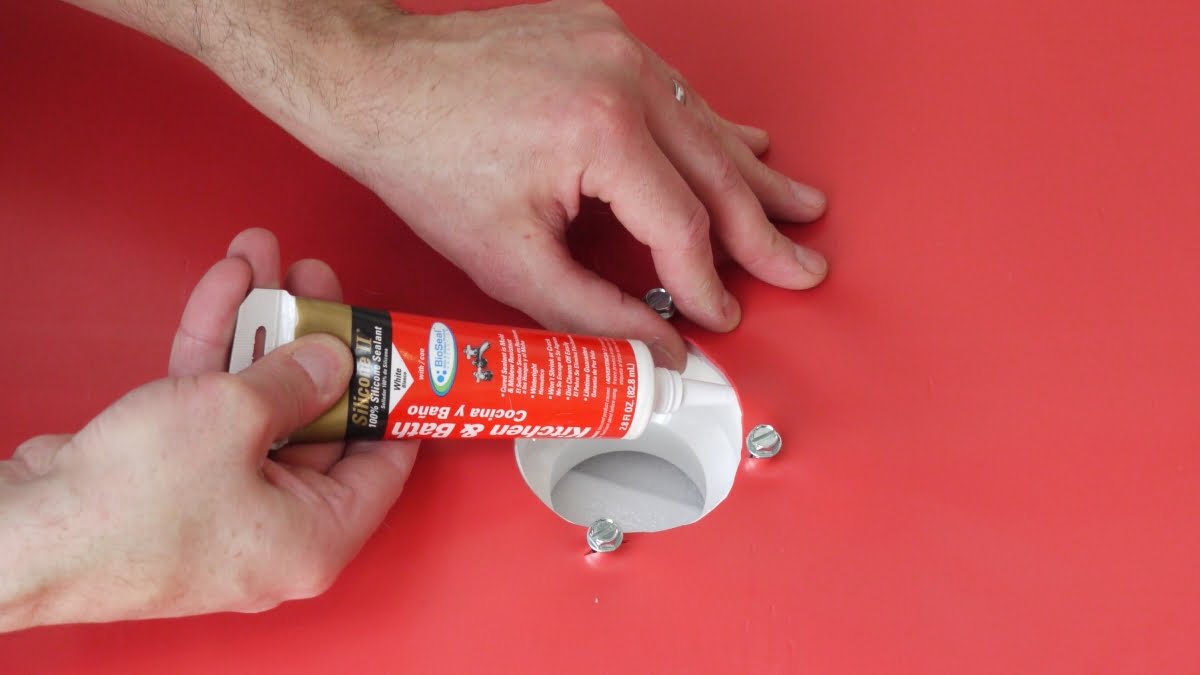
Add silicone sealant below membrane. Do not apply sealant on top of liner. 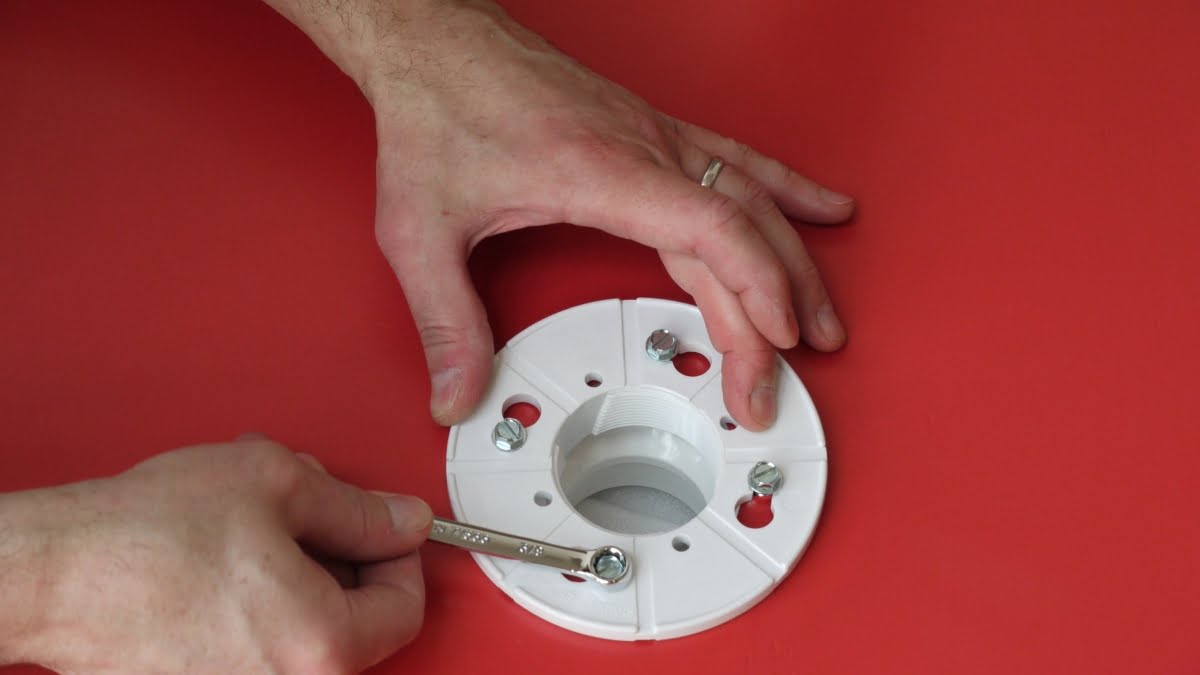
Install drain clamp and tighten drain bolts to seal with shower liner. 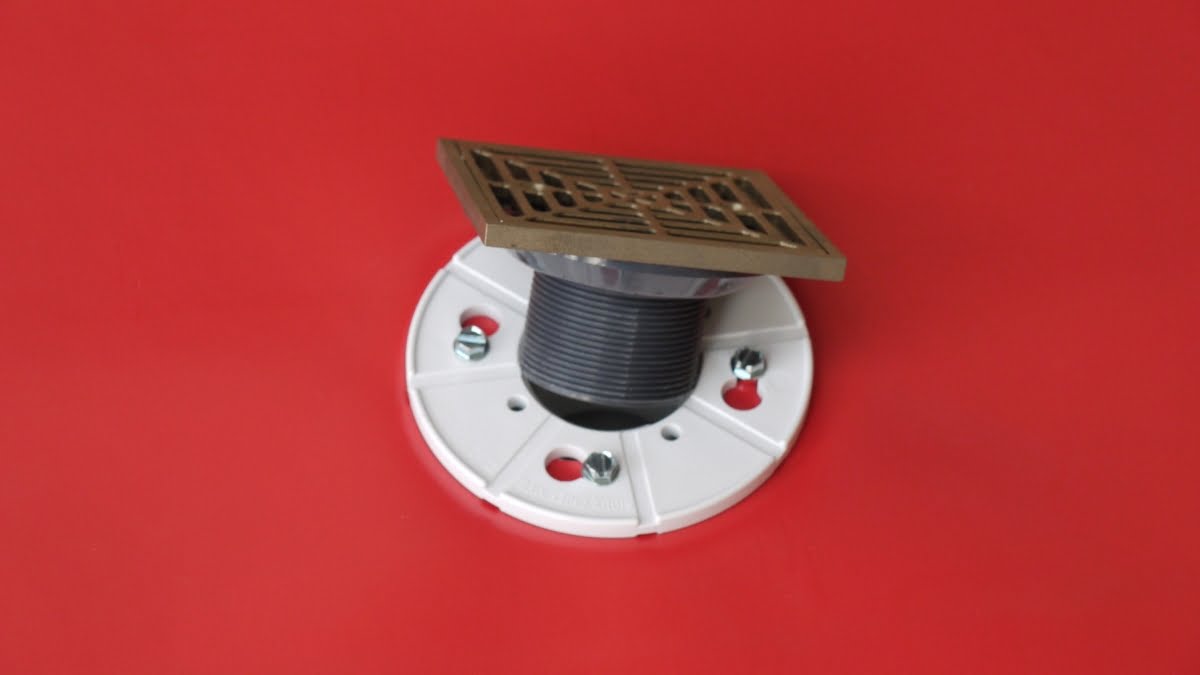
Insert drain riser into the drain throat and adjust drain height to match final concrete layer plus tile height. 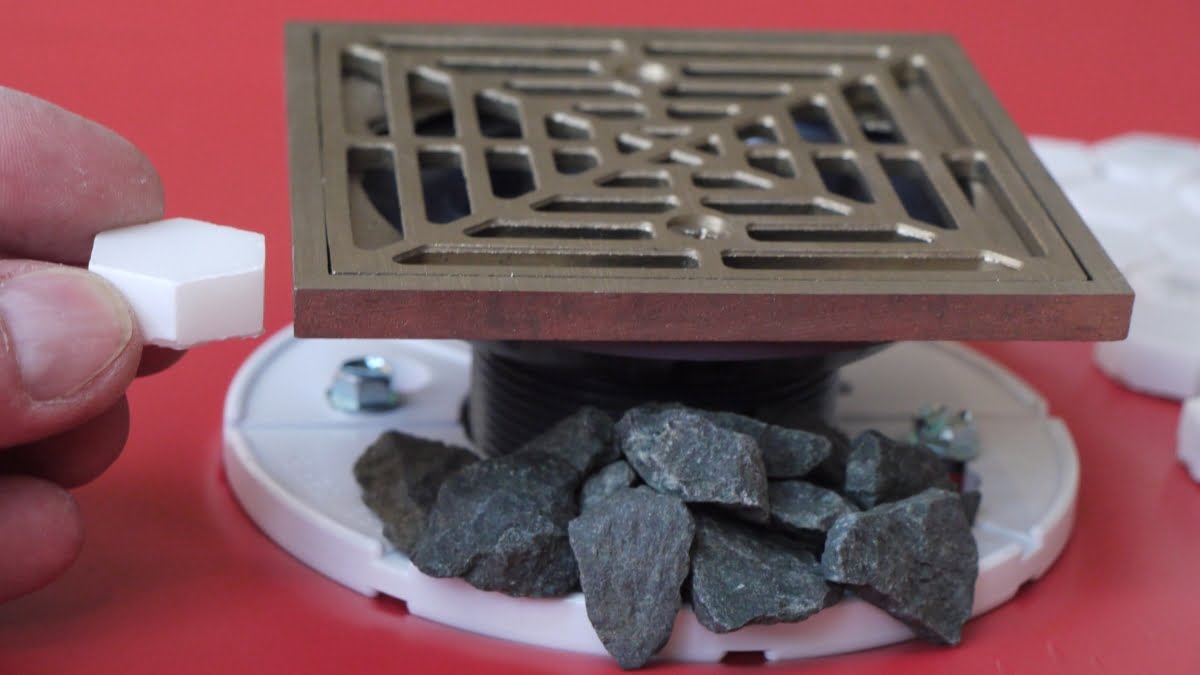
Adjust drain riser to accommodate desired to mortar layer thickeness and planned tile use. - Install the shower wall tile backer board and place the top mortar bed.
Prior to placing the top mortar layer of the shower pan, install the tile backer board so that it will be embedded into the shower pan top mortar layer. Embedding the tile backer board into the top mortar layer provide structural stability of the shower walls and allows for proper water runoff from the shower walls onto the shower floor.
Install tile backer boards slightly gaped (1/2′ or so) above the shower liner surface. This gap will help prevent mechanical damage to the shower liner from any movement of the tile backer board over time. It will also help prevent capillary-action movement of water up and into the wall assembly. For the same reasons, gap the tile backer board above the shower curb as well.
When securing the lower portion of the backer board, use great care to avoid placing screws or nails through the bottom portion of the backer board that could penetrate the shower liner behind the backer board. When installing the backer board, you only need to install the lower course if you like and can install the upper portions after finishing with the shower pan.
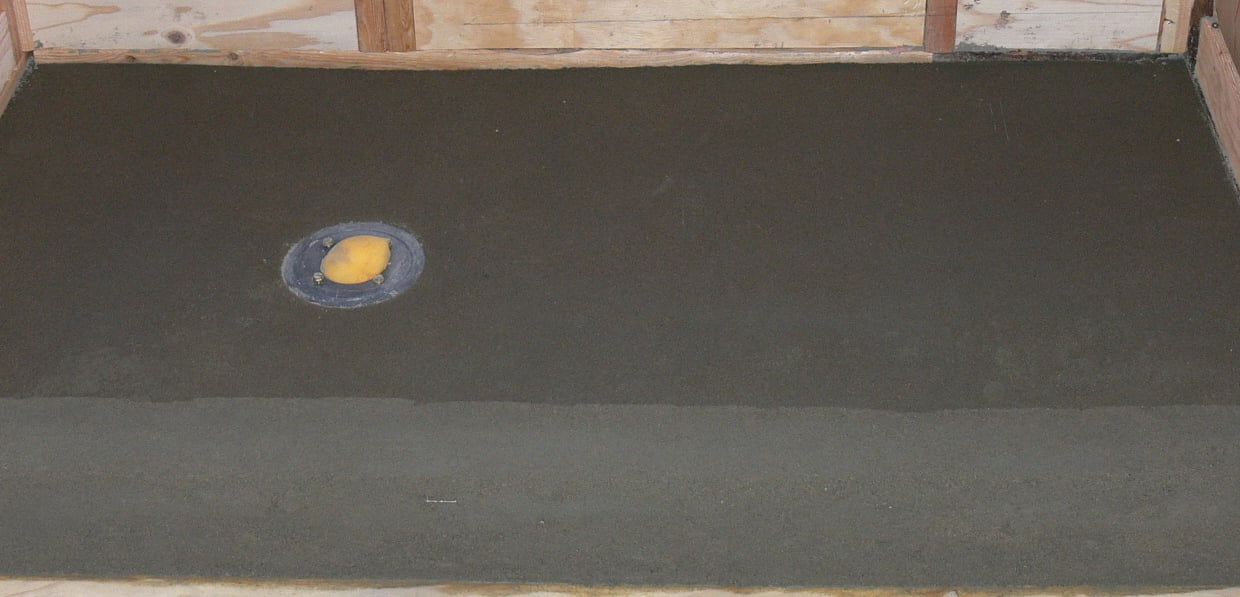
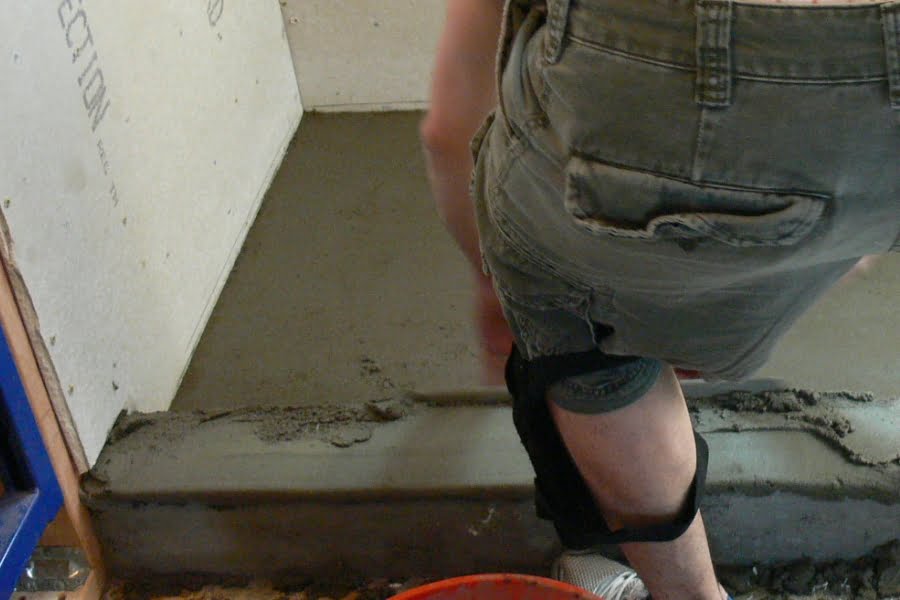
With the lower portion of the tile backer board installed, mix and place the top mortar bed of the shower pan.
This top and final mortar layer of the shower is poured directly on top of the shower liner and will serve as the installation base for the floor tile.
Plan for 2″ – 3″ of mortar for this layer. Slope this top layer the same 1/4″ to 3/8″ per foot as the bottom mortar layer. This top layer of mortar should have sufficient thickness for mechanical integrity and in general, should be at least 1 1/2 – 2″ thick at the drain. Since you have already sloped the base mortar layer which you are placing this mortar layer on top of, this layer can be a uniform thickness, depending on the existing slope of the first layer.
Adjust the height of the drain throat to allow for the desired mortar thickness with consideration for the final thickness of the tile and thin set to be installed. The final height of the tiled shower pan should just match the top edge of the shower drain and account for the desired thickness of your planned tile. If you remove the top drain grate, the level of mortar at the drain will be just below or close to flush with the drain collar.
To ensure proper slope of this top mortar bed, mark the walls as you did for the first mortar layer using a level to determine the proper mortar levels at the walls of the shower.
Once the drain height is set and walls are marked, dump damp floor mix onto the shower liner and screed smooth using wooden or magnesium float. Again, work from the back of the shower to the front. Dump the mud directly on the shower liner and screed with a straight piece of 2×4 lumber, level, magnesium float or straight edge.
Once the mud is in place and at the proper slope and thickness, smooth and finish the surface with a steel finishing trowel.
Next, place the top layer of mud over the shower curb, similar to the shower pan, directly on top of the shower liner. You can reinforce the curb mud layer by embedding an “L” shaped piece of wire mesh into this second mud layer. Use care not to penetrate or damage the shower liner with the wire mesh or tools while building this top layer of the curb.
Finally, finish the curb top surface of the a steel trowel.
You are now ready to finish the shower pan with tile. Before tiling, allow the completed shower pan and curb to cure for a day or two. See how to tile your shower here.
Applying the second (top) layer of mortar to the shower pan. Notice installed cement board is embedded into this layer, but be sure to gap it above the shower liner by at least 1/2″. 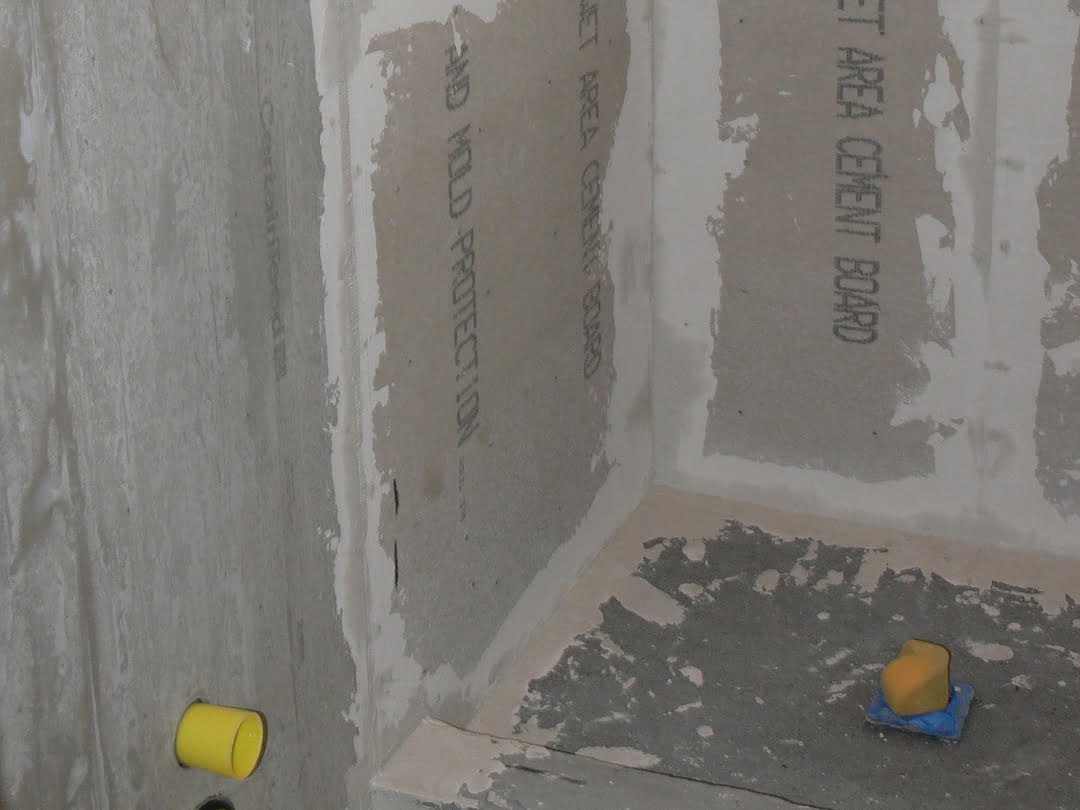
Completed shower pain and drain with installed and taped cement board. 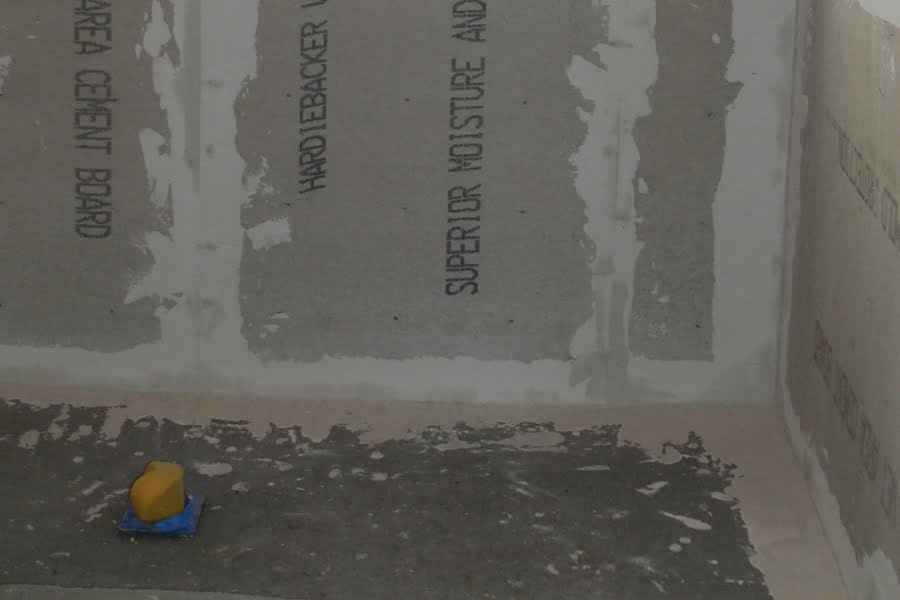
Completed shower pan after mortar cured and cement board installed. Notice pan height at drain to accommodate tile install.
IMAGE GALLERY | Build a shower Pan


Before embedding the backer board, should it be Redadgarded down to the bottom edge or should the Redgard be applied after the top mud deck is dry? I’m building a bench and a niche and feel using Regard , reinforced at the transition points, would provide the best option. I’m leary about using a topical floor so I’m planning on using a PVC liner. My concern is wicking at the wall to floor transition.
Hi Shawn,
The order of install from mud to shower liner and Redgard should be:
1. First mud layer of shower pan (the first layer, sloped to the drain)
2. PVC shower liner installed over the cured first shower pan mud layer and run up 1′ or so up the walls and over the curb.
3. Wall backer board installed (no fasteners through bottom portion of backer board that could puncture the shower liner. Some leave a gap between the bottom edge of the backer board and the top of the finished shower pan (idea is to avoid water wicking), and some will embed the bottom of the backer board in the top mud layer of the shower pan to help stabilize the backer board. If you embed the bottom edge of the backer board into the top mud layer, be sure to gap the bottom edge of the backer board above the shower liner to avoid mechanical damage to the shower liner.
4. Top (final) mud layer of the shower pan placed over the installed shower liner.
5. Paint-on waterproofing membrane (Redgard) application to walls and cured top pan mud layer (sealing the top surface of the shower pan may impede the drainage of water through the top mortar layer of the shower pan. Water which has passed through the surface tile or grout lines is supposed to move through the top shower pan layer and follow the shower liner which is sandwiched between the top and bottom shower pan mud layers, into the side weep holes of the shower drain.)
Gary
Fabulous tutorial! Thank you for this. Question for you- Just starting the planning of my shower remodel. I live in Florida and have a cement subfloor. I am planning on using bricks for my curb. How would I attached the wire mesh to the curb and subfloor?
Thanks!
Jennifer
Hi, great article! Specially because we are just about to build our own shower pan. A couple of questions if you don’t mind:
1) I was wondering what should be the minimum thickness of each mortar bed?
2) I was reading the instructions of the mud bed I intend to use and it mentions to put the wire mesh in the middle of the mortar layer. Is there a difference between putting it in the middle or under? What would be the best way?
3) For the curb, would it be fine for me to cover the wood with beckerboard instead of using the mesh and mortar?
Thanks!
Talita
Hi Talita,
Thanks for using our site. Your questions:
The liner is then laid over this cured first layer and sealed to the drain clamp. The second layer is poured (placed) on top of the installed shower liner. This top layer is typically thicker to provide strength as this is the layer that will be tiled and the finished floor layer of your shower pan. Most make this layer at least 1″ thick at the drain and again slight slope so the layer is thicker at the walls. It is true that if you sloped the first layer, all you need is a uniform layer of mortar at this top layer, as the slope will mimic the first sloped layer. I think my top mortar layer was 1 1/2″ or so at the drain and 1 3/4″ or so at the walls.
As you see in my images, I did use a wire mesh on the bottom mortar layer, but if you do, make sure the mortar fully covers it. Many place a wire mesh reinforcement layer in the top mortar layer too.
OK, good luck and have fun! Let me know if there is anything else,
Gary
How many days working how many hours per day does it take for one person to build the Shower bathroom floor. Including letting the cement dry, shower pain, and tiling of shower floor. Not including entire buildout of a whole bathroom. Just the shower part?
Hi Tim,
I would say 3 to 4 days of several hours per day. Most of the delay is allowing the two mortar mud layers to cure (each overnight). If you can pour a mortar layer on days 1 and 2, you should be able to start tiling on day 3. Here is a summary of the rough steps to building a shower pan (floor):
Day 1: Plywood sheeting over joists (if not already in place). Cut and install drain base. Blocking of stud cavities. Build curb (if using wood). Asphalt felt over plywood base. Stucco wire (if using). Pour and slope first (base) mortar mud layer. Allow mortar to cure overnight.
Day 2: Install shower liner over cured base mud layer and over curb and run up walls to a level safely higher than the curb (12″ or so). Cut out shower liner and install drain clamp and drain riser. Install tile backer board on shower walls (at least the lower course to allow the lower edge of the wall tile backer board to be embedded in the top shower pan mortar layer). Pour and slope second mud layer over shower liner and curb. Allow mortar to cure overnight.
Day 3: Tile shower pan (floor) and walls.
So my question is,
New house construction, master shower is on concrete, first layer of slop was installed then a fiberglass mesh and luquid was formed to create the shower pan. it looks like the fiberglass used to build boats. there are what looks like staples sticking into the shower from the outside through the fiber glass. what are these for as they are uniform in placement? i was going clip them off, install the lower portion of backer board and put three coats of redguard on the walls before tiling.
Hi Kathy,
Thanks for the question. Yes, fiberglass can be and is used to create shower pans. And, yes, marine fiberglass resin is often used as it is water-resistant and tends to be flexible and not crack with structural movements of your home. I would guess the staples were used to secure the fiberglass mesh prior to applying the resin. I think you plan is sound, but I would flood test the shower pan prior to moving forward to ensure the fiberglass pan is still functional.
Gary
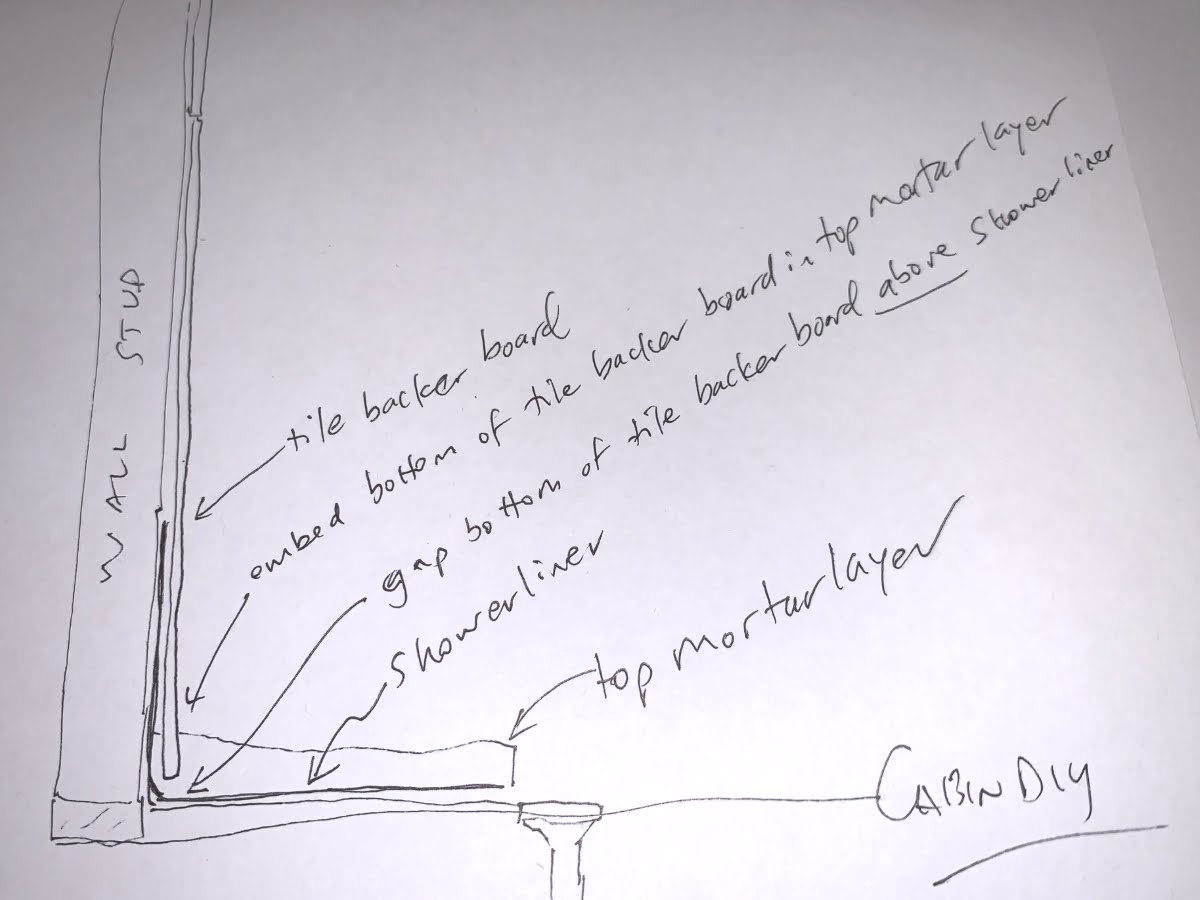
It says to embed the concrete board into the mortar then it also says to leave a half inch gap between bottom of board and top of pan liner. I don’t understand exactly what is meant by that. My thinking is that the pan liner extend up the studs 4 to 6″ above the top of the actual shower pan. so if I leave a gap, how do I embed the bottom edge of the concrete board? I hope my question makes sense! Thanks for your help!
Hi Jen,
Thanks for the question and sorry it wasn’t more clear.
The bottom edge of the tile backer board is gapped above the horizontal portion of the shower liner. This helps avoid mechanical damage to the shower liner from the bottom edge of the tile backer board. This bottom-gapped sheet of backer board is fastened with roofing nails or backerboard screws to the wall studs starting above the height of the shower liner travels up the shower walls. Once the backer board is installed, place your top mortar layer, embedding the bottom of the backer board within this top mortar pour.
Here is a quick diagram of the tile backer board gapped above the shower liner and embedded in the top mortar layer:
What would you recommend I use for the final top cover of the shower pan (on top of the mortar bed) if I am not going to tile it? We just want a cement-like surface
Hi Reldon,
Interesting question. You could just “finish” the top surface of the top mortar bed. I would probably modify the top mortar bed to include some small aggregate like pea gravel or similar and add latex and for sure some embed some type of reinforcement wire or mesh within the mixture. Straight mortar (Portland cement and sand) makes a good tile base but would not be very durable. Adding wire and aggregate should add strength and durability.
I would also make a rich (more Portland cement) mix that should be like a stiff concrete mix instead of a dry pack mortar. A more concrete-like consistency will be easier to trowel smooth, but remember that less water = more compressive strength, so keep the mix fairly dry (thick paste-like).
Once the concrete has cured, I would hone or polish the surface and seal it with a clear finish or sealer. You could also consider a concrete paint or garage epoxy finish product. Obviously, any smooth surface created using these products could create slip hazards within the shower and you may want to add grit to the concrete mix or finish. I would think carefully about the grit choice as you would want the right mix of anti-slip, foot-feel, wet durability and look. Micronized polypropylene might work. I am certainly not a concrete expert, so it may make sense to consult someone with more experience with concrete finishes.
Of course, you could just add tile and be done! Good luck and let us know how it goes. Sorry for the slow response, I’m traveling currently.
Gary
Great article. Thanks for sharing.
I am at the stage where I applying floor mud to the curb, on top of the liner.
I’m working with a neo-angle, so there are some odd folds etc. to the liner. Because of this, in some spots, the liner does not sit flat against the curb (I guess you could say their is almost a “bubble” under the liner).
I am worried that even with mesh, my mud layer is going to be unstable because the liner does not sit nicely flat against the curb. I would staple or otherwise affix it, but that would put holes in the liner!
Any suggestions? Only think I can think of is using something like the Kirb-Perfect to stabilize the top mud layer – but I can’t find anywhere that sells it where I am (SW Ontario)
Hi JM,
Thanks for the question. My initial ideas are:
Gary
my tub has a 11/2 drain. when converting to shower would it be adequate size. wall enclosing drain make it impossible to change piping unless I tear complete wall out.
I have a want to build a shower from scratch. Removed the old tub and moved everything, including plumbing to a corner of the bathroom. I want to install tile of the walls and floor. I understand all that you are stating, BUT I have an elderly mother that will be in a wheel chair very soon. Need to build a rolling shower. The house has a crawlspace and not a basement. I guess I need assistance on building a shower pan box that is recessed. I have been researching for some time and getting a lot of information, BUT I still haven’t found how deep I can build the pan box and about what is the approximate depth of the first application of Mortar?
Also, you stating that it is dry mortar – SO just add enough water to make the mortar moist and pack it down?
Thank you very much in advance of your help.
Hi Bill,
Thanks for the questions and sharing your project. Let me do some searching for resources regarding building a curbless shower. Yes, the shower pan mortar is dry pack – add just enough moisture to activate the cement. You should be able to form a ball with the mortar that holds its shape but doesn’t release water when squeezed.
Is this the type of shower you are looking to build: Accessible shower build on Houzz
Ok thank you
Here is another pic here the cement moves
Hi Kenny,
Thanks for the question. The prepitch first mortar layer is the base layer that provides slope for the liner. As long as this layer is structurally sound, a few cracks should not matter. To me the mortar looks solid and I would proceed with the liner install followed by the top mortar layer.
Gary
Hi i just build the pre picth mortar but it crack in some places do i need be concern or dont worry since i will installing a liner?
My question is about the drain its self. My plumber installed the oatey grey shower flange. It has 1/8 bevel on the flange where it meets the floor. He beveled the subfloor so it is level with the top of subfloor and screwed down. My question is how will this effect the preslope bed where it meets the flange since it is flush. they way i understand your instructions the slope should be 1/4 inch tall at the flange.
Hi Jason,
Thanks for the question. You are correct. The drain is designed to sit above the shower pan base to allow for the preslope mortar. I suspect he doesn’t build a preslope mortar layer in his shower pans. Skipping the preslope mortar layer is a big mistake as the shower liner will not be sloped to the drain but just flat on the shower pan base (subfloor). A non-sloped shower liner will tend to accumulate water within the shower pan potentially leading to leaks, organic matter growth, odors, etc., etc.
I would have this corrected and consider using another plumber. Here is a very good image showing the Oatey shower drain install:
(Diagram of Oatey adjustable shower drain and shower liner install. Source: Oatey.com)
Gary
Hi Gary,
It’s been a little while since I last visited, but I get your emails from the website when people post. Nonetheless, I wanted to offer a great solution for many who are concerned of any wire reinforcing puncturing the liner. I really try to stay away from using any plastics nowadays, but for some applications it’s a great solution. I use plastic wire mesh (sold in the box stores) for my mortar preslope and for the reinforcing in my actual shower pan float. If I don’t use the plastic wire I would always put tape over any exposed sharp edges of my cut galvanized chicken wire. I will tell you though, I just removed a bad pan failure (someone else’s) and found that over three years or so the galvanized diamond lath had completely turned to dust by the drain where the leak was.
Hope this helps!
Onga
Hi Onga!
It’s been a while, thanks for visiting!
Good advice as always. I only use metal mesh in the bottom mortar layer and not in the top layer. Plastic mesh would be a great alternative for the top mortar layer to help avoid damage to the shower liner.
Hope all is well!
Gary
Is there a video you can recommend? I like your very detailed descriptions. I’m attempting to correct a mistake a contractor has made. He build a shower where water accumulates on the side rather then going into the drain. It drains into my hallway. Now I have a difficult time trusting anyone to do it correctly. Any tips?
Hi Is,
Sorry to hear about your shower troubles. I sounds like the shower pan is not sloped properly to allow water to drain into the shower drain. If the shower pan was not sloped properly, it is very possible other steps where not completed correctly during the shower pan build.
Here is a good general overview of a traditional shower pan build using a shower liner and two piece drain: Shower pan build video
Thanks for using our site and thanks for the question.
Gary
I was noticing that there is conflicting information with regards to the ordering of the installation of the backer board and the top mortar layer. In some places it says to install the backerboard first and the add the top layer of mud; in other places (including the pictures, and the list of steps), it shows putting in the top layer of mud first, and then the backerboard. I guess either is OK?
Hi John,
Sorry for the confusion. When using a traditional shower liner membrane (as in this article), the tile backer board should be installed over (after) the shower liner is installed to provide the proper layering and water protection.
Because a traditional shower pan is created in two layers with a sandwiched shower liner membrane, the first (base layer) of mud is typically placed first, followed by the shower liner which covers this base layer and is carried up the shower walls and then the tile backer board is installed over the shower liner. Finally, the top mud layer is placed.
Other, commercial shower pan and water-proofing systems may allow for backboard install prior to pan install. With a traditional mud shower pan, backer board install follows the liner install. As long as the backer board is installed over the shower liner, your shower should perform well. Embedding the backerboard in the top layer of mud is not necessary, but likely improves the stability of the installed backer board.
Gary
Thanks for response. Indeed I wasn’t wondering about the possibility of installing backerboard *before* the liner (which sounds quite bad); instead just about the whether the backerboard is tucked down into the top mortar layer (as shown in th diagram) or not. My feeling is that’s not a good setup, because backerboard I believe does wick water, and that means it will be wicking water up the wall. Instead (after thinking and reading about it some more) there should be an “air gap” (or caulk gap, as the case may be) between the top tile layer and the backerboard, to prevent such wicking. I ended up doing that, at least. In my case I have large tiles for the walls, so there’s no concern for stability. If I was doing small tile for the walls then stability might be more concern, and I’d perhaps be inclined to do as the diagram shows. In that case though I’d probably do something not shown in the diagram – whichis to apply some waterproofing on the backer (e.g. redgard) before laying the top mortar layer, to prevent wicking up the wall.
Hey John,
You bring up an interesting point concerning potential water wicking. I would guess the significance of any water wicking up into the backerboard would depend on the presence and height of the shower liner behind the backerboard. A properly installed shower liner running up the lower portions of the shower walls should contain moisture carried into the lower portions of the backerboard. It is true that the additional moisture carried into the backerboard may dry into the wall cavity and potentially lead to problems over time.
This isssue may support the practice of waterproofing the front of the backer board (at least the lower portions that will see a majority of the water from shower use) to help prevent water passing into the backerboard by way of grout lines.
Probably the take home message is to carry the shower liner well up the wall behind the backer board. I would also consider a paint-on waterproofing agent – especially over the lower portion of the shower walls. Your idea to gap the bottom of the backer board makes sense too, with the trade off of what ever structural benefit that is gained from embedding the backer board. Interesting…
Gary
Question regarding using *both* an isolation layer (the tar paper or plastic under the bottom mortar layer) plus the shower pan liner. Won’t this form a “mold sandwich”, such that any moisture that gets between the two (either moisture from the air, or any leaks that happen to happen) ends up staying around? It seems like you’d want to have just a single waterproof layer (the main liner) and not two. Is that not the case?
I’ve seen this point made, for instance, with people who are doing the side walls of the shower and propose to use both tar paper (under the cement board) and red gard (over the cement board). The general consensus I believe is that’s a no-no, because of the “mold sandwich” effect of having two waterproof layers. Is that not the case with the shower floor as well?
Thanks for doing this tutorial. It’s like my bible for rebuilding a moldy shower.
I didn’t want to buy a whole role of tar paper for a little 3×5 space. Is 4 mil plastic enough of a vapor barrier between the subfloor and initial layer of mortar? What is the benefit of tar paper over another vapor barrier?
Thanks again,
Brad
Hi Brad,
My understanding of the tar paper isolation layer main function is to separate the subfloor from the shower pan. A secondary function is to retain water in the shower pan mud while it is curing to help it cure completely and gain full compressive strength. Therefore, using plastic sheeting should work just fine.
This is a continuation of my above post from Chris.
Before adding the 2nd mud layer, I coated the bottom 3″ of Hardie Backerboard with Redguard to prevent water weeping into the Backerboard.
In one of your answers, you said that some people put tar paper over the liner to prevent the 2nd mud layer from damaging the liner. Oatey does NOT recommend having tar paper (a petroleum product) contact their PVC liners.
I could not find a 135 degree external curb piece for patching the liner and my built in shower seat created two 135 degree external corners. I filled the need by cutting a slit in a 90 degree external corner and then overlapping and gluing the overlapped edges, thus increasing the angle to 135 degrees. I then glued this 135 degree curb piece on the inside to the liner and glued additional patches to the outside of the liner for extra safety.
For the shower curb, I did not apply the 1st mud layer since the 2nd mud layer would be structurally independent of the 1st mud layer (separated by liner). Instead of the 1st mud layer, I nailed a 5/8 to 1/2 inch thick (sloped) by 3.5 inch piece of wood on the top of the three 2×4’s. This gave me the extra height and slope that the 1st mud layer would have been provided. It was easier for me to work in wood than mortar and the result was stronger. I then bent 1/2 galavanized hardware cloth and placed it over the three sides of the curb. I nailed the mesh to the curb only on the outside. To make sure that the mesh did not contact the liner, I tied small strips of 1/4 inch Hardie backerboard to the inside of the wire mesh. I then screwed 1/2 inch Hardie backerboard to the outside of the curb to give a perfectly flat outside curb and a sharp 90 degree top outer edge. I then applied a mud layer to the top and inside curb. I used boards to keep the inside curb vertical until the mud set up.
After a few days, I applied the 2nd mud layer to the shower pan floor. For the 2nd mud layer, I put down about an inch of mud, then placed 1/2 inch galanized hardware cloth mesh on top, and the added the balance of mud for the 2nd mud layer. This may be unnecessary but the wire cloth adds a great deal of strength. Care must be taken to prevent the wire mesh from puncturing the liner.
Hi Gary
I went back to review. You complete the wall first and do the floor last. I did the opposite and placed the base of the wall tile on top of the floor. This seemed better from a water run-off standpoint.
Your way, however, eliminates the issue with the line where the wall meets the base not being as precise and seems to make for a neater line.
Have I got that right?
Thanks,
Chris
Gary
I wanted to take a moment to thank you for this excellent instructional. I have rehabbed two bathrooms in my home and am about to start a third and a fourth. The second one had a custom shower pan and I was very frustrated with the contractor who did the work. He apparently doesn’t own a framing square. “Can’t see it from my house” was his attitude which is the reason I do so much of my own work. (plus I love the work). The glass guy’s first comment was, “That pan isn’t square!” but he was able to work around it. Finished product is fine (only I know it isn’t square) but now I have the confidence to do it myself. Thanks very much.
One question on the tile work. You suggest starting a good bit from the bottom for the walls, I assume to allow for the pitch of the floor. How much of a tile do you allow for the last course? On my job the drain was in the center so all the walls started at the same height and I used tile with a flared base at the same height all around. The new job will have the drain at one end. The bottom tiles, then, are not a full height and each is tapered according to the pitch of the floor?
Thanks again.
Regards,
Chris (Mistrfix)
I see you put wire mesh in the bottom layer of morter to add strength then lay the membrane but it doesn’t show putting an type of mesh or reinforcement in the top layer?
Don’t you need this to prevent it from cracking?
Thanks for your very detailed description on ow to make a shower pan.
I am building an elongated neo-angle shower with a bench in the corner. I have attached a couple of pictures of the framing that I am now in the process of building. After I install the first layer of mud and the liner one foot up the wall, I will bring Hardie backer board down to 1/2″ to 1″ above the liner. I will also cover the bench with Hardie backer board. I am concerned about installing the liner over the irregular shape. Do I need to cover the entire bench with the liner? Would this have to be done with just one liner piece? I do not know how to secure the liner over the bench without putting nail or screws holes through it. Or after taping the joints of the Hardie backer boards covering the bench, could I just coat the Hardie board covered bench with a few coats of Red-Guard?
Thanks for your help. Chris
Hi Chris,
Thanks for visiting the site and thanks for your question.
If using a shower liner for the pan of the shower, I would just carry it up the front of the bench and pull any excess material or folds behind the face of the front of the bench. Don’t forget to slightly slope your bench top toward the center of the shower to allow for water drainage from the bench seat. Obviously you will need a few vertical framing members to support the bench and wrap the shower liner around.
Once the framing is complete, use roofing nails or screws to hold up the topmost portion of the liner. Once the liner is mounted, install tile backer board over the liner and over the seat of the bench. The shower pan liner does not typically cover the shower seat, although you could do this – just don’t penetrate the liner anywhere below the seat if you do. If the shower liner only covers a portion of the front of the bench, consider notching the front of the framing to allow the tile backer to lay flat against the framing (same goes for the shower wall framing).
As you suggested, you should allow a 1/2″ or so gap under the bottom of the tile backer to protect the shower liner and avoid mechanical damage to the liner. Next, pour your top shower pan mud layer – which will embed the shower liner in the shower pan mud layer.
Then, to waterproof the shower bench, use a paint-on waterproofing membrane (like Redgard) to cover the seat, any alcove, and all of the tile backer if you like (I covered my entire shower with paint-on membrane prior to tiling). Consider adding membrane reinforcement at the front and back corner of the bench during the paint-on membrane application. Once the paint-on waterproofing membrane is dry, tile over the walls and bench (or add a piece of solid stone for the bench top if you please) using an appropriate fortified thinset/mastic.
Good luck, and feel free to upload progress photos as you go!
Gary
Hi Gary.
I recently followed your tutorial here to create a shower pan, however I have a concern. When my husband installed the faucet he ran quite a bit of water in the shower pan (which had previously been dry for over a week) and now the shower pan is still wet. I could hear the water drain through the weep holes when it was running, but the moisture is concerning to me. It’s now 4 days later and still appears damp. Any ideas of what’s going on here/how to fix it?
I appreciate any insight you may have.
Thanks!
Jen
Gary, The knowledge you share REALLY saves us. Big Thanks and a Big handshake to you, that you TAKE THE TIME to help us with Correct information! My question is in the shower, tile on walls to ceiling. Decided to paint shower ceiling. Should I put a skim coat of thinset before paint? Also, latex or oil base? Thank you, again for your time and help. Rick-O-Matic
Hi Gary,
As most have mentioned here you have one of the most comprehensive tutorials on the web so thank you for that!
I didn’t see this answered in previous comments so hopefully I’m not being repetitive: do you use the same mix for both morter beds? For the base you were pretty explicit about the mix needed but I’m not sure about the one poured over the liner.
Thank you again for what you’ve done here. So helpful!!
Jen
Hi Jen,
Yes, same floor mix mortar for both the below and above liner beds.
G
Can i put the first layer of morter mix ontop of the backer board i already have on the floor? Underneath that is plywood. Would it hurt to just start on top of it like it were the plywood. Or would that cause an issue? Thanks so much
Thank you so much for the tutorial! I built the pan and am now ready for tile.
When I put the liner in I did not do a flood test. I am wondering if there is a way to do a flood test at this stage. I just tried but realized that it will not work because of the weep holes. I hear the water moving into the drain so it appears I have well functioning weep holes! I had my inspection the other day and told the gentleman I would do a flood test. Any thoughts on how to go about it?
Hi Elmer,
You could use an inflatable drain plug that would be easy to position below the drain. You may need to check with your local inspector to ensure testing after your mortar bed is installed is acceptable.
Gary
Thanks so much for the tutorial.
I laid my first layer of cement recently and have a problem. My pan is crumbly and somewhat sandy. Portions of it seem solid, but there are spots that have crumbled away with minimal coaxing. It seems I might have not gotten the mix wet enough or not compressed it enough. I have attached a picture that shows what it looks like after brushing and vacuuming off.
I’m thinking I could fix this with some sort of thinset.
Would that be a reasonable way to fix it?
Hi Elmer,
Thanks for the question and photo. I would guess maybe the mortar mixture was not as well mixed as it could have been (some sand not coated with Portland cement maybe) and mixed a bit dry. Obviously the best fix would be to bust it up and start over, but if most of it is stable and solid, you could likely get away with removing anything loose and patching it with additional mortar mixed with latex admixture instead of water. Latex concrete admixture is available at tile and home improvement stores and when added to mortar will increase adhesion, flexibility and strength. I would mix this mortar a bit wetter so the end mix is the consistency of thick peanut butter.
As you suggested, you could also try a latex fortified thinset. No matter the mortar used to patch, I would paint the areas to be patched with the latex admixture straight out of the bottle prior to patching, this will likely improve the adhesion of the patch.
When considering whether to patch or replace, consider the job of your shower base. It will need to withstand daily use with temperature changes, foot traffic and likely some movement from you buildings forces. If you have any questions of it’s soundness, bust it out and do it right. If you do start over, I would suggest adding latex admixture to your mortar – maybe substituting 50% or more of the needed water with latex. And remember to thoroughly mix the dry components prior to adding liquid – you want each sand particle coated with cement prior to adding water.
Good luck and let us know what you do!
Thanks,
gary
Thanks for your reply Gary
I think I will try the patching method. I will use more admixture this time around, last time I used it for maybe 1/4 of my moisture needs. I will also brush up on my mixing process! Thanks. I will let you know how it goes.
Hi,
I am currently having work done on 2 shower pans. After coming across your site I now have questions for my contractor. My first bathroom has been completed but I now understand that a shower pan lining was not used. He has assured me that by using quikrete hydraulic water stop cement that I will not have issues. He mentioned he did his home this way 10 years ago and has had no water issue. Is it possible to not have water problems when not using the shower pan lining? Im concerned about my showers as the second one is now in progress. I’d like any feedback you have. Thanks.
Hi Aman,
With one very limited exception (see below), every residential shower pan must have a waterproof lining system – either a waterproof membrane embedded in the mortar pan (vinyl shower liner, hot mopping, copper or lead, etc.) or a topical waterproofing system (Kerdi system, paint-on membranes). Section P2709 of residential building code addresses shower receptors (shower pans) and P2709.2 specifically addresses Shower Receptor Liner requirements:
P2709.2 Lining required. The adjoining walls and floor framing enclosing on-site built-up shower receptors shall be lined with sheet lead, copper or a plastic liner material that complies with ASTM D 4068 or ASTM D 4551. The lining material shall extend not less than 3 inches (76 mm) beyond or around the rough jambs and not less than 3 inches (76 mm) above finished thresholds. Hot mopping shall be permitted in accordance with Section P2709.2.3. The completed liner shall be tested in accordance with Section P2503.6.
There was a recent change to P2709.2 liner requirements that applies only to a very specifically designed concrete shower build that is incorporated into a concrete floor. The recent building code changes also require flood testing of all shower pans.
I would be very concerned by the proposed lack of a shower liner or topical waterproofing system. The proposed build by your contractor is likely not code complaint and a set up for future water problems.
Gary
Hello,
Thank you so much for providing this invaluable public service!
My contractor installed fiber cement board on the floor of the shower area, and was planning to tile right over that, with no slope, no waterproofing, nothing. I was lucky enough to see this tutorial in time, and stopped him from tiling, and now I’m going to try to ask him to follow these instructions. Do you think it’s necessary to ask him to remove the fiber cement board, or can we just proceed as you would over plywood, with a layer of asphalt felt, wire, then the topping mix, etc.?
Thanks again.
-Joan
P.S. I neglected to mention that I’ve already had a plumber install the bottom half of the drain, with the fiber cement board in place. So that may complicate matters. I wish I had thought to ask this earlier…I guess I was just hoping it would be okay to proceed as-is. Please let me know what you think. Thank you! -Joan
Joan,
You will need the base of the shower drain installed prior to building the shower pan, so no problem.
Feel free to attach some photos if you like.
G
CDIY
Hi Joan,
There is no problem using cement board or similar as the base layer for your shower pan.
As you point out, it would be a huge mistake to proceed without a properly built shower pan – one constructed without a sloped shower liner.
You can also reference this excellent article for proper shower pan construction:
Shower pan construction br the floor elf
Be careful and have it done right or your shower will leak.
G
CDIY
Great info here. Given me reason to pause my project and consider next moves.
Straight off the top, I’ve made some mistakes that I don’t think I can go back on. I installed 1/2″ backer board directly to the studs prior to liner installation, then poured a curb directly against that backer board. So many mistakes. Really hoping I don’t have to demo the curb and pull the backer board.
The question then becomes: can I pour a pre-slope up against the installed backer board, lay down multiple coats of Redguard on the entire pre-slope and walls up to the ceiling to create a waterproof membrane, then pour final slope, then tile, or is that too risky from a waterproofing standpoint? Redguard ‘supposedly’ meets the same standards as rubber/vinyl, but is this inner-liner idea an acceptable method? Better question is: would it pass inspection?
Also, what is the recommended minimum & maximum thickness of the pre-slope at the top edge of the drain base? Clearly the thicker it is, the higher up the walls the outer rim of the pre-slope will end up, which will also increase the curb height requirements.
Regards
Adam
Hi Adam,
Thanks for the nice words and thanks for sharing your project with us.
Regarding your shower build so far, I think you have a few options. You could do exactly as you suggest and use a paint-on membrane product to waterproof your shower pan and lower portion of the walls. If you do go this route, I would recommend several layers of the paint-on membrane and consider using anti-fracture reinforcement tape for waterproof membranes. If go this route of the paint-on membrane, I would recommend painting the walls as well – I like the idea of carrying up the moisture barrier all the way up the walls, and make sure you cover any coves or cutouts in the shower walls. Also, check to insure the drain you are using will work with paint on membranes – remember most drains are designed to clamp to a vinyl membrane.
Another option is to cut and remove a lower portion (say 2 feet or so) of the tile backer board and then install a traditional shower liner and then reinstall the cut out backer board. Because you have already embedded the backer board in the first mortar bed, in addition to cutting the board a the height you want to remove, you will also need to cut it out of the first mortar bed. You could do this using a flush cut style saw (protect against silica dust – use a mask and vacuum as you saw) or by thoroughly scoring and smoothing any proud backer board above the mortar layer. This surface must be smooth prior to installing the shower liner to prevent damaging the liner.
Once the backer board is removed, install a tradtional shower liner. Remember not to use any fasteners in the lower portion (at least the height of the curb, but ideally a bit higher like 6 – 8″ or so) that would penetrate the liner and allow water to pass through the liner. Prior to installing the liner, consider notching out the front of the studs to accommodate the thickness of the shower liner and allow the backer board to lay flat once installed over the liner. After you have reinstalled the backer board, make sure to reinforce the top seam of the cut backer board with the appropriate backer board tape and cover with thinset. You may need to trim the to-be-installed backer board pieces so the reinstalled backerboard bottom edge is gapped above the shower liner. Do not install the backer board directly on top of the shower liner as it can rub on the liner and create penetrations to the liner. Now when you pour your top mortar layer, the backer board will be incorporated into the mortar bed.
Once you have completed the above fix and the top mortar bed is complete, you could then apply a paint-on membrane product (like Redgard or Laticrete Hydroban) to the backer board walls, especially over the lower portion and carrying it up over the newly created seam. This should help prevent any issues with the lowish horizontal seam from patching the backer board.
Regarding the thickness of the mortar beds at the drain:
Hope this helps. Attach some photos if you like.
G
CDIY
Thank you for all the advice!
I’m removing the backer board around the bottom perimeter. I didn’t install blocking around the perimeter behind it, so this will also give a chance to do this and really get a *mostly* proper start, which will ultimately lead to a longer life for the shower (thanks to this site!). I also need to pull the drain and drill a larger hole and lower it an inch so it sits flush with the backer board. Now knowing I can go as thin as 1/4″ with the pre-slope at the drain means it time to modify the plumbing. Fortunately I have access from below.
To clarify, I didn’t pour the pre-slope yet but I did form and pour a very solid curb once the backer board was installed, so I have to cut and smooth around the curb to remove the backer board. I will then block the perimeter and pour my pre-slope right against the already-poured curb. FYI, for the shower floor I used 1/2″ backer board on top of the original 11/16 tongue & groove sub-floor, so it’s quite solid.
Question: For my pre-slope is the metal mesh/lathe all that imperative, as I’m not planning to carry the pre-slope concrete over the top of the pre-formed curb? I can’t staple it to anything since the floor is concrete backer board and the curb is already fiber-reinforced concrete.
Any additional advice you can give about the folds and/or cuts in the vinyl liner up and over the curb? Seems like it’s going to be tricky to make that work, and I don’t want to cut the liner excessively if I can avoid it. Does vinyl adhesive stick to concrete backer board?
Regards,
Adam
Hi Adam,
I think removing the lower backer board is a good plan.
Yes, in review I would:
I would also review these two excellent articles on shower pan construction:
Shower Floor by The Floor Elf
How to Build a Shower Pan by The Family Handyman
G
Hello,
I ordered the same drain assembly you used for this project, thinking it would have a pretty ornate metal face plate like the one shown in the closeups, but it does not! Can you please tell me where you got that nice face plate? I know it has been a few years since the original post, but thought it was worth a shot.
Thank you,
Joan
Hello Joan,
The drain is the Kohler K-9136-BN square design tile-in shower drain in brushed nickel. You can find it on Amazon. My drain does not have necessarily have an ornate design, but does have a very solid, clean appearance.
Gary
Don,
I wanted to add a bit more to your questions. I understand your drain questions and yes the pebbles (hopefully rounded) to not puncture the liner are still used. There isn’t much of a difference between this drain prep and a regular shower with a standard drain. You mentioned you would float the mortar up to the top surface of the linear drain after you slipped in place? You would be leaving room for tile yes?
Regarding mastics and thinset. I might first answer that question and say mastic is junk, but that would be terse and probably not true. Actually I love mastic because you don’t have to mix thinset and there is almost no waste.
Just don’t use in a wet environment unless it’s okay by the manufacturer and even still make sure it’s completely okay.
Good luck it sounds like you know how things work and are probably quite skilled.
Onga
Gary. Onga,
Hats off and many thanks for all of the great info and your time! Having taken the time to read all of the questions posted and your answers I do still have a couple of questions.
First, I would encourage folks to read down through all of the questions asked previously as there is a lot to learn and many of the same questions have been asked and answered many times.
That said, please forgive me if I missed seeing my questions that have been answered previously.
I plan to use a linear drain and the top edge of the drain (finished tile height) will be roughly two inches above the rough in drain. It’s a slip fit into the rough in drain. My question
/ concern is how this will impact my pebbles placed around the drain for the weep holes to function. They will be covered by nearly two inches of mortar. Can you point me to or provide some details on how to do this correctly?
The finished drain will be at the far end the shower (six feet) which is also furthest from my curb. So I will be installing a simple one direction slop albeit a long one. The drain is located about three inches from the opposing wall so my thought is to run my first pre slop to the the beginning of the drain flange but stop there.
Believe I have to do it this way so I can then install my liner, clamp it into the rough drain and then slip in the linear drain with the height adjustment feet carefully setting on the actual liner??? Then install my second and final mud bed and capture all of it while bringing it up to the finished edge of the linear drain.
I fully understand all of your previous guidance given and correct material layers/process.
Next, would you please provide your thoughts on using Mastic versus thin set for setting tile?
I’ve had great success using premixed Mastic in the past but may just be lucky to date. Seems to have better adhesions, especially on vertical and overhead applications and is much easier to use although a bit more expensive. I have used thin set in mostly floor applications where I needed to account for some small amounts of leveling when installing the tile.
Many thanks from the guy that says the more I know the more I realize I don’t know.
Sincerely and best regards!
Don in KC
Hi Don,
Thanks for the nice feedback and questions.
Let’s start with your last question first – mastic vs. thin-set. Thin-set mortar is mixture of Portland cement and sand (and additonal additives depending on the product) used as a tile adhesive. Thin-set mortar is intended for use in relatively thin beds of 3/16″ or less – hence the name. Because thin-set mortars are concrete products that cure water resistant, they are well suited for areas of high moisture exposure (showers, bathrooms, etc). Latex fortified or other “modified” thin-set mortars simply add a polymer (like latex) to the mortar for improved bonding, plasticity, flexibility and strength. These fortified thin-set mortars are excellent for applications requiring excellent bonding (shower walls, ceilings, etc), durability (exterior) and over more difficult substraits (plywood, etc). I used a latex fortified thin-set mortar for this shower install (Pro-Flex Platinum fortified thin-set mortar from The Tile Shop.
Mastic generally refers to liquefied organic adhesives that can be used to attach tile and other materials (think construction adhesive). But, because these compounds are organic, the tend to not stand up to wet environments and can support bacterial and mold grow. For these reasons, tile mastics should generally not be used in wet areas (bathrooms, outdoor, etc).
Regarding your shower design and linear drain, I would carefully read the install instructions from the manufacturer, since there are many different designs. That said, if you plan to have your drain location not against the wall, but close to it, you should typically have slope on both sides of the drain – that is one long slope from the far wall to the drain and a short slope from the near wall to the drain. Without knowing more about which linear drain you plan to use, it would be difficult to guide you on membrane install. Regarding protection of weep holes on the drain, the concept is to add a coarse material over the weep holes (like pea gravel or tile spacers) to keep mortar from directly filling in the weep holes. Even though the mortar will let moisture pass over time, keeping the weep holes mostly clear of mortar improves water flow through the weep holes into the drain. I would email the drain manufacturer if the install instructions are not perfectly clear.
Enjoy and good luck!
You explained this how to build a shower pan very well. I am about to finish mine. Thanks for sharing.
Hi Gary,
Thanks for the site. Really useful.
I’ve noticed that most of the cutaway graphics I’ve seen show the first layer of pre-slope packed beneath the lip of the drain flange, so that the flange sits flush with the first layer of pre-sloped mortar. Unfortunately, I installed my drain before seeing this, and have inset my drain flange flush with the subfloor. What should I do in this case? Can I run the pre-slope up to the edge of the drain, using just enough mortar at the edge of the drain to cover the metal lath? If I do this, then the edge of the pre-slope will be slightly higher than the drain flange. I’m not sure if this is a problem. Let me know what you think.
Thanks for the info! From all the various websites and blogs I have viewed, your method seems to include most of the best practices everyone seems to agree upon. There is one area where I am really having a tough time deciphering which is the “correct” method (if such a thing exists).
The issue is, do I embed the concrete wallboard within the top concrete layer, or do I lay the top concrete layer first, and then place my concrete wallboard just above that? I understand the argument of stability, as you are unable to screw the wallboard below the liner, but I have also read that this can cause the water to be “wicked” up the concrete wallboard. I know you have addressed this both in the tutorial and the comments, so sorry for the repetition. I guess my question is, what is the argument against laying the concrete wallboard above the top concrete layer of the shower pan? Thank you!
Hi Dom,
Thanks for the nice words and using the site.
Regarding the question of whether or not to embed the shower backer board into the top mortar layer of the shower pan, I would offer the following:
1. The concept of gapping installed panels above a flat surface is probably more relevant for water sensitive materials installed over areas with potential for standing water (plywood installed over a flat slab for example). A properly sloped shower pan should move water away from the walls and shower backer board should not be harmed by exposure to water.
2. Many of what I consider to be “expert” resources suggest embedding the backer board in the top mortar layer. Here is a great graphic courtesy of the excellent resource Fine Home Building: Shower pan cutaway from FIne Home Building Magazine
3. If you embed the backer board in the top mortar layer of your shower pan, remember to space it above the shower liner. This will help prevent mechanical damage to the shower line with any wall movement.
4. With a properly installed shower liner (installed well up the base of the shower wall, behind the tile backer board), any potential wicked water should be contained by the shower liner and not present a risk to the wall or shower structure.
5. Gapped panels may affect the stability of the backer board may adversly affect the installation and performance of shower tile.
So, in summary, I would embed the backer board.
Thanks for the question,
Gary
Afternoon Sir,
Thanks for the great tutorial. I have a few questions and need some assistance. I had my shower hot mop, sloped and tested. No leaks and tested with water for a few days before inspection. Do I need a metal lath to finish the mud deck and dam or to do without it? Please advise.
Afternoon Sir,
Thanks for the great tutorial. I have a few questions and need some assistance. I had my shower hot mop, sloped and tested. No leaks and tested with water for a few days before inspection. Do I need a metal lath to finish the mud deck and dam to do without it? Please advise.
Hi Tom,
I will answer you a bit and I am sure Gary will respond soon. If he is busy and doesn’t please feel free to ask more details. I will try and keep it short.
Yes to the wire or mesh. This acts as a re-bar to hold the mortar together. I use Mapei lath (plastic lath) over my waterproofing so their is no threat of compromising the vinyl or in your case hot mop. Make sure the hot mop didn’t block your drain weep holes (these need to be open).
when you do the metal lath on the curb you can use expandable metal (diamond lath). Just measure and cut it to fit, then fold it as if it was a glove that will slip over the shape of the curb. I use tape on any exposed edges so nothing sharp can puncture the liner.
If you don’t have experience floating then you can probably get away with doing a heavy skim coat over the entire curb and wire. DO NOT USE staples, screws or anything to puncture the waterproofing. After you cut and form the curb it should fit snug over the curb and with the mortar skim coat it will be held in place.
One last question: Is your wall paper over the hot mop? It looks as though it is, but just wanted to ask.
Good luck, Onga
Hi Gary,
This is a picture of the second mud pan of my shower. A thin top layer of the concrete crumble off. I’ve read through your post and understand that latex thinset mortar could help smooth out the surface of the mortar bed, after rolling on a layer of primer? Is that correct?
Thank for being so helpful to all of us diy-ers:)
Nga Phan
Hi Nga,
Sorry I am late getting back to you. Have you finished your project yet? If so, what did you do with the shower pan surface?
Looking at your photo, it’s clear that the shower pan surface is quite irregular and patchy. This surface would be hard to tile over and likely fairly unstable as it looks brittle. I would guess that your mortar was too dry and not completely packed when you applied it. If the surface is still in this condition, I would remove as much of it as I could and re-apply a uniform, properly-mixed mortar layer. Latex may help to strengthen the layer, especially if it is somewhat thin (it appears thin in the photo).
Another option may be to lightly tap the mortar with a hammer to loosen any brittle sections of the mortar and then apply a topping layer of a latex-fortified thin-set to create a smooth surface. Let this thin-set layer dry overnight and then apply tile. I would only do this if most of the top mortar layer is fairly solid and sound (it doesn’t appear very solid in your photo).
Sorry for the delay in getting back to you, I hope you found a suitable solution. Let us know what you did if you like, or if you have further concerns.
Gary
Gary,
I’ve read through most of your responses – and haven’t seen my issues. I’ll start with what I did; 3/4″ subfloor, relocated the shower drain, patched the hole, added 1/2″ plywood, tar paper, wire mesh, custom float needing mortar @1/4″per ft,[that was after the 1st attempt failed when I stepped on the pan and it cracked where the old drain was] liner, lastly – top mortar. That was ~ 3-months ago and as you can see from the photos – I have cracking yet again – along with ~ 1/8″ of vertical movement between the top layer and the liner. The shower is 66″L x 42″ wide, utilized (3) 2×4’s for my curb, and plan on having a bench 42″ w along back wall.[I believe I made a mistake here as well – as I didn’t frame it prior to the liner install and already glued the Durock to the back wall. My thought here is to sister additional 2×10’s to the joists below and adding cinder blocks for the bench. Please advise as to what you would do in this situation moving forward.
Kind Regards,
Garth
Hi Garth,
Thanks for the questions. Unfortunately, your images didn’t get uploaded (try it again using the “Choose File” button above the submit comment text block field), but I will try to answer your questions based on your explanation.
Regarding the separation between the shower liner and the top mortar layer, I suspect this will not be a significant issue. Depending on the size of the floor tile you plan to use, you should have no issues with installing tile in a thin set mortar bed over this retracted mortar. As long as the shower liner is intact and uninjured, I would move forward with the top tile layer.
Depending on the size of the gap between the retracted mortar and walls, you may want to fill the gap with thin set mortar and allow to dry prior to laying tile. Just be sure to not injury the shower liner when filling in with thin set. Use a soft tool to spread and level the thin set in the gap (like a grout float or a kitchen spatula) to avoid tearing or puncturing the shower liner.
Regarding the bench question, I think you have some options. I would simply waterproof the backer board using a paint-on product like Hydroban by Laticrete or Redgard by Custom Building Products. To build the bench, I would strongly recommend using one of the Better Bench trays from Innovis (http://www.innoviscorp.com/better-bench). They install easy and will provide you with a very strong, durable shelf style bench with the benefit of not losing any floor space as you would with a cinder block bench. I used the corner bench from them for this shower (see How to Tile a Shower – https://cabindiy.com/how-to/tile-a-shower/.
Upload the images if you can and we can continue our discussion.
G@cdiy
Should you use wire mesh in the second layer of mortar or only in the curb?
Cody,
Yes you will use mesh in the mortar above the shower pan liner. The first layer is for pre-slope and is under the liner. The second layer of mortar is above the liner and will be the most sensitive. If you have any sharp edges keep it away from your liner because IT WILL puncture it and you will get a leak. If it’s easier for you they sell plastic mesh and that would be recommended. If you use the wire mesh, just tape the edges and you need wider tape to have it stick to itself over the sharp edge. I hope that makes sense because it’s usually difficult to explain with out photo’s or in person.
One last thing, don’t put the mesh directly on the pan liner. Put a very thin layer of your dry pack mortar then the mesh.
Good luck,
Onga
Hi Cody,
Thanks for the question and thanks Ogna for the reply. You can use mesh on any of the mortar layers. Some build the pan without mesh in either the base or second layer of mortar. Dry pack mortar (the type of dry mix mortar used for shower pans), should be fairly stable with or without mesh.
The benefit of the mesh is strength and stability. The downside, as Ogna points out, is the risk of damage to your shower liner. Consider the size of the pan and other potential factors when deciding to add mesh within the mortar layers and if you do, be very sure to protect the shower liner.
Gary
Dear Onga,
I’m so glad I asked, as I probably wouldn’t have used the right glue and caulking! Thank you for the fast reply.
The pan liner does go up just to the height of the curb, and at the curb, it is cut to continue on over the curb to the bathroom floor. I used a generic adhesive sealant (rated for rubber as well as plastic and cement) to attach the liner to the base concrete layer, and it didn’t seem to seal too well, but since some versions of instructions didn’t call for any at all, I wasn’t too worried about that part. It did seem to seal the liner very well to the drain. But I will use the approved materials for the seam, now.
I can see why the corner patches at the curb would be important. I was worried that the cut there might tear, so I put a small strip of duct rape at the curb edge cuts to hold it against tearing until the later materials held it more fully in place. I will redo those corners with patches.
Thank you again!
Anne
Anne,
I will try and help you because I am figuring Gary is busy. The position you are in doesn’t seem detrimental, but again it’s not ideal. Does the pan liner at least go to the curb height? If it doesn’t then I suggest you pull it out and do it over. If it at least goes to the curb height then you could patch in with the same material. Go roughly 4 inches higher than the rough curb height with the patch. When you attach the new liner material you will do it 2 ply. Use the compliant glue (weld) material to adhere the patch and only do a wall section at a time. Do it like a dry mount and apply with a roller on the patch piece and also apply it to the existing liner. let it dry for roughly 2 minutes and then attach them together. They should weld tightly and have no area that separates,
Continue this process around the shower from curb edge to curb edge. After that welding method is done and cured (fully attached) you will seal that seam with the compliant caulking.
Make sure you use the weld glue and caulking sealant that complies with the liner material. If not some chemicals will completely break each other down if your not careful.
Try and buy some outside corners to patch over the inside curb after putting the liner patch on the wall. If not at least cut some liner material and make your own patch. Use the same glue (weld) to attach the curb pieces and finish with the adhesive sealant.
How did you attach the liner to the drain? Did you use an adhesive sealant?
Wishing you luck,
Onga
I was feeling really good about my progress today — thanks to your really good instructions — until I realized I made two mistakes. One seems pretty major, and I’m looking for the best way to remedy it.
I put the wire mesh reinforcement in the second layer of concrete instead of the base layer. I hope that isn’t a big deal.
However, I only ran the liner up about 4 inches from the base layer, instead of the recommended 12 inches.
I used a spacer board to be able to lock the backer board in later, because I didn’t have the backer board available yet when I was doing the mortar. That means that the top edge of the liner is still accessible. I was thinking that I could take a 10″ strip of liner and use a mastic (caulking) to seal it along an overlap of about an inch. Then I would fit the backer board into its slot, and it would compress the overlap section. Would that work to prevent the risk of water wicking above the current upper edge of the pan? Or is my mistake not as big as I fear, and I can leave it as is?
Hi you added a mesh on your curb the second time when applying the mortar. I haven’t attempted to do this yet but I’m wondering if it will be a bit unstable not as solid as I’m thinking it should be because there are no nails fastening the mesh. Second question if I were to make a bench in the shower does underneath the bench has to have the pre slope? And would I apply the same method as the curb in terms of felt paper/mesh/mortar/ rub membrane/ mortar and mesh? 3rd question when all set and done what is sealing the screw holes and corners?
Thanks
Dave
Hi Dav,
Thanks for the question. The wire embedded in the second mortar layer for the curb is intended to provide strength to this layer.
Given the “U” shape of this concrete layer, it should be very stable even without fixing the wire to the framing. Fixing the wire to the curb framing would require puncturing the shower liner and potentially lead to leaks.
Sloping the underside of a shower bench (or a shelf), in theory, makes some sense – especially if you expect that surface to get wet.
If using the Better Bench system that I used, you do not need to slope the underside (and really cannot). The system uses an aluminum tray that you fill with mortar. The underside will be the outer surface of this tray. The system does not require the same layers as the shower pan – no tar paper, shower liner – just mortar and tile.
Regarding your question about sealing the screw holes and corners; if you are asking about the screw holes for the Better Bench mount, I used silicone caulk around and into the screw anchors before inserting and tightening the screws. If you are asking about sealing the screws and corners of the tile backer board of the shower walls, I applied paint-on waterproofing membrane.
I know from reading your comments that I goofed and hung the cement board before the liner. I will fix that. My drain seems high? I did about 1 1/2″ of mortar for the sloped base layer. What comes next? I put down mesh and was going to do another 1/2 inch layer of mortar just to embed it. Then after that dries, put the liner and another inch of mortar? I thought I did my research but this is really kicking my butt! Maybe I should unglue the drain and try to lower it and skip the mesh, go right to the liner and last mortar layer? My curb turned out awesome so I don’t want to lose that by such a thick mortar bed.
I later added 2 layers of mesh tape on the curb and on every corner. Mesh tape is a good thing it really adds durability. And that dud put the p trap too tall it exceeds the ceiling high. So I have to ask drywall finisher to add a “box” to make up extra space. So my ceiling is not flat anymore. The tile work is beautiful.
this is after two coats of Redgard, do you think I can get a way with that? They applied one layer. I bought another galon and applied one more coat myself over night. I just can’t sleep with one coat of Redgard!
here is the drain part. do i need to paint this part? I am afraid the water will sweep into mud pan. But good thing the nail is on the upper slope. He didn’t water test it, claiming he have done this for 13 ys. But I guess he didn’t put nails down on the pan liner in many of them.
Hi I let go with my first contractor. Now my second contracor is working on my room. It is almost done. But my mind is not at peace. He did flip the old mud pan to subfloor and used oriented strand board OSB as the subfloor. then he put first mud pan, then liner, then second mud pan. And from this point some things concerned me. 1) He didn’t flood test the pan liner. 2) He used 1/4 Hardiebacker on the 60 in wall (He used up 1/2 in hardiebacker on other side of walls). And I guess the 1/4 board is too flex so he put 2 nails at the very bottom of the board, literally touch the pan floor! I didn’t see the nail until it was too late. 3) he used treated wood as curb which I don’t know if it is ok. But he then put hardieback on 3 sides of curb and put nails down all over the place. When I saw the nails on the bottom of hardiebacker it was too late. two mud pans are already there. And he paint shower pan and walls using Redgard. I don’t like the pan liner-mud pan-Redgard idea because people say it traps the water inside the mud pan. But because he put nails on the pan liner, there is no way I can sleep well knowing that the integrity of the pan liner is already broken. So here is the questions, will two layers of Redgard be OK? Also I don’t know if I need to pain the drain part. Because water can easily sweep into the mud pan if I don’t paint it….By the way, he turned a fan on all night for the second mud pan and only waited 18 hours before applying the Redgard. Please help me and give advice…. Thanks a million.
Gary
On your photo of the completed shower pan at top of this discussion there is a tan-colored border on the floor where the walls meet the pan. Is that some type of sealer?
Hi Troy,
I believe what you are describing is a layer of thinset over cement board seam tape that I used at the corner of the cement board wall and the shower pan. I added this for some reinforcement at the base of the shower wall.
G
Thank you … I’ll do the same on my project! (You’ve provided some GREAT info on this site!)
Thank you so much Onga. I wil try that route( i.e. find someone else to finish the job). Thanks.
Vicky,
Most things that I see in the photo’s are concerning to me. I am not saying that your tile guy doesn’t care because to a certain degree it looks as though he does, but most things that I see are not even close to normal protocol. The things that you mentioned in the beginning of your message were really impressive and spot on. You called the manufacturers and got their professional advice regarding their products. These are the “BEST” people to talk to and usually you only listen to them or other professionals that use these resources. Meaning tile people that call their product technical supports. Here is what I would do if I were you. If there is any chance you can contact a “reputable tile contractor” in your area and have them finish this project that would save you from failure down the road. The reason I say this is because I don’t see much success with almost everything I see in the photographs and from your conversations with the technical support. I wish you luck and will leave the rest to Gary because I will be on the road for the next week.
Good luck,
Onga
“He did say that the upper concrete layer had a crack and has to be replaced.” what I meant is the old concrete that was originally above the black layer. The crack, according to my contractor, is pretty long, like goes across the shower pan(~30in side). I am not sure if this is from the forces he used during demolition or it was already there. My contractor thinks it was already there before demolition.
the right side stud, notice it is behind the ceiling edge. How to reinforce this stud?
the drain
left side of the curb, damaged as well.
the crack between the curb and wall, it is from demolition of the bathroom. is this fixable?
Hi Gary and Onga. Thanks for your comments. Here is the update. My contractor used Redgard uncoupling mat as the shower liner. This layer was on top of the Hardiebacker shown in my last comments. And on top of the mat he put Hardieback using thinset as bonding agent. I contacted both Custom Building who makes the Redguard mat and James Hardie who makes the Hardiebacker. Both said their product should not be used in a shower pan. Custom Building suggested using Redgard liquid membrane as pan liner. So this morning I was at HD trying to buy some pan liner and happend to talk to a HD associate who, according to his coworker, was a builder and is very experienced. He agreed that Redguard mat should not be used in a shower pan but he thinks Hardieback should be ok to be used in as shower pan. He showed me a demo on his desk. The demo was a glass bottom inside it was a small piece of Hardeieback submerged in water. Their is a label on the bottom indicating the Hardieback was put in water on 2012. He pointed out that the Hardieback is still intact with no degradation or disintegration or anything, So he think Hardieback is ok to be used in shower pan. But I now think the water they used in the demo probably is distilled, super clean water, not the everyday tap water mixed with soap, dirt and heat. Also, this associate thinks the black thing in my photo is pan liner. It is thick and when touches it plastic/PVC. I don’t know how the tart-felt membrane should feel like. I was really confused. I attached some photos here for you to look at. The pink, fabric like thing is the Redgard mat and the gray board above it is Hardiebacker. He used two 50 lb bucket to add the weight to help the thinset to bond. The stud inside the shower pan is for temporary shape only. I noticed the curb is a little damaged I am not sure if this is going to be an issue.
Regarding the black stud, he didn’t do anything. I don’t even think he knows how to bleach a stud. Is there a way to do it without take off the newly added stud? For the structure, I am not sure if I understand Onga’s comments. Are you suggesting to add some horizontal stud in between the vertical ones, just like how Gary did in his photos? I am not sure if you can see the right side stud, the far inside one. It was actually three pieces joined by nails, not even a whole piece wood. It is certainly not stable but I don’t know how to reinforce it. One photo shows how it is behind the ceiling so I can not add a stud in front of the old one.
For the draining, it is a new one because he said the old one was very loose, indicating the leaking could be part from plumbing problem so he replaced it. don’t know how he did it… I took a picture of the new one. He also replaced the U shape draining pipe. When he took the old draining away, I got a chance to see the cross section. Beneath the black “tart” paper is a concrete/gypsum layer with wired mesh in it and under this layer is wood. I don’t know if this original concrete layer was sloped or not. I don’t know how the subfloor is constructed because he didn’t go that far. He did say that the upper concrete layer had a crack and has to be replaced. I am worried the crack indicates the sub floor is not flat. Sorry for the super long questions.
Vicky,
I have a question or two in addition to Gary’s follow up to also help protect your new shower investment. In the first post and the first photo, what is the black stuff on the wall and wood? If that is mold he should at least spray bleach or a like chemical to try and kill the mold before covering the wall back up. Second to this what is he doing by installing a new wall on top of studs (vertical wood) that are facing flat (wrong direction). I know these are original, but that is not a suitable structural application for a shower wall. If he plans to do something to reinforce these flat studs then that might pass, but if he doesn’t that won’t be a strong enough surface for most types of tile.
Lastly? Why is that old pan liner (black or gray) being left in place? Is the same drain being used? If the drain was changed out are there any weep holes exposed and ready for the new shower pan preparation? There are too many questions with this application so far and I am concerned for your new investment. Can you send another photo of the drain so we can see if he is doing this even close to proper.
Thank you,
Onga
I bought some stud from HD and insisted my contractor to add to the bathroom. But I have another question, my contract just used this 1960s original felt paper (the black shown in the picture), he refuse to change it. On top of this layer, he added polymer thin-set (this one http://www.homedepot.com/p/Custom-Building-Products-VersaBond-White-50-lb-Fortified-Thinset-Mortar-MTSW50/100091767) and added a Hardie backer board) on it. After it is dry, he will do the slope using thin-set and add shower liner to it. My question: 1) before he applied the backerboard, he didn’t clean the felt layer, will the thin-set work on dirty surface? I am worried the felt and backer board will not adhesive well. 2). He didn’t tray to falt the thin-set if the bottom felt is not flat will the backer board bend and easy to break. 3) Is thin-set ok to use or he has to use cement? 4). is wire mesh required? Thanks.
Hi Vicki,
Thanks for the kind words and questions, and sorry for the last response(s).
To answer your second set of questions, what he has done so far is probably OK – depending on what he does next…
I am assuming the thinset and backer board base is just a way to provide a foundation for the shower pan pour. Latex-fortified thinset has excellent adhesion properties and usually will stick to most building materials even if not perfectly clean. But, if he building on top of this, rather than pulling it out to the floor, it’s probably a shortcut – depending how stable it is and what is below it.
I worry about the stability of a shower pan built over what sounds like an old asphalt saturated felt shower liner. A properly built concrete shower pan will weight several hundred pounds once complete, and should be built on a foundation capable of supporting it.
Regarding the shower pan build, if he plans to build a traditional sloped concrete pan with a sandwiched shower liner, he should be using a portland cement based floor mix concrete. Thinset mortar is designed to be an adhesive for masonry products and tile product and used in thin (less than 3/8″) applications.
A shower pan is a “thick bed” mortar application and should be poured using products approved for “thick bed” applications (like Quikrete Sand/Topping Mix).
Not only are thinset adhesives not recommended for use as thick beds, they are much more expansive. Given the additional cost, I doubt your contractor intended to build a properly sloped shower pan, as it would likely require many bags of the product he is using.
Finally, metal reinforcement (like wire mesh,etc.) and acrylic or latex admixtures are not necessarily required but will add strength and durability to the shower pan.
You may want to have another party review the plans / build of your current contractor.
CDIY
Wow this post has inspired so many people! Thank you so much for post it and with great details and pictures. I really learned a lot, While I am not handy I have to hire a contractor to do the job. I am in the middle of remodeling my bath room. The picture shows how the wood frame look like. My contractor does not want to do anything he think the wood is fine despite the black color. Do you have any suggestions on this? The surface is black but the side view of the stud seemed fine. I of course want to change it but I don’t want to my contractor think I am a hassle. Thank you so much for your advice.
Linda,
Good question. When you are attaching the drain and figuring for the height you have options on the height. Understanding the drain comes in two main parts you will need the bottom part of the drain flange (where the bolts are received) to be roughly 1/2 inch above the subfloor (plywood). This way the area right around the drain can have a thickness of mortar that is substantial and won’t break apart too easy within the time before the liner is installed. Nonetheless after the drain height is established the height that you want from the furthest point inside the shower pan area will be in the furthest corner. This will need to be 1/4 per foot of slope. So if you have the furthest corner that is 4 feet away from the drain you will need the mortar to be 1 inch above the bottom flange drain height.
In actuality this will be 1 1/2 inches roughly to account for the bottom flange being 1/2 inch above the subfloor. The best way to check the correct height of the mortar is to have a level and or straight edge that extends from the corner to the bottom drain flange and measure with your tape measure the difference when the level reads level. Meaning the level extends from the corner at the desired height for slope and extends over the drain and when the bubble is in the center check the distance between the bottom of the level and the top of the bottom flange. In this case it should be 1 inch and that is the total slope over 4 feet which breaks down to 1/4 inch per foot.
Hope that helps more than confuses. I am sure Gary will follow up to this soon.
Good luck,
Onga
When you install the drain to the plywood…..what is the level of the mortar from the wall (1 1/2′) down to the drain. All pictures look like the mortar sloaps complete down to the drain level. Is this the correct level of the mortar in relationship to the drain attached to the plywood?
Eddie,
It’s possible Gary is busy. I am assuming that you have waterproofed the shower pan with some sort of a liner then floated mortar on top. Now you are at that stage that you mentioned above and want to use Concrete blocks to form a bench? There are other ways to build a bench if you are interested just let me know and I can explain. Otherwise to answer your question, use a modified thinset to embed your blocks to the shower pan mortar and when you do this use a level to level the blocks and make all planes level and plumb. When you are finished and it has cured it’s easier then to establish the slope on the top of the bench you were asking about. I use Floor (deck) mortar for this and if you are comfortable with that just remember use thinset to bond the mortar to the block. If you aren’t comfortable floating with mortar then you can use thinset, but given it’s sticky nature it’s difficult to get it smooth and on a perfect plane. If you did chose to use mortar then attach it with thinset and set up two guides of mortar on either side of the bench with the slope running front to back and across the front you want those to be level. They will be parallel to one another and will be higher in the back and lower in the front to drain the water. Use a level and a straight edge to achieve this. Once you have your guides which should be no less than 1/2 inch at the thinnest point. (The guides will be floor mortar packed down to achieve compaction) Once the guides have been established and you are ready to spread thinset on the rest of the top. When the thinset is still fresh dump a half bucket or as much as you will need of floor mud on top of it. Spread it evenly and pat it down for compaction. after you have good compaction you will (screed) the mud off of the middle area without disturbing the guides you established so don’t fully cover the guides. This will all be done with a delicate pull to screed the fresh new mortar off, but keep everything on plane. Once you have all the mortar smooth and on plane you can use a wood float (trowel) to smoothly work out any imperfections. If you have little voids, just sprinkle some mortar in the holes and smooth with the wood float.
I hope this helps and doesn’t confuse too much. If you have any other questions please let me know. In the mean time Gary might be back with more insight.
Good luck,
Onga
Thanks for the great information. I am getting ready to start my master remodel and had a question. I am putting in a shower bench with concrete blocks over the shower pan concrete base. How do I level out the concrete blocks if the floor is sloped from the wall toward the drain? I need to put a slope on the top of the bench but shouldn’t my blocks be flush and level? Thanks again for the great information
Hi Eddie –
Sorry for the long delay in getting back to you and thanks to Onga for his input and help!
To begin, understand that shower benches are tricky and can be prone to leaks. Think of a built-in shower bench as a flat build out of the shower wall that will need to be waterproof. If you follow the water path down the shower wall, onto the bench top, down the front of the bench and onto the shower floor you can start to understand the challenges of building a leak-proof shower bench. To make the task of build a shower bench easier and potentially less prone to leaks, several commercial systems are available (Kerdi, others), but expensive.
Understanding the challenge of creating a waterproof built in shower bench that connects to the shower floor, I would suggest considering a shelf style shower bench like the Better Bench System by Innovis.
This is the bench system that I used to complete this shower. The suspended bench eliminates many of the potential water leak issues and frees up floor space in the shower. It is also inexpensive and relatively easy to build and can be completed after much of the shower is built. I highly recommend using this or a similar system if you plan to build a bench.
If you would still like to build a floor up, built-in bench consider this article: Building a shower bench by the Floor Elf.
I would only use block to build your bench if you are building the shower on top of a concrete slab. If you are building the shower over a wood subfloor, use standard lumber framing covered with tile backer board and waterproofed with a paint on membrane like redgard or Hydroban by Latticete.
Good luck. I can’t recommend the Better Bench system enough, I used it and could not be happier. This is the article that addresses the better bench build: How to Tile a Shower – CabinDIY (scroll down about halfway through the article to see the Better Bench install).
And Thanks Onga for the thoughts and suggestions!
G
Gary,
I’ve watched quite a few videos and found your instructions on this site more helpful than anything I’ve watched. We begin tear out of our old shower in 2 weeks and I feel comfortable enough in rebuilding the walk in however one thing I can’t seem to find/clarify in all my research is the drain and the top layer of mortar and tile. I am using an adjustable drain and confused where the top layer mortar sits with the drain. If I am using a 1.4″ tile am I safe leaving a 1/4″ of drain sticking up past my mortar, which would end up sitting my tile flush with the drain? If my drain is adjustable do I have room for error in regards to the height of the mortar?
Hi JD,
Thanks for the comments and question.
Yes, adjust the height of the drain throat to provide the proper drain height to accommodate the tile thickness you are using. A few tips though; remember that the thinset used to install the tile will add to the thickness of the top tile layer, and keep in mind the finished drain height will depend on the grate that attaches to the drain. It is better to have the drain slightly below the tile height (level is probably ideal depending on your drain design) vs. slightly above it. Obviously water needs to drain freely over the tile surface into the drain.
As far as the ability to adjust the drain height after pouring the top mortar bed, the answer is yes, but it is easier with round drains compared to square drains (I used a square drain in the article) and generally needs to be done while the mortar is wet. A round drain throat will rotate realitively easily in the wet mortar bed compared to a square drain that will disrupt the mortar more than the round drain.
If you need to adjust the drain height, do it just after you pour and level the mortar bed. Then re-smooth the mortar using a trowel or similar.
So here would be the general steps for the top mortar layer regarding drain height:
1. Estimate and set the initial drain height
2. Pour the mortar layer, add pitch as needed, and smooth the surface
3. Lay the tile next to the drain edge to check height.
4. If you need to adjust the drain do it then while the mortar is still wet then the-finish the surface of the mortar bed that may have been disrupted by turning and adjusting the drain.
5. Let the mortar cure for a day, then tile.
Hope this helps,
Gary
Good afternoon. We have framed a neo-angle shower and are in the process of placing the pan liner. The question I have is that the liner wants to “wrinkle” at the angles of the frame. Do we fold the wrinkles down and mud over, or cut the liner and patch so it will lay flat? I’m very hesitant to cut but if that is the best option, can I use extra liner with Oatley shower liner adhesive as a patch? Thanks and your website is excellent!
Best regards,
Brandon
Hi Brandon,
I would smooth the liner if possible and not cut it.
You can spread liner adhesive over the mortar prior to smoothing it to help it stick. The top layer will cover the liner, but you should avoid wrinkles in the liner that could hold water.
Thanks for the question.
Gary
Hi,
This is a very nice description of the work. Is it okay to screw in 1/4″ hardy backer on the subfloor and then put the shower liner and then the concrete? Is 1″ concrete towards the wall okay? I will slope 1/4″ for every foot. My shower area measures 42″x42″.
Eric,
I wanted to also give you some insight on the secondary (hydroban/redguard) waterproofing. I was doing this for a while when working over important living spaces. This being condo’s, other people’s apartments, and possibly a grand piano :). The only trouble with waterproofing the preslope mortar is when you now put the liner on top and sandwich the liner with the flange with adhesive. What happens if any moisture ever gets in between the two? It will get trapped at the drain. ideally the drain could be a multi-functioning system to allow for this double waterproofing. I don’t know if they make one of if so what the cost, but that would be great. I hope this makes sense to you. If not I am sure Gary isn’t too far behind me with a more elaborate explanation.
* Don’t forget to add some type of wire when you float the final (6) Mortar bed. If chicken wire is used I tape off any exposed sharp edges and the same for diamond lath (expandable metal). You might want to put it on top of a thin layer of mud as you are floating so it doesn’t really touch the liner.
The other option if you can find some plastic wire or lath, you should use that because less chance of puncture. If it’s wire DO NOT STEP on it inside the pan.
I think we are all lucky to have Gary on here helping people and to the extent that he does because who likes to fail? I would hope no one and all of this helps to achieve that.
Good Luck,
Onga
Gary
I was thinking of adding a waterproof material like Hydro Ban or Redgard on top of the mortar pre-slope floor and was wondering what you think of that? My shower is 3×5 on plywood. Do you think the additional waterproofing is a good idea or overkill?
So my layers starting with the bottom would be:
1) Plywood floor
2) Roofing felt
3) Mortar pre-slope
4) Redgard waterproofer
5) Plastic shower liner
6) Mortar top layer
7) Tile
Thanks
Hi Gary,
Your site is proving to be very helpful for me. When adding blocking for the shower pan box I have the water supply lines in the way and I’m not able to add the block between the studs in this area. What would you recommend that I do in this case? Thanks
Hi Eric –
Thanks for the question. The basic functions of the blocking are to: 1) create a form for the first pour of the shower pan and 2) to support the shower liner.
That said, some do not add blocking and simply pour the first shower pan pour to the height of the bottom wall plate. The liner is then installed and secured to the wall studs (only at the very top edge) without support behind the liner at the wall cavity. This is probably not the best practice and considering the relative ease of adding some form of blocking, I would recommend doing so.
In your case, I think you have a few options. After looking at the image you uploaded, it appears you have a fairly wide span from the corner to the first stud. You could add another stud to the left of the plumbing to allow for blocking in that span and offer additional substrate for fasteners for your tile backer install. For the plumbing cavity, you could use some foam board with cutouts for the plumbing. This would supply some support for the shower pan pour and the shower liner too.
Alternatively, you could add a strip of 2×2 or similar to the floor plate offset from the front edge to provide a means to secure some blocking to this, using the bottom edge. (see attached image)
Gary
Thanks, Gary. I like both of your suggestions but I think I’ll try adding the extra stud and foam board cut out. I’m going to follow your site step-by-step when I working on my shower later this week.
Thanks again.
Ah well, we learn by our mistake, it looks like I have some work to do. Thanks for the detailed response.
Thanks. Thought I’d add a pic of the base going in. The mud base was sloped on the top using a kit which kept the mud away from the drain and provided the angle for the slope on the top which to be fair i ended up making a bad job in the middle between the rods on the larger section so will fix, but the slope was generally good. The water drains off the top of the mud base down the side of the drain to the weep holes ok. Would you still suggest not redguarging that surface in any event? Just trying to figure if I need pull the whole lot out. Not sure why the tile adhesive failed so significantly either, as per the tub and the guy in the tile shop, it was suitable for the job. Could can you recommend the best make for this.
Thanks again
Ben
Hi Ben,
Sorry for the late reply, I was traveling. Thanks Jeremy for your help with this.
OK, regarding the original failure, the main problem with your shower pan was the lack of slope under the shower pan liner. Without slope (or pre-slope as it is often called when referring to the slope of the initial mud layer that the shower pan liner should be installed over), water accumulates in the base of the shower pan and stays there causing all sorts of problems.
Although concrete and mortar products are very stable when wet, they do not stop water movement. This includes tile grout lines and the mortar bed of the shower. When you use your shower, water easily passes through the finished top surface of the tiled shower pan. This passed water will continue to move through the mortar shower bed until it is stopped by something waterproof (the vinyl shower liner, or similar). With your original build, you have essentially created a mortar sponge that will stay saturated with water. The flat-installed shower liner does not allow water to be easily re-directed to the drain.
With this continuously saturated shower pan, you encourage organic material growth (mold, mildew, bacteria, etc.) and contribute to building material failure. The redgard you used is not intended for continuous submersion in water and was likely the cause of the thin set release you experienced. You should also be sure you are using the proper thinset designed to be used in wet locations. There are mastic adhesives that are not designed for use in wet locations. You should check the label of the product you intend to use.
Regarding your new shower pan pictured. Unfortunately, it looks like you may have a problem. From the photo, it looks like you have the tile backer already installed before pouring the first mortar bed (the all important pre-pitch mortar bed). This is a problem, as the shower liner should be installed on top of this pre-pitch mortar bed and the shower liner should extend up the shower walls behind the tile backer board. Here is a diagram of the layers:
What you want in a proper shower pan are two parallel sloped surfaces to the drain; 1) The top tile finished surface that moves most of the water to the drain entrance and 2) The deep, embedded, shower liner covered surface that redirects passed water into the side weep holes of the drain.
To build a proper two-layered shower pan start with the first mortar bed. This bed should be sloped to the drain and covered with an installed shower liner that runs a foot or more up the shower walls. Do not puncture this shower liner anywhere except for the very top edge at the highest part along the wall. This will serve as a waterproof funnel to catch passed water and redirect it to the drain.
Connect the installed liner to the shower drain using the specified shower liner adhesive or silicone caulk only on the bottom surface and tighten the drain clamp assembly to seal the shower liner to the drain. Pour pea gravel or tile spacers around the edge of the drain to help prevent mortar from plugging the side drain access holes that allows the shower liner to empty into the shower drain.
After this first or deep mortar bed is complete and the liner installed, pour the top mortar layer (the layer that the floor tile will be install on). This top layer will also need top be sloped toward the drain to allow for surface water to easily run into the drain when using the shower. Because you already have slope in the first mortar layer, you may not need to add much additional slope when pouring this layer. Prior to pouring this top mortar, install the tile backer board leaving a slight gap at the bottom and embed the backer board in the mortar pour. Once this top mortar bed has cured, install your shower pan tile of choice using an appropriated thin set adhesive and grout.
To fix your current build, I would remove the bottom 2 feet or so of the tile backer board (cement board). Then, when your first pitched mortar bed is dry, clean it well and lay a vinyl shower liner over the surface and run it up the stud wall (or block or whatever is behind the backer board) 18″ or so. Attach the liner to the walls only at the top to prevent penetrations in the liner lower down. Next, connect the liner to the drain (I walk through this in detail in the article).
Then, re-install the lower portions of the tile backer board leaving a 1/2″ or so gap above the liner to prevent injuring it with the abrasive cement board. When installing the lower sections of the backer board, do not use fasteners at the lower portions to again prevent penetrating the shower liner. Lastly, pour your top mortar layer embedded the bottom edge of the backer board in the top mortar layer. When this top mortar bed is dry, install your tile.
Good luck, sorry for the bad news and I am sorry my article is a bit unclear regarding the shower liner install behind the backer board. I will try and add some additional images to make this clearer.
Gary
CDIY
Ben,
I will also help with this one. It is imperative to have a pre-slope. Yes you can get away without it, but there is no question in my mind and especially if the pan is over a living space. I know yours is not, but it should be done. If you are not comfortable floating mortar to pre-slope, then use the foam. There are a few companies manufacturing the foam. The liner needs to extend all around on a level line 3-4 inches above the (rough) curb height. You also must use the proper adhesive to sandwich the liner between the two parts of the drain body. When making the holes for the bolts try not to cut, but use the rounded tip of your sheetrock knife to (perforate) the holes first. This helps not make a mess of the liner.
*Do not use the red guard or any other like waterproofing on mortar that has no pre-slope underneath. In your shower and almost all others the water from the walls is intended to run down and get behind the red guard unless you used red guard on the whole shower substrate. Water is supposed to penetrate grout and most tile, unless it’s glass or porcelain. In that case it will still go through the grout joints unless they are epoxy.
* The best way to do tile in water areas is do the best job possible on the primary waterproofing (behind the cement board or mortar float) and let the surface breathe. It’s really important to do a great job on the waterproofing and let the surface breathe otherwise you can get a whole host of other issues and usually occurs from trapped water or just moisture.
Lastly try and put some drainage pebbles around the weep holes of the drain when floating the final mortar bed.
Good luck,
Onga
Hi Gary
I build my shower in the basement following the various Youtubes etc and all looked great. However the tiles have lifted and the thinset underneath has softened and gone mushy around the drain about 5 weeks daily use. I have pulled up all the tiles in the floor ready to start again but need to review everything I did to try and make sure it doesn’t happen again!
The liner was installed by the plumber who put the drainage in for. no pre pitching layer just straight on the concrete slab.
I installed the mud bed using one of those kits but a friend suggested though I did find a couple of flat spots that cause don’t exactly pool but don’t cause the water to run either.
I also finish the mud bed off with Redguard as I had with the walls before tiling. Was this the wrong thing to do?
For the floor tiles I used those small penny sized round tiles using ready mixed thinset mortar for shower areas by Mapei.
Anyway I guess the question is, with the tile now removed, should I be pulling up the mud, doing pitched layer of mud then another membrane and some more mud and getting rid of that layer of red guard (has that caused the thinset to stay wet and fail)?
What do you recommend?
Thanks
Great info Gary. Can I use a couple coats of Redgard instead of a liner?
Ed
Hi Ed,
Thanks for visiting and the question.
Although I have seen a few authors recommend using a paint on water-proofing membrane in place of a traditional shower liner, I would not recommend it.
The challenge of using a paint on membrane without a shower liner is the difficulty sealing the paint-on membrane with the shower drain. Most adjustable shower drains are designed to mechanically clamp to a shower liner and without the liner, the seal between the shower pan and the drain may be difficult and unreliable.
I suppose you could incorporate a ring of fabric or membrane or similar to cross the gap between the drain and the pan and reinforce the paint-on membrane, but I’m not sure how this saves you time or money. There are several commercial systems designed to seal the top surface of the shower pan directly to the drain, but these use specially designed drains and waterproofing fabric. They tend to cost several times more than a traditional mud shower pan with a shower liner.
I would stick with the tried and true system documented here.
CDIY
Hello, I will be building a shower pan where a bath tub once was. Right now it is a vinyl prefab pan which I will be removing. My question is, about how much mud mix will I need for the 2.5×5 rectangle shaped pan? Thanks so much!
Hi Samantha,
Thanks for the question. You will need enough mud to create the base and second layer of the shower pan. If you have a shower pan that will 2.5 feet x 5 feet, you have a 12.5 square foot shower pan area. The total amount of mud needed will depend on the total thickness of the mud. If you assume the average thickness of the base layer of mud is 1/2″ to 1″ and the average thickness of the top mud layer is 1 1/2″ to 2″, this yields 2″ to “3 inches of total average thickness for both mud layers x 12.5 square feet or 25 – 37.5 total square feet. If you divide by 12 you get a total of ~ 2 to 3 cubic feet of mud.
A #60 bag of Quickrete Topping Mix (available at Home Depot) will provide ~ 0.5 cubic feet of mud, therefore you will need approximately 4 to 6 #60 bags of floor mix concrete.
You can always buy 6 bags and take the unused bags back. Good luck and have fun!
Gary
Hey Gary,
Nicely done explaining to people how to construct a good and long lasting pan. I agree with the majority of materials you use, although I am not familiar with using silicone between the liner and drain. Probably because I have been using a CPE liner for a while.
Nonetheless, it’s nice of you to share this information with the public, I wish I had the time to do the same.
Good luck
Onga
Howdy,
What drain do you recommend for a concrete slab?
My shower will be newly constructed. The slab will be poured soon.
I want a curbless shower so how deep should I recess for the shower pan area which will be 36″ x 60″ & what slope would I use if I plan on putting the drain in the center (2/3?, 3/4?)? The total thickness of the main slab (non recessed area) will be 6″ (includes 2″ rigid insulation – R10 & 12mil vapor barrier). Should I use a paint sealer over slab or roofing paper before I put my 1st layer of sloped mortar?
If the concrete is my finished floor what would you recommend I seal it with? Also, would you use something different for the second mortar layer? With a curbless shower it’s recommended to extend the liner at least a foot into the bathroom floor. So my question is how would I do this if the bathroom floor is also concrete (no tile)?
Thanks ever so much.
V
Hi. What type of mortar did you use on the layer above the liner?
hello Gary,
thanx for the information. something i didn’t find – how thick should the mortar bed be, at least?
then, you don’t recommend to use a waterproofing additive to the mortar? i don’t see it mentioned.
last, these seem to be special drains, with weepholes. i don’t see those here, in spain, is there something else i can do when using an ordinary one?
best,
Radek
Gary,
I found your information to be very helpful.
Is it better to use backer board around my shower basin vs./ Duroroc? Also we want to use glass block for the walls. For the curb, standard 2×4’s are to narrow for the 4 inch blocks, is forming and pouring a cement curb our only option?
Hi Dean,
Thanks for visiting the site.
Any shower approved tile backer board will work well as a sheathing for your shower walls. Durock, a brand of cement board is an excellent choice. I am not familiar with glass block shower construction. I know some warn about potential issues with water wicking into mortar seams if mortar is used between the block.
Forming and pouring a curb would work. You could also find some shorter bricks or blocks to use in place of 2×4 or substitute the 2×4 for a 4×4.
Gary
WHAT ARE YOUR FEELINGS ABOUT THE GREEN WALLBARD FOR SHOWER CONSTRUCTION ABOVE THE CEMENT BOARD?
Hello again Jack,
Thanks for the add-on question.
Personally, I would use the most water-resistant product for your project. There are many excellent choices that are in many ways far superior to traditional green board. If you search the internet you will find an endless supply of horror stories related to green board use in wet environments, especially in shower or bath areas.
The cost difference is fairly nominal considering the potential risks. If you are planning to finish the areas around a shower tiled with cement board, use a smooth finish product of the same thickness as the cement board that is approved for shower use. Or, if you haven’t installed the cement board yet, use a smooth faced product approved as a shower tile backer for the entire room and simply paint the areas not to be tiled. This is what we did for the above project. The small increase in cost will be more than offset by the piece of mind and performance of this products compared to traditional green board.
Another good source of information regarding best practices for tile and wet area backer boards is the install and product information published by the various makers of these product. Many manufacturers have these documents available on their website pages for the specific products. Here is the page for HardieBacker products.
Gary
I made a big mistakes by trusting a friend’s friend to help me out… We rip the old shower and put a flat surface for my handicap son”s bath chair… When he put concrete on the drainage; he made it flat 7 TOLD ME HE’S GOING TO HELP WHEN i’M READY TO TILE…. I am not an expert but I have tiled my other bathroom before. I made a comment about the drainage being flat instead of sloping down. But when I ask his help; he gives me a lot of excuses. I laid down the tile before realizing my big mistakes…. How do I repair or my big Mistakes? I need help. I went to home depot & Lowe’s; but no one really what to tell me how to fix it… I was on a budget with no income; but needed the shower for my son & save my back. He’s 20 with CP.
Hi Rhonda,
Thanks for the question and sorry to hear about your shower issues.
You are correct, the shower surface should be sloped to the drain. Without slope, standing water will eventually lead to problems for the bathroom (due to high humidity) and for the shower structure itself.
A picture of your shower may be helpful in guiding you with further recommendations. If you can, take a picture of the shower and upload it to this thread using the “Choose File” button above.
If the shower liner was installed properly the repair work will be fairly easy – remove the tiles you just installed, add slope to the shower surface with mortar, then replace the tile surface. I suspect if there is no slope on the shower surface, the first layer of mortar was not sloped either. This is a bigger problem.
If the first mortar layer was not sloped, you might need to fix this by pounding out the pan and starting over.
An alternative might be to remove the tile, add mortar to slope the top surface, then use a paint-on water barrier (like the blue stuff I used HydroBan by Laticrete available at Lowes, or RedGard available at the HomeDepot) to provide a sloped waterproof barrier. You can then just tile over the paint-on waterproof barrier once it is dry. This would provide you with a properly sloped barrier in addition to the installed shower liner which was probably not installed correctly. I think this is what I would do.
Here is a video showing you how to use the paint-on membrane in your shower pan: Paint on shower pan water proofing
If you decide to do it yourself, I would add latex addmixture to the mortar you use to reslope the top layer of the shower pan or possible use a latex fortified thinset instead of mortar. Latex fortified mortars and thinsets add flexibility and help maintain the strength when used in thinly applied products. You should check the recommendations for maximum thickness of the product you use if you plan to try and use a fortified thinset to add slope to the pan. The advantage of using fortified thinset for the add-on slope is the likely improved flexibility and stability of these products when applied thin. Standard floor mix mortar tends to crack when applied too thin, but adding latex to the mortar for some or all of the water when mixing it will help.
Good luck. This might be a job to get some help with, but I bet you could do it yourself and I would be more than happy to help throughout the entire process. Please feel free to ask any questions and contact me at anytime – it would be no problem at all to write up a simple step by step of what I would do and the materials necessary – just ask.
Gary
What would you recommend I use for the final top cover of the shower pan (on top of the mortar bed) if I am not going to tile it? We just want a cement-like surface.
Gary, Thanks for the excellent instructions.I have followed you plans to the letter but I have just one question: Do you apply a vapor barrier on the walls (roofing paper of tyvek) behind the backerboard? Or is this unnecessary if the backerboard is well sealed with hyydroban or redguard? Thanks!
David
Hi David,
Most tile backerboard manufacturers recommend installing a moisture barrier like roofing felt (tar paper) or sheet plastic over the wall cavity prior to installing tile backerboard in wet locations (showers).
However… many building experts suggest waterproofing the surface of the backerboard with a paint-on membrane like Hydroban or Redgard instead of using a moisture barrier behind the shower backerboard. The reason is that when using vapor barriers installed behind the backerboard, fasteners will penetrate the barrier providing a path for water into the wall cavity. AND, once water gets into the wall cavity the barrier (like plastic sheeting) greatly reduces the walls ability to release this water leading to damp walls and all the goodies that go with it (mold, rot, etc).
I highly recommend only using a paint-on waterproofing agent (like I did) and not placing a moisture barrier behind the shower walls.
Gary
Amazing.. you showed large gravel, and even suggested, tile spacers at the weep holes..how about pebbles? The INDUSTRY STANDARD!!. Also, what about ‘sealing’ the corners on top of curb that has ZERO LINER?
Baffled how you use old school (mortar bed) new variations (backer board), new chemicals (hydroban) to suit your needs with no regard for the future. Water wicks into the smallest spaces and without air movement it causes DAMAGE. While you may chose not to use Kerdi because of YOUR cost analysis,.. It was designed so even an amateur can get fool proof results. Good luck explaining your way out of just one call back because you saved money on a muddled approach to INDUSTRY standards.
Hi Patrick,
Thanks for the comments and feedback. I think it is more than acceptable to use a variety of methods to keep weep holes open including all you mentioned – here is a nice reference. I’m not sure what you are referring to regarding the top of the curb without a liner – I suggest that the liner should cover the top of the curb – some of the photos I had and used for the article do not show some of the details well.
I haven’t used the Kerdi system, I would welcome your feedback about it.
Gary
My question is about using adhesive to hold the liner in place. Can I use the Oately Pan Liner Adhesive dribbled and spread around the mortar base and up the walls? Is there some better product, maybe one spread like tile adhesive? Some tutorials skip this step, but I am concerned the liner might sag or stretch or pull away from the walls.
Hi Pan,
You can certainly use Oatey liner adhesive to hold down the liner. You could spread it with a trowel to help prevent high adhesive spots and ridges in the shower liner that may decrease the ability of the shower liner to drain properly. Also, make sure you leave sufficient liner in the corners and do not pull the liner too tight at the corners – you do not want the liner to be stretched or damaged by the weight of the top mortar layer and use of the shower.
Gary
Sunday I went to jump in my shower and found tiles starting falling off the wall. I’ve started tearing it out and it’s a mess. One question I have is that the existing concrete pan actually has sides built up on it. This doesn’t look like anything I’ve seen online, so I was wondering what the purpose is. I was hoping to be able to reuse without disturbing, but may have to knock it all out to get to the rotten studs on one side. Would it even be possible if I was able to get the floor tile off, or it likely going to crack it? I can reach behind it and feel the plastic liner, but it doesn’t even go to the top of the concrete edges which are probably 6 inches tall. The shower is original and the house is 35 years old, so it probably needs to all be torn out and start from scratch. This is just new territory for me.
Hi Kirk,
Thanks for visiting the site and thanks for the question.
I think you have some options regarding the shower pan. If you are happy with the drain, you might consider reusing it. If you did reuse the shower pan, I would consider waterproofing the pan using “hot-mopping” with asphalt or a similar technique like a paint on waterproof barrier.
I would also check under the existing shower for any signs of chronic water leaks to help you with your decision to re-use any part of the existing shower or shower pan. If it looks like its been wet before, maybe better just to replace the entire shower.
Gary
Thanks for the quick reply. I will have to do a bit more digging in there. I haven’t gotten all the old tile out yet and lack the whole floor On the wall where the tile was coming off, it’d been getting wet there for a while it looks like, water damage, plus I’ve got damage from carpenter ants. I’m going to have to replace some wood there. Where I live just about all of the houses are slab foundation so It’ll be hard to tell if it’s leaking from underneath. …I’ll keep going.
I did almost the exact same method but made a few mistakes. I like your article. Wish I found it before I did my shower pan. Here is a link to my project. https://mmmhr.wordpress.com
Thanks for the great info. Are both mortar layers the same ratio portland to sand and the same consistency.
Also how would a bench be handled? Is it done like the walls with backer board?
Thanks again.
Hi
I had a DK Industries hot mopped shower pan done. Am I correct in thinking that this serves the same purpose of the liner? If this is correct, I will attach the bottom walls with backer board, and incorporate those walls into a 2″ deck mud back to the center drain. Is this correct?
Thank you for your time,
Hi Robert,
Thanks for the question. Yes, you are correct, hot mopping refers to the application of hot asphalt to a shower pan to provide waterproofing in place of a shower liner. The hot mopped pan should be built on a pre-slope foundation (the same the first sloped mud layer you would use under a shower pan liner) and sealed to the shower drain. Most hot mopped shower pans use multiple alternating layers of asphalt and asphalt felt (tar paper)
Most will water test the shower pan after it has had time to cool (several hours). Leak test it by removing the drain grill and plugging the drain with a drain plug. Then fill the shower pan with water and inspect for leaks. After testing, drain the water and dry the pan.
Once the pan is tested, bring your backer board down into the pan (leave a slight gap above the pan to prevent mechanical damage to the pan seal surface. Then pour your sloped mortar bed and finish with tile. You may want to add a “loose” layer of asphalt felt over the hot mopped seal to help protect it when you pour your mortar bed. If you do add asphalt felt, DO NOT STAPLE THROUGH IT as you will penetrate the hot mopped seal and very likely cause leaks. Also, remember not to fasten the lower 12″ or so of the backer board as these fasteners may penetrate the hot mopped seal and cause leaks.
Enjoy the project!
Gary
Thanks i learned something about professionilism, u did very well, i now think i can do this shower pan, i am building on a concrete floor, is it ok just to regard the floor and then put the pre-mud down? or do i need to put tar paper or something else?
Hi Charles,
Thanks for using the site. If you are building your shower directly on concrete you do not need tar paper.
There are a few considerations for pouring a shower pan directly on a concrete floor.
1. You may want to check for moisture coming through the slab – especially if the slab is in a basement. There are many ways to do this, but a simple way is to lay a sheet of plastic over the slab and check for condensation. If you have significant moisture passing up through the slab, I would consider sealing the slab prior to pouring the shower pan. There are many paint-on waterproofing membranes that would work just fine (redgard at the Home Depot, Hydoban by Laticrete, others). If you do use a waterproofing membrane, you typically can just pour your pre-slope over the cured membrane.
2. Do not use wood lumber for the curb – instead use masonary blocks or brick set in thinset or masonary mix. If you plan to use wood lumber for your framing, use treated lumber that will stand up to moisture better than standard lumber.
Good luck!
Gary
Thank you so much, you have been big help.
Glad to help Amy! Reply with a photo if you like when you are done with your shower.
Gary
after the the first layer of mortor is down what is a good way to make sure it had a good pitch to it?
Hi Amy,
A simple method to check your mortar bed slope is to use a level.
You should have a minimum slope of 1/4″ of drop per one foot of run. To check your slope, rest the end edge of a level at the wall of the mortar bed. Then lift the other end of the level until it is level (the fluid bubbles align with the level marks).
Once level, measure the distance from the bottom of the level to the edge of the drain. This distance or “drop” is your slope and should be at least 1/4″ per foot of distance from the wall.
As an example if the shower pan mortar bed that you are checking is two feet from wall to the point where you are checking slope (typically the edge of the drain), then the distance from the level to the drain edge (the drop) should be 1/4″ per foot times two feet or 1/2″.
A shower pan that is not square with a centered drain will have differing slopes depending on the distance from the drain to the wall. The important factor is that the slope along any path is at least 1/4″ per foot.
So, as long as the slope is correct for the longest distance, the shorter distances will be greater than 1/4″ per foot, but not typically noticeable.
What if I glued the liner to the subfloor?
Hi Gale,
Thanks for the question.
Applying the shower liner directly to the subfloor is a huge mistake. As discussed above, a shower liner needs to be sloped to a proper clamp drain assembly to function correctly.
All tiled shower floors leak water. Think of grout and tile as a wear surface, but not necessarily a waterproof one. Once water passes through the shower floor surface, it readily moves through the mortar shower pan bed to the shower liner.
If the shower liner is properly sloped, water will then be quickly re-directed back to the shower drain, passing through weep holes located just above the shower liner at the clamp drain assembly.
If however, the shower liner is not sloped, water accumulates and does not drain. The shower pan stays wet, mold grows, water spreads and pattern of continued and worsening water and mold damage begins.
A properly installed shower liner should rest on a sloped initial mortar bed. If you did not install it this way, I would tear it up and start over.
Further reading: Improper Shower Pan Liner Installation
Sorry,
Gary
This is my first attempt to make a shower pan, we forgot to lay down tar paper and there isn’t much of a pre-slope, is that going to be a problem? Also the guy at HD said that i could use the thin set mortor is that correct?
Hi Amy,
Thanks for the question and thanks for using the site.
The purpose of tar paper (asphalt felt, builders paper) applied on top of the subfloor before laying a mortar bed is to; 1) help retain moisture in the mortar bed while it cures and 2) to isolate the mortar bed from the subfloor and help protect it from cracking.
The significance of omitting the asphalt felt layer depends on the specifics of your install, but probably not a critical error.
The pre-slope slab is important. The slope of this layer allows the shower liner to drain to the weep holes of the drain. If this slope is not sufficient, water can remain within the shower pan for extended periods of time allowing mold and other organic material to grow.
In addition to mold and mildew buildup, a chronically wet shower pan can create wet conditions leading to moisture problems in and around the shower, including the floors and walls.
As far as the use of thin set mortar for the pre-slope layer of mud; it is probably reasonable to use, but still should be mixed dry and not according to the manufacturers recommendation on the bag.
Thin-set mortar is intended for use installing tile and use in thin layers. There are additives used in thin-set mortars to improve the performance of these compound for their intended use (tile application) that may not be useful in creating a thick, sloped mortar bed.
For me, if you have a choice use standard floor mix mortar.
Hi Gary,
Lot of veryuseful info. NIce presentation. Thanks.
Have a question.
I am installing a shower pan. I ended up getting a gap (small) between the mortar bed and the vinyl liner on all four sides as the mortar didn’t stick to the vinyl. I didn’t embed the cement board. I plan to install the floor tles to the vinyl liner and install the wall tiles against the floor tiles. So, I am cocerned with the gap and looking for some expert’s opinion on how to fix it. I know it is not going to seep on to the subfloor as liner is protecting it.
Hi Ravi,
Thanks for the question.
The issue really depends on how large of a gap and how stable the mortar pan is. It is a bit concerning that the mud dried with a gap along the edge – it makes me think the mud was too wet or not packed well.
If it is a very small gap (like 1/4″ or less) and the mortar bed is otherwise solid, you likely could just continue on to tiling. I would be careful with the exposed liner not to injury it with tile mounted against it or tools used to install the tile.
A better solution may be to trowel on some latex fortified tile thin set to fill in the gaps and cover the liner prior to tiling. If you do add thin set to the gaps, use care not to injury the shower liner as you do so. You may want to use a soft tool (kitchen spatula or similar) to apply the patch thin set to help avoid damaging the shower liner.
You could always upload an image using the attachment link below.
Gary
Hi Gary,
Here is a picture.
A mason was helping me to make the mortar pan. You are correct. He did use bit more water and didn’t pack it well.
I am going to use plastic drywall mud tool to put thinset inside the gap. Thanks for the tips.
Hi Ravi,
Looking at your photo, you probably do not need to worry about the gaps.
Your yet-to-be installed tile backer board will cover the gaps. If you already added the thinset that is fine too.
Looks good!
Upload an image of the finished product if you have time. Thanks for the image.
Gary
Can i pour b level cement on top a cement slab for my base before i install a membrane for a shower pan
Hi Gary u,
Thanks for using our site!
Yes, you can pour a mud shower pan over a basement concrete slab. You should, however, consider a few things.
You may also want to check your slab for moisture prior to building the shower and bathroom and sealing the slab as needed. You can test a slab for excess moisture by taping down a sheet of plastic and watching for moisture accumulation under the plastic. If you decide to seal your slab prior to building over it, there are many products that will work for this. (Hydro-ban, Redgard, etc).
Good luck!
Gary
Hi Gary, the second attempt went much better. Last night I layed my last layer over the shower liner and all four corners are nicely sloped. However, going over several areas with a small level I found I have some flat spots. What do you suggest about theses areas before tiling?
Hey Nick!
If the flat spots are significantly large enough to pool water or cause water to flow to or pool near the walls, I would consider adding a bit extra slop over the areas.
I would try using a longer straight edge (like a 2′ level) across the surface to find flat areas. You could then mark them on the surface of the pan.
To add slope I would either apply additional floor mix with maybe a bit of latex admixture or use a small batch of thinset. Trowel on the patch material and use a longer straight edge or flat 2 x 4 to screed the surface to fill in the deficit and match the slope of your pan. Let the patch dry (quicker with thinset) and you should be ready to tile.
Gary
Thanks for the response, Gary. I lightly struck the surface with a screw driver and it literally shattered. I took your advice and broke it all up with a hammer and removed all the mortar. It looks like I’ll be starting from square one, this time adding more water to the mix.
Hi Nick-
You might want to try a new bag of mortar mix too. Many use Quikcrete Topping mix with good results.
Make sure you work the surface smooth with a street trowel. If you get a chance reply with a photo if the new mortar bed if you like.
I think you made the right decision to redo the mortar bed.
Gary
Hi. I just came across this site. My question is, if i already installed the backer board on the wall, how can i install the shower liner correctly. I also put backer board on the floor with a thin layer of thin set. Can i make this work properly or do i have to start all over? Thanks.
Hi Guillermo,
Thanks for the question. The shower liner should run up the wall behind the backer board. You could cut the lower portion of the backer board, remove this portion of the backer board, install the liner up the wall and then re-attach the backer board. You should not penetrate the backer board over the lower portion of the backer board near the shower pan (maybe the lower 12″ or so) or you can create water paths through the shower liner to the wall and create potential leaks. With this in mind, I would cut at least 2 feet out around the lower portion of the backer board to give yourself room to add some fasteners at the top.
As for the install of the liner in the pan, the shower liner should be sandwiched between two concrete mud layers. The base or lower mud layer should be sloped to the drain. On top of this base layer apply the shower liner and attach to the drain flange. Of note, this shower liner should extend up the walls behind the backer board. If you have already cut the liner and do not have enough of the liner to run up the walls, you will either need to use a new liner or cement additional liner to the old one to run up the walls. If you cement the liner use a large overlap and the proper cement designed for shower liners. Finally, you need a top layer of floor mud (concrete mortar mix) thick enough to support your finish layer (typically tile) for the shower floor. A thinset layer is probably not thick enough nor strong enough to serve this purpose. The thinset is applied to the top mortar layer to attach the shower pan tile layer.
In your situation, the likely best remedy is to pull up the thinset and shower layer, cut out the lower portion of the wall backer board (save the pieces to re-install). Then apply a new shower liner, re-install the backer board and pour a suitable top mortar bed layer. Let the mortar bed layer cure, then apply tile with an appropriate (shower approved) thinset.
Good luck,
Gary
Hello,
In preparation of building the pre-pan, I mixed the sand/cement mix to a consistentcy that held its form, but was not saturated. After the application and 24 hours of curing, there are many areas of the surface with loose particles of sand. Is this the result of adding too little water? Should I be concerned? Thank you.
Hi Nick,
Thanks for using the site, and thanks for the question.
The pre-pan layer of mortar will be slightly sandy, depending on how you finished it and the specifics of the mix you made. The ratio of Portland cement to sand should be in the 1:4 to 1:6 range. It is also very important the sand, and cement are very well mixed prior to adding water – you want to coat every grain of sand with cement.
If the surface is stable and relatively flat, you should be OK. I would brush or vacuum the surface to remove loose sand prior to installing the shower liner. If the surface is coarse, you may want to consider placing a layer of roofing felt (tar paper) over the surface of the dry mortar to help avoid any abrasive damage to the shower liner.
For your top mortar layer, make sure you mix the dry components well before adding water. You could substitute some of the water for latex admixture, which will strengthen the mortar. Finish the top layer with a steel trowel worked over the surface, which will flatten and increase the density of your mortar surface, resulting in a smoother, harder finished surface.
Remember that the mortar bed is only the structural base for the shower liner and tile at the surface. As long as it is structurally sound you should be in good shape.
Here is a photo of my mortar bed for the first layer of the shower pan (it is still wet in this photo). It is a bit sandy and if you rub the surface some sand is released.
Reply with a photo if you are still concerned.
Gary
***** I didn’t see your photo when I first responded above. After seeing your photo, it is a bit loose and coarse at the surface. If you can easily disrupt the surface of mortar, I would consider breaking it up and re-doing it. It looks like the surface wasn’t finished with a float or trowel, which should help flatten and harden the wet mortar surface.
As an alternative, you could just remove the loose mortar and re-surface the bed with a richer (more Portland cement) or a fortified (latex added) batch of mortar to fill in any deficits. If you do go this route and resurface it, just before you spread the re-surfacing mortar on the existing pour, you could paint the surface of the existing mortar with latex admixture straight from the bottle to improve the bond between the existing mortar and your re-surfacing mortar (probably overkill).******
Here is a good video showing the process of mixing, pouring and finishing a mortar bed (although it is the top layer of the shower pan).
I have read and watched several videos on instructions for shower base, and this is one of the best. I can see an error or two I have made in the prep for the shower base. I will be correcting and then I think I am ready to finish the job. I did not see info. on selecting the drain assembly, and that is where I made my mistake. Thanks
I am redoing my shower walls. I have removed all old tile and backerboard material and have new backerboard ready to install. THe floor tile is staying. Do you have any suggestions for the seam between the existing tiled floor and the new backerboard walls? I see from your instructions that I should not push the backerboard all the way down the floor to avoid wicking. It seems that if the new tile does not completely cover the existing floor tile there can be a failure if the caulking fails. I would like any suggestions to help prevent failures. Thanks.
Hi Donna,
Thanks for the question.
The concern regarding wicking of water by the backer board and suggestion to gap the backer board at the bottom; this is in regard to the position of the bottom edge of the backer board compared to the shower liner. A gap between the two here also avoids mechanical damage to the shower liner by the bottom edge of the backer board.
In regard to your shower redo, the best method depends a bit on the shower liner currently installed in your shower. If you have an appropriate shower liner under the shower pan that travels up the shower walls some distance (12″ or so), you should be good from a waterproof standpoint no matter how you build your shower wall to floor interface. Any water that leaks through this corner should be caught by the shower liner and directed down the drain.
That said, the less water that gets through this corner the better. You really have two options:
1) If there is room, you can tuck the backer board behind the current shower pan tile (which is what I believe your photo shows). Depending on the amount of gap between the shower pan tile and the backer board, the tile you install could either tuck behind the shower pan tile or be thick enough to overlap it – I would try and overlap it and seal the corner with caulk.
2) Install the backer board down to the shower pan without tucking it behind. Leave a slight gap at the bottom for wall movement. When you tile the backer board, the tile will sit “on top of” the shower pan tile. Caulk the corner joint with caulk.
For me I would lean toward option 2. Without knowing the status of the existing shower liner, I would try and get as much of the water path away from the corner of the wall and shower pan. Water that runs down the shower wall hits the shower pan and moves toward the drain. Thus, water would have to travel backward and down to move below the shower pan level. I would then use caulk on this bottom joint and not grout. Caulk is more flexible and there tends to be movement at this wall floor corner.
The other thing I would do, and maybe the most important is seal the backer board you plan to use with a paint on water barrier like red-gard or hydro-ban. Cement backer boards are very permeable to water. Not knowing your shower liner situation would make me anxious about water passing through the bottom area of the backer board and possibly moving into your walls. For $30 or so, you can buy a bucket paint on water barrier and give the bottom half (or all) of your backer board a coat or two. Now you have a water proof barrier that will help keep water out of your walls. Then just install them as suggested in #2 above. Add tile and caulk the corner (redgard is available at the HomeDepot and Hydroban or similar at Lowes).
The end product should have the water-proofed backer board installed over the floor tile. The possible water path will likely favor water moving toward the drain.
Good luck,
Gary
CDIY
We applied Hydroban over all of our backer board before we tiled our shower. Thinset and tiles can be applied directly over the hydroban or redgard waterproofing once dry.
Hi I needed know if you can tell the materials I need to make a new shower pan over concrete because I remove the old shower pan because I’m remodeling my bathroom and the old shower pan wet and the 2×4×60 with mold and that the reason I removed the old shower pan. Can you tell what I needed buy to make a new shower pan 36×60. I send a picture i hope toy can help and I appreciate you help
Hey William,
Thanks for the questions and for using our site.
First off, if you have any significant rot of your framing members from water or mold, you should replace the damaged lumber. Also, any wood that is fastened to or installed over concrete or block should be treated lumber to help prevent future rot.
From the little I can see from your photo, it appears the bottom plate and studs are not treated lumber. You should consider replacing the existing lumber with treated lumber.
Once you get your framing fixed, pouring a shower pan over a concrete slab is essentially the same as pour it over plywood. One consideration, is to use concrete block for your curb instead of lumber. Here is a good article that speaks directly to pouring a shower pan over a concrete slab in the basement:
It is possible that the mold problems originated from moisture from your basement slab and walls (especially if the lumber there was untreated) and not your shower. Considering that, you may want to check your slab for moisture and consider sealing it prior to fully remodeling your bathroom. A simple test is to tape a piece of plastic to the floor for a few days and see how much water accumulates under the plastic. If you do have significant moisture coming through your concrete floor, you could consider sealing the concrete with one of the many paint-on water sealants available (hydro-ban, red-gard, others).
Good luck. You may want to consider having someone look at your project for you to give you additional feedback – it sounds like there may be several issues that need to be addressed.
Thanks.
Gary
CDIY
Getting ready to install first layer of mortar….How thick would you suggest making the first layer…I see you suggest 2″ for the second layer, if the first is also 2″ and the curb is three 2x’s , wouldn’t that make the curb height too low for the shower stall?
Thanks Robert
Hi Robert,
The first mud layer need not be as thick as the top layer. It is important that this layer is sloped toward the drain. My first layer was maybe 1 1/2″ at the wall. Remember that you will be adding two layers of mud to the curb similar to the base, which will add height to the curb as well. You can see the height of my curb after my pan build here. You can always add another 2 x 4 if you would like a higher curb.
Thanks Robert!
Gary
CDIY
Gary,
When enbedding backer boar for the walls in the pan mud will that cause water to be wicked up the wall keeping the board wet?
Can Hardy backer board be use?
Thanks !!!
Jose
Hi Jose,
Yes, water can travel up into the backer board when connected to the shower pan. However, if using a gypsum free backer board (Hardie Backer as an example) it really shouldn’t matter and there would only be “wicking” if there was a persistent water level in the shower pan. Any water that makes it into the lower portion of the shower wall backer board should not be able to pass into the wall structure if the shower liner is properly installed and high enough to contain any “wicked” water.
The benefits of embedding the wall backer board in the shower pan is the structural stability of doing so.
Regarding HardieBacker backer board, it can be used in showers and is what I used for my shower.
Gary
Awesome instructions. I’ve followed this step-by-step, and now have a great looking leak-proof shower pan. Thanks a bunch for putting this on the web for layman (like me) to accomplish projects like this on my own. Many thanks!!
Will,
Thanks for the feedback and thanks for using our site!
Congrats on the new shower, feel free to upload a photo using the image uploader below the comment submission box if you like.
Gary
Nice tutorial, thanks
Any thoughts on using pre-pitch for shower slope to get even drain…Also I see some install backer board after floor tile is Installed to drain over tile ..Does it matter? Gracias
Hi Robert.
Thanks for the visiting and thanks for the questions…
I have used a pre-pitch kit for the shower pan before and they can help produce a smooth slope. One big caution though, some of these kits may fool users into using the kit in a way that does not pitch the first base layer of mortar (see Quick Pitch example here) leaving the shower liner flat, without slope toward the drain.
This is not a good idea as any passed water stopped by the liner will tend to pool and not move toward the drain. Many of the pitch kit makers also sell a “pre-pitch” kit for the first (under the shower pan) layer of mortar. If using these kits, make sure to slope the first mortar bed during your build.
Concerning the matter of backer board over tile pan vs. tile pan next to embedded backer board, I favor backer board embedded into the shower pan. You can certainly install the pan tile first with the wall tiles “over lapping” the floor tile for drainage reasons. No matter which way you do it, it should not matter from a leak standpoint as the shower liner should travel well beyond this transition up the shower walls. I also feel the backer board embedded in the shower pan method provides a more stable shower wall as the backer board is embedded into the pan concrete.
Good luck with your project. Upload a photo or two if you want to show off your work.
Gary
thanks Gary…good point when using the pre-pitch to make sure slope is in base mortar to get proper slope for liner.
Robert
Awesome tutorial! quick question , I am planning to build the shower pan in the basement which has a cement floor. Do I need to follow same steps for base or can I apply directly to cement floor? Thanks
Hi Dan,
Thanks for using our site.
If building a shower over a basement slab I would do everything essentially the same, with the exception of using lumber for the curb. I would, instead use concrete bricks or block. Concrete floors often release water vapor and I would worry about wood rot and warping.
I would also consider checking your slab for moisture and sealing the slab under your shower / bathroom. This could be done using a paint on vapor barrier (Hydro-ban, Redgard, etc).
Here is a good article which touches on pouring a shower pan on a basement slab: Shower pan over concrete slab
Gary,
I’m wondering if you mortared your dam on top of the shower liner? I ran out of mortar … But here’s the progress so far after following your instructions.
Hey Alex!
Thanks for sharing the image and congrats on the nice progress with your project.
I did continue the top layer of mortar over and around the curb. This allowed me to tile directly to this mortar once dry. There are many ways to prep the curb for tiling. Some use board forms around the curb which will allow you to pack floor mix around the curb and form a square, flat curb when finished. I just free handed the mortar around the curb using two floats.
Others attach pre-bent stucco wire (in the shape of a square candy cane) over the curb to help hold the mortar when building a curb with mortar. If you do this secure the wire with roofing nails at the front face (and maybe the outter most top edge) only of the curb to help prevent water entry behind the shower liner.
Another technique is to box the curb in with strips of tile backer board secured with thinset and select nails at the front and outer top edge of the curb.
No matter what method you use, you should avoid puncturing the shower liner anywhere you think water could pass once the shower is complete. Also remember to slope the top of the curb slightly toward the shower to drain water back into the shower.
Here is an excellent discussion of this very issue at FineHomeBuilding.com: finishing a shower curb when bulding a shower pan
That said, I can see you used roofing nails to fastened the shower liner to the top of the curb. This may or may not be a problem, depending on the design of your shower enclosure. In theory, if you install a shower door or glass anywhere in front of these nails, water may find its way under the shower liner. Any water that runs down the front inside walls or door of the finished shower and passes over the curb where there is a nail underneath will likely find its way under the shower liner. Some will nail the shower liner at the top, but only at the very front edge to avoid any penetrations within the surfaces of the shower that will see water when the shower is used. I did not use nails on the curb, allowing the second layer of mortar to just embed the liner.
But, no worries, I think you can easily reseal the top of the shower curb by covering it with another layer of shower liner over the nailed top and inside edge. I would clean the existing liner surface well and simply a patch of shower liner material over the top and inside edge of the curb. Secure this patch with adhesive made for shower liners (Oatey X-15 PVC Adhesive). Once this liner fix is in place, proceed with building the mortar or cement board surface of the curb.
Also, after you have patched the liner and are building the mortar or backer board curb, make sure you are happy with the curb height of the inside edge – yours looks to be a bit low depending on your goals. You will need sufficient height to accommodate your planned tile finish on the surface of this inside vertical curb wall (you can always cut your tile as need too). Lower curb heights are easier to enter, but don’t hold as much water in the pan and could spill water over to the bathroom floor if your drain doesn’t keep up or someone stands on the drain while showering.
You can easily adjust the curb height when you add the mortar or backer board layer and make it taller.
Good work! I look forward to seeing it when its done!! Thanks for sharing your project with us.
Gary
Does the shower pan use any kind of cement or is there a specific kind I should use for the pan. Also I was originally planning on framing a curb and making it with concrete but I like the way you did. Do you put backerboard right over it to tile? Thanks for the help!
Hi Loren!
The “cement” for the shower pan is just a mixture of sand, portland cement and water. You can buy this premixed in bags as “floor mix”, “deck mud” and a few other names. The important points this mixture is the ratio of portland cement to sand and the amount of water. Premixed bags will work, but be careful not to mix it too wet. Add just enough water to moisten the mixture. The proper mix should hold a ball, but not release water when squeezed. Here is more info on floor mix: Article on floor mud
For the curb, as you can see, I used a stack of 3 2x4s wrapped with metal mesh and covered with a 1/2 or so of the floor mix is used for the shower pan. I did not cover the curb with backerboard. I did form the first layer of the floor mix curb prior to installing the shower liner so I could install the shower liner over it. I then added a second layer of floor mud over the shower liner to install the tile on. Basically, the shower curb is constructed just like the shower pan – two layers of floor mix with the shower line in between.
Gary
Thanks Gary for the quick and helpful response. Very helpful site and tutorial1
I want to know if i should remove the pebbles that were place to keep the mortar from getting into the weep holes, or should i leave them.
Hi Penny,
Thanks for visiting our site and thanks for the question. The pebbles placed around and over the weep holes should stay. Leave them in place to protect the weep holes from filling up with deck mud when you pour your shower pan. The idea is to maintain water movement into the drain weep holes by both avoiding them being filled with deck mortar and to add a course, water porous aggregate, around this drain area.
wat type of portland cement is used in the sand mix tocreate the mud pan thank you
Hi Paul,
I used FLoor Mix by Superior Adhesives and Chemicals (from The Tile Shop). You can buy Quikrete Sand / Topping mix or deck mud or similar product from most hardware or home improvement stores. For more info check out this excellent article by The Floor Elf: How To Make Deck Mud
thanks excellent discription of prject
Thanks Robert!