Crawlspaces are very common under homes and cabins. Unsealed crawlspace foundations allow the passage of water vapor, soil gas, radon, rodents and pests into your home and cabin.
This article walks through our crawlspace vapor barrier installation and sub-membrane depressurization system install to fix our crawlspace moisture and soil gas issues and improve the air quality of our cabin living space.

Crawlspaces are nasty places and should be sealed
Like many homes, our cabin is built over a soil crawl space. While crawl spaces offer simple construction and access to the underside of your home, they provide little protection from the environment, and can lead to structural and air quality problems within your home. Standing water, high moisture levels, soil gas, dust and an abundance of rodents and other critters are common in unsealed dirt crawl spaces.
Our crawl space had all of these, including several inches of water after heavy rains. In addition to water, we also noticed odors and fine dust in our home that seemed to be coming from our heating and air conditioning ducts from the crawl space. We needed to do something.
After some reading, I decided to seal the space with a crawl space vapor barrier. After a few bids running in the $5,000 – $8,000 range (just for the membrane install), I decided to do some research and do it myself. Read on for the juicy details.
Crawl Space Encapsulation
As most of you know, crawl spaces are shallow, typically unfinished basement spaces. Many have dirt floors and readily allow entry of moisture, mold, soil gasses, radon, insects and vermin, which can compromise the structural integrity and air quality of the home.
In addition, moist crawl spaces promote rot of structural components, and floor joists contained within the space.
Traditional thinking (and building codes) promoted ventilation of crawl spaces to circulate outside air into the crawl space and control moisture.
Unfortunately, ventilation of crawl spaces often does more harm than good. In many climates, ventilation can make moisture problems worse by introducing an unending supply of relatively humid outside air into the crawl space that can form water once in contact with the cool surfaces within a crawl space.
Current recommendations (and newer building codes) recognize the moisture problems associated with ventilated crawl spaces and call for sealed crawl spaces without foundation vents.
Unsealed soil or concrete floors within the crawl space can allow the passage of moisture and liquid water into a crawl space. Building codes typically call for the addition of a vapor barrier to a concrete slab or over an unfinished dirt floor of a crawl space to help mitigate the passage of moisture into the space.
Unsealed soil or concrete crawl space floors also allow the entry of various gasses into the crawl space. Some of the gasses are known to be dangerous (radon, methane) while others simply compromise the air quality within the home by way of unwanted odors.
If water and unwanted gasses are not bad enough, particulates like silt and dust can easily move from a crawl space into living spaces. This is especially true if heating and air conditioning ducts are located within the crawl space.
Natural movements of air through the home during heating periods due to “stack effect” can also easily transport particulates with air movement through the home.
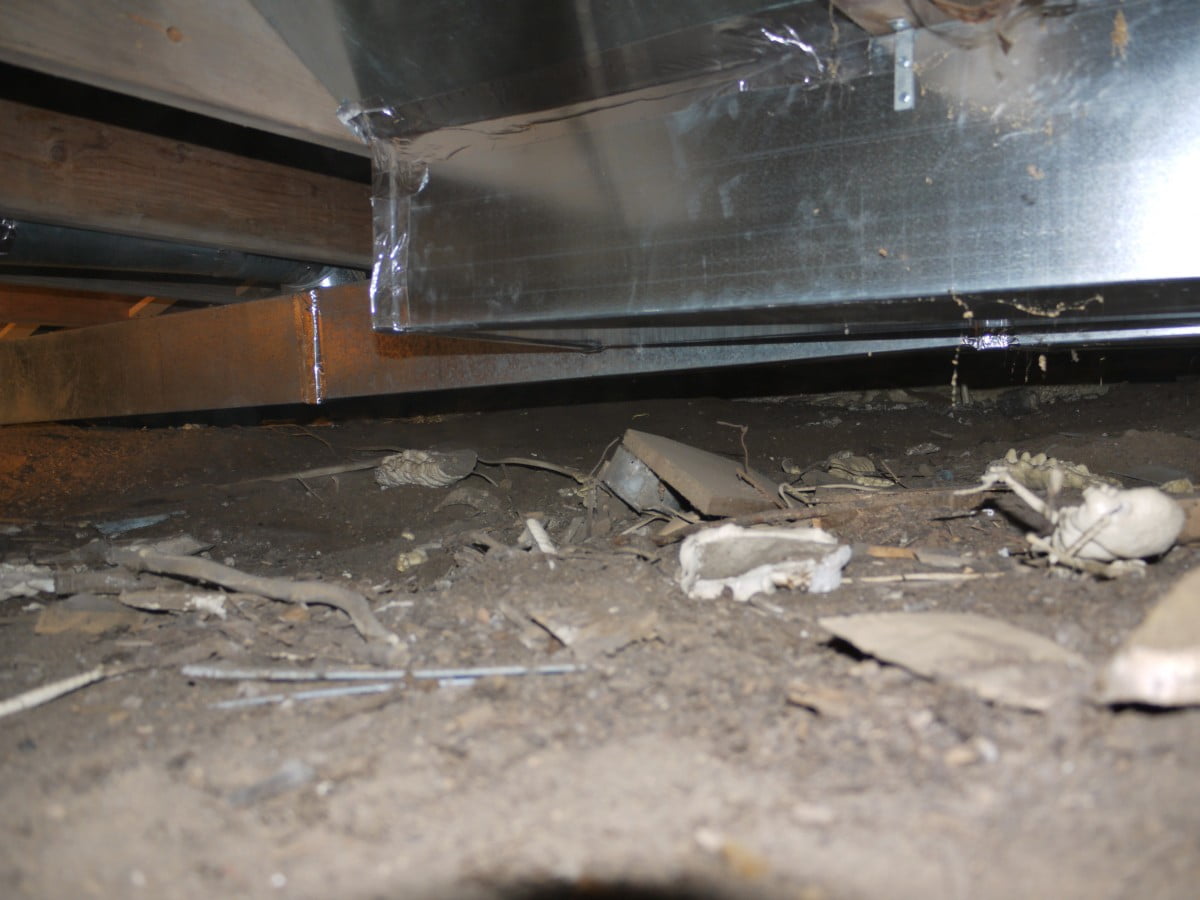
As you can see in the photo above, we do have HVAC ducting within the crawl space. We suspect that much of the dust and dirt we noticed in our cabin was entering our home from the crawl space by way of this ductwork.
So how do you tame the nasty beast that is the dirt crawl space?
Simple: seal it up.
The ideal crawlspace should be an extension of the living space within your home. It should be clean, dry, and insulated along the exterior walls (foundation walls). And to get to this clean and dry state, your crawl space must be sealed. Sealing the walls of the crawl space prevents outside air, rich in water vapor, from entering your crawl space. Sealing the floor of the crawl space prevents entry of soil moisture, gas and other contaminants.
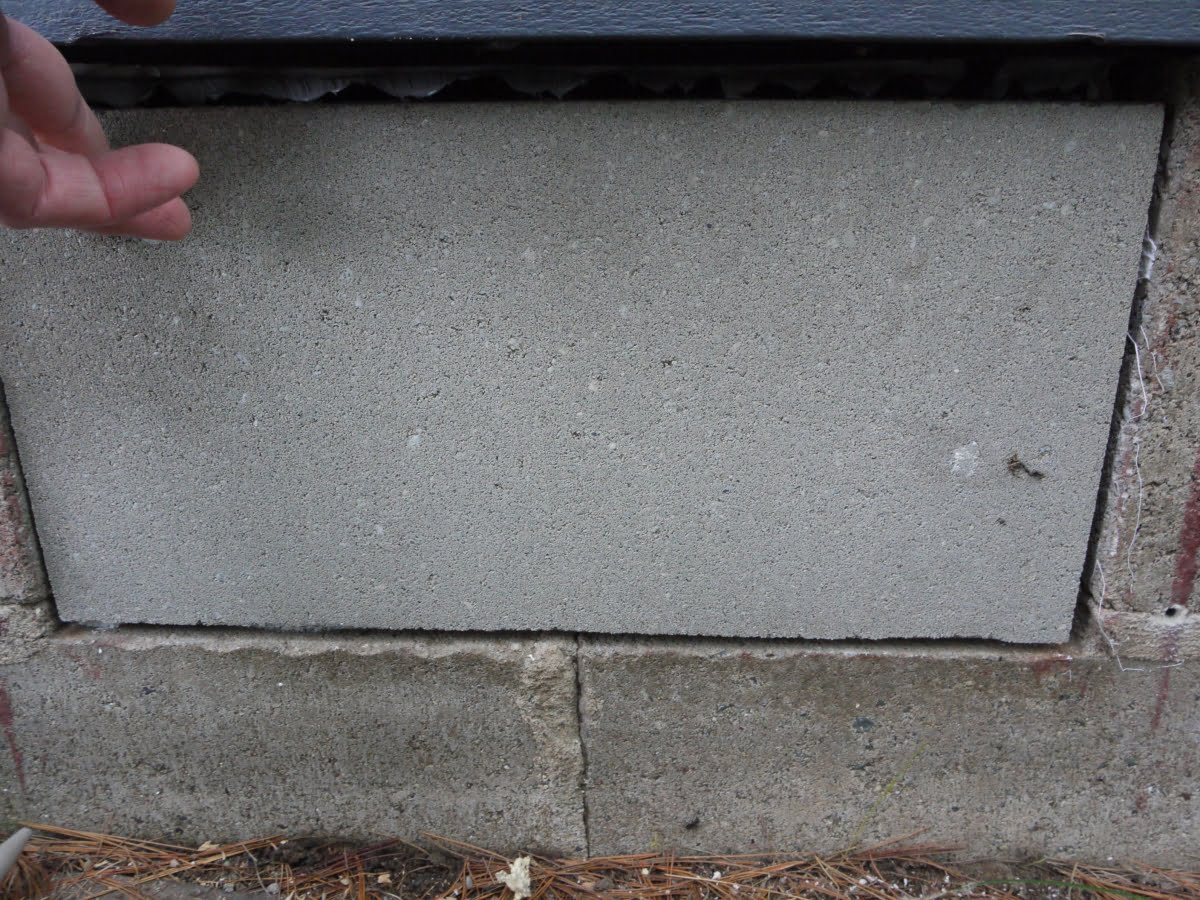
Seal foundation wall openings using concrete foundation block or similar. Block can be installed to close vent openings using masonry mix or a durable caulk. I closed all of the foundation vents of my crawl space using concrete block and polyurethane caulk. Traditional wisdom suggested ventilating crawl spaces to help keep them dry. Unfortunately, the opposite is often true. Ventilated crawl spaces are wet crawl spaces.
Ambient air often contains a fair amount of water vapor. This water vapor, when allowed to enter a crawl space, readily condenses to liquid water once in contact with cool surfaces within a crawl space. Keep water vapor out and your crawl space dryer by closing and sealing foundation vents and penetrations to your crawl space.
In addition to sealing the crawl space foundation walls, the floor of your crawlspace needs to be sealed as well. Dirt and unsealed concrete crawl space floors easily allow moisture, gases and other contaminants to enter your crawl space. Seal your crawlspace floor to keep water and contaminants out and your crawl space and home dryer, cleaner and healthier.
To seal your crawl space floor and foundation walls, use a poly sheeting. Plastic polymer vapor barriers can be fairly easily installed over crawl space floors and up foundation walls to seal your crawl space.
Prior to installing this vapor barrier, care should be taken to eliminate other sources of water entry into your crawl space. In our crawl space, we first sealed old foundation vents and installed a drainage tile and sump pump system.
For additional information on eliminating sources of water in your crawl space, please see my article detailing Sump Pump Installation.
The Addition of an Active Membrane Depressurization System in Your Crawl Space
Adding an active depressurization system to your encapsulation project can significantly improve the performance of the system – especially for the removal of moisture and soil gas.
An Active Depressurization system incorporates a radon pump to create a continuous vacuum under the vapor barrier membrane.
This vacuum actively sucks out moisture, gasses, and fine particulates from under the membrane. These are the same systems used to evacuate radon gas from basements and crawl spaces of homes.
The benefit of adding this active depressurization system is the better performance of the barrier system; the downside is more work, complexity, and cost.
Despite the added cost, many professional installers strongly recommend the addition of a depressurization system with vapor barrier installation. The barrier alone may only concentrate moisture and gasses that later leak into the crawl space through imperfections in the barrier system.
Active depressurization systems are identical to those used to mitigate Radon gas. The principals of such systems are identical and the concepts the same for these systems.
In fact, I used a publication for radon system design to create the system for my crawl space. The publication is the excellent book by Douglas Kladder, Protecting Your Home From Radon: A Step By Step Manual for Radon Reduction (Second Edition)
The book is a terrific reference, and I highly recommend reading it if you plan to install an active system.
Additional Crawl Space Information and Reading
- CrawlSpaceVaporBarrier.net – High quality U.S. made membranes, tapes and supplies and excellent how-to videos for crawl space encapsulation. (Highly Recommended)
- Protecting Your Home From Radon. A Step-By-Step Manual For Radon Reduction. 2nd edition. Colorado Vintage Companies, Inc. July 2003. (Highly recommended)
- Crawl Spaces. GreenBuildingAdvisor.com
- Research Report RR-0401 Conditioned Crawlspace Construction, Performance and Codes. Joseph Lstiburek. Nov 27, 2006. BuildingScience.com.
- BSI 009: New Light in Crawlspaces. Joseph Lstiburek. Oct 16, 2008. BuildingScience.com.
- Building an Unvented Crawl Space. Martin Halladay. May 13, 2011. GreenBuildingAdvisor.com
A word of caution before you embark on this project – crawl spaces can be nasty places! Rodents, mold, dust, debris and tight working conditions can make this a very unpleasant and possibly dangerous place to work. Contact with mice is associated with Hantavirus infection – which can be fatal. Contact with mold can also have adverse health effects. If you are unsure about the condition of your crawl space contact a professional for further advice before proceeding.
OVERVIEW | Crawl Space Encapsulation
SUPPLIES LIST | Crawl Space Encapsulation
-
 20 mil GuardianLiner
Highly recommended - super high quality!
20 mil GuardianLiner
Highly recommended - super high quality!
-
 Foundation Pins
Fastens barrier to foundation wall
Foundation Pins
Fastens barrier to foundation wall


-
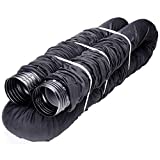 Flex-Drain 51510 Corrugated Drain Pipe
enough to pass around foundation perimeter
Flex-Drain 51510 Corrugated Drain Pipe
enough to pass around foundation perimeter

-
 PVC Tee 4"
Sewer & Drain PVC
Thin wall DWV (drain, waste, vent)
PVC Tee 4"
Sewer & Drain PVC
Thin wall DWV (drain, waste, vent)


-
 Oatey PVC Cement Kit
Oatey 4 oz. kit
to connect PVC pipe for radon fan circuit
Oatey PVC Cement Kit
Oatey 4 oz. kit
to connect PVC pipe for radon fan circuit
TOOLS LIST | Crawl Space Encapsulation
-
 Aluminum Landscape Rake
great for removing debris and leveling crawlspace
Aluminum Landscape Rake
great for removing debris and leveling crawlspace
-
 Tyvek Coverall
really nice to have for a dirty crawlspace
Tyvek Coverall
really nice to have for a dirty crawlspace


-
 Wiss Shop Shear
Wiss 11" Titanium Coated Single Ring All-Purpose Shears
for cutting thick plastic membrane and underlayment
Wiss Shop Shear
Wiss 11" Titanium Coated Single Ring All-Purpose Shears
for cutting thick plastic membrane and underlayment


STEPS | Crawl Space Encapsulation
- Clean Crawl Space and Level Surface.
Thoroughly clean crawl space and remove trash, old wood, metal, sharp rocks and other debris that could puncture the membrane. Use a lawn rake to remove larger debris and level the crawl space floor.


- Measure Crawl Space, Obtain Materials and Plan material layout.
Measure and diagram your crawl space including the height of foundation walls and supports. Create a diagram of your space. Once your diagram is complete, estimate the amount of membrane and underlayment (if using) to order.
Assume 6 – 12-inch seal overlaps and foundation membrane heights of 1 – 2 feet or more. If using an underlayment fabric, you will obviously not need to include foundation walls in your calculations for the amount of underlayment material.
Next, obtain your materials. I ordered my vapor barrier membrane, underlayment fabric (if using), seal tape, foundation wall mounting tape, polyurethane caulk and mechanical mounting supplies (plastic pins, masonry screws or nails, etc) online and had it delivered to my home.
When looking for materials, I highly recommend considering the highest quality materials you can afford. The difference between thin, low quality, recycled plastic membranes from your local hardware store or home center and high quality, reinforced membranes is enormous.
Crawl space encapsulation is a nasty job, and that offers terrific benefits if done right — use quality materials and do it right the first time!
I ordered my material from CrawlSpaceVaporBarrier.com (Crawl Space Repair) and highly recommend their products! I used their 20 mil SilverBack Vapor barrier, Felt 550 underlayment fabric, white seal tape, foundation tape and the plastic foundation fastening pins.
All of the products I purchased and installed from Crawl Space Repair were top notch – I could feel and see the quality compared to other membranes I have seen. Ordering from their site was easy, and everything arrived quickly, well packaged and intact.
When deciding what membrane thickness to use and whether or not to use an underlayment fabric, consider your crawl space conditions and your desired use of the space once finished.
Thicker, higher quality membranes are indicated for high traffic crawl spaces and those with uneven surfaces and surface characteristics that increase the risk of puncture of the membrane. Crawl spaces with a greater risk of membrane puncture (coarse soil with rocks, concrete debris, etc.) may also benefit from a protective underlayment fabric — like the Felt 550 that I used for my project.
Low use crawl spaces with good quality, even surfaces that are lower risk for membrane puncture typically can use thinner membranes. I still would recommend using a minimum of 12-mil thickness and stick to quality, US made products. Most building codes call for 6-mil or greater membrane thickness.

- Cut and Label Material For Install.
Plan your desired material layout, and then cut the pieces of membrane for the installation. I recommend doing this outside of the crawl space. Measure, mark and cut membrane sections first, outside of the crawl space, then pass them back into the crawl space to install.
Most crawl spaces are cramped, dirty and dark. Measuring and cutting rolls of thick plastic is much easier outside of the space. I used my lawn to spread out the material, cut it and roll it back up into labeled pieces. I then passed the rolls into the crawl space and unrolled them in the space for the install.
Many choose to install the membrane along the foundation walls first. Hang it like wallpaper and leaving enough material to overlap at the floor by 1 to 2 feet. With the wall pieces installed, install the floor membrane.
For me, it made more sense to install a portion of my L-shaped crawl space as above, foundation walls first followed by the floor. For the remainder of the crawl space, I started the membrane at the top of one foundation wall, continued to the floor and finished at the top of the adjacent foundation wall. It makes little difference how you orient the material as long as you install it flat with well overlapped properly sealed seams.
When laying the membrane do not pull the membrane tight – leave enough slack in the material to allow movement and not to stress the taped seams and wall attachments. Be sure to leave sufficient slack over any components of a depressurization system that will suck the membrane to the contours of the floor and walls once activated.
- Install Underlayment Fabric.
I started my project with Felt 550 underlayment to help cover the rocky, debris-filled dirt floor of the crawl space and to help provide a slight airspace for the sub-membrane depressurization system.
One of the hidden advantages of using the underlayment fabric is the improvement of the working environment the material provides. My crawl space floor is a very fine silty soil that made it a very nasty place to be.
Once the underlayment felt was down, conditions improved dramatically, making the work much more enjoyable (and likely safer).
For an active depressurization (suction) circuit below the vapor barrier, you will need to layout the drain tile pipe for this system on top of the crawl space floor (on top of an underlayment if using) before rolling out the vapor membrane.


- Layout and Install Sub-membrane Depressurization Drain Tile Pipe (if using).
The corrugated drain tile I used is the typical 4″ perforated plastic drain tile found at most home improvement stores. I used the type with a synthetic filter fabric sleeve to help prevent plugging of the perforations over time. The underlayment fabric should also help to prevent the entry of sand, clay and other obstructing debris.
The use of a perforated pipe provides a vacuum circuit for the removal of accumulated moisture, moisture and gas and odors below the vapor membrane. The use of this perforated drain pipe can also act as a conduit for water movement (into a sump basin for example) if installed in a properly sloped space. However, it is not necessary to consider slope when using the drain pipe solely to provide suction under the membrane.
To layout the drain tile, extend the corrugated pipe by pulling it to full length. Then loosely layout drain pipe throughout the crawl space. You do not have to pipe on both sides of the space for most average size spaces — a single pass of pipe down the middle of the space is sufficient.
Plan the layout to allow for easy connection to a PVC riser to connect to a radon fan. Plan the passage of this riser PVC pipe (usually 4″ schedule 40 PVC) through the living space in a concealed spot (closet, wall cavity or similar) or to the outside of the home. For my project, I ran my PVC pipe through the back of a small broom closet.
For my sub-membrane corrugated drain tile layout, I ran the pipe along the foundation walls of the entire space. I planned for the riser connection, just under a closet where I planned to route the riser PVC pipe to the attic.
To connect the drain pipe to the PVC riser, use a system of 2 rubber roof boots (4″) is used. Sandwich the vapor barrier membrane between a bottom and top roofing boot through which, a piece of thin wall (DVW) 4″ PVC is passed and attached to a DVW Tee fitting. This Tee fitting connects to the corrugated vent pipe network.
If you plan to run 4″ schedule-40 PVC for the evacuation circuit to the attic, you will need a 4″ thin wall (DVW) to 4″ schedule-40 PVC coupling. Use this coupling to connect the riser boot (connected to the corrugated pipe) stub out to the schedule-40 evacuation circuit out of the crawl space.
To connect my riser apparatus to the long run of 4″ PVC heading to the attic, I used a 4″ rubber plumbing coupling to allow for service later if needed and help reduce any vibrations in the system.
Although I only used one suction point riser, you may consider multiple suction points for larger or non-continuous spaces. My crawl space is rather small (~600 SQ FT) so I used just one suction point.
When planning the location of the suction point riser, you will need to add a 3-way Tee fitting to the corrugated drain pipe run. The top joint of the Tee will allow you to connect the corrugated piping run.
Once you have laid the corrugated pipe, connected a Tee fitting at your planned location for the suction riser. Later, you will be ready to create the suction riser by cutting through the membrane to access the Tee fitting.
To seal this riser, you will use two 4″ plastic roof boots that are typically used to seal 4″ PVC pipe penetrations through the roofing. One will sit on top of the corrugated drain pipe Tee, under the vapor barrier membrane, and the other will sit on top of the vapor barrier.
A piece of 4″ thin wall PVC pipe will then pass through both roof boots and connect to the corrugated drain pipe Tee. The two roof boots are then sandwiched together with caulk and sheet metal screws to create an airtight seal between the suction riser and the vapor barrier membrane.
Prior to sealing the membrane, you will need to have one roof boot under the membrane. Even if you forget to install the first roof boot prior to sealing the membrane, you can typically roll the plastic roof boot enough to pass it through the hole you will cut in the membrane for the suction riser pipe.
So, once you have the corrugated pipe installed with the 3-way Tee connection with one of the roof boots aligned over the top Tee connection, locate the top of this Tee under the membrane and cut a circular hole. The hole should be large enough to allow the crown of the first (under membrane) roofing boot to stick through.
Once the hole is cut, align the under-membrane roofing boot and the top connection of the corrugated 3-way Tee opening.
Then pass a piece of 4″ thin wall PVC through the roofing boot that is sticking out of the membrane hole and into the corrugated Tee connection. Seal this connection if the fit is not tight and there is a risk of the components separating.
Because this connection is under the membrane, it does not have to be “airtight”, but should be mechanically tight. Now pass the second roofing boot over the thin wall PVC riser and push down to sit on top of the membrane. Under this boot apply a generous bead of polyurethane caulk.
After caulking, push the roof boot down firmly on top of the membrane. Secure the top roofing boot to the boot under the membrane using stainless steel sheet metal screws. The screws should draw the two boots together and along with the caulk form an airtight seal (see photo).
Naturally, you will not complete the assembly of the suction riser until the vapor barrier is installed and is discussed here to aid in the required planning for the riser assembly after the membrane is laid.


- Layout and Secure Vapor Barrier Membrane.
Now that you have your underlayment fabric (if using) and corrugated drain pipe (if using) in place, it’s time to begin to install your vapor barrier membrane.
Depending on the size of your crawl space, you will likely choose to install your membrane in sections. Many install the foundation wall sections of the space followed by floor pieces. The specifics of your crawl space and material size will determine the best install plan for your project.
To securely hang the vapor barrier membrane, you will need to use a system of fastening the membrane to the foundation walls. Many use double-sided tape (foundation wall mounting tape) to provide an initial stick and seal and complete the attachment with mechanical fasteners spaced every few feet along the foundation walls.
In addition, to double-sided mounting tape, polyurethane caulk can be added to help secure and seal the membrane to the foundation walls. The addition of caulk is especially useful for irregular, wet, or uneven foundation wall surfaces (older, irregular wall block, stone, walls with spray foam insulation).
To complete the mounting of the membrane, most use a mechanical fastener such as a plastic trim pins or similar to hold the membrane securely in place on the foundation walls.
Prior to applying the foundation tape and caulk (if using), clean the foundation block with a broom, brush, vacuum or similar for improved adhesion. Take some time to rub the tape into the block with pressure to enhance the tape contact with the foundation.
After the membrane is attached to the double sided tape and caulk, secure the membrane to the wall with a mechanical fastener spaced every 1 – 2 feet.
To use plastic trim pins (similar to those used to hold on auto body trim pieces), first pre-drill holes through the membrane into the block. Then, tap the pins into the holes with a hammer. Pass the pins through the double-sided tape or caulk bead or higher to avoid leaks.
This system of double-sided tape/caulk plus plastic trim pins works well with flat foundation walls. However, my foundation walls had a very irregular layer of spray foam that made the above, standard method of fastening the membrane difficult.
Because the foundation tape did not stick very well to the spray foam surface, I used a very thick (3/8″+) bead of polyurethane caulk with the double stick tape. In addition, I use powder-actuated concrete nails as mechanical fasteners to secure the membrane to the wall.
When I was thinking of using a powder-actuated nailer (Ramset Cobra) to fasten the membrane, I had to consider the risks of such a technique. A powder-actuated faster system can easily damage your foundation walls.
Prior to using this system, I trialed the nailer using a few spare foundation blocks I had in my boathouse to test whether the nailer would crack the blocks.
My tests did not reveal any evidence of block damage when using the Ramset system, so I proceeded with caution and only used the Ramset nails were I could not use the traditional plastic trim pins.
Other options to consider; concrete screws through pre-drilled pilot holes, and pre-drilling pilot holes for the Ramset concrete nails.
As you install the membrane on the foundation walls, take some time to rub the membrane over the area of the double sided tape and caulk to promote adhesion and a good seal.
Once the foundation wall pieces are in place, begin laying out your floor pieces. Overlap the foundation pieces and floor pieces of the membrane and any seams by 6 – 8″ or more.
As you install the vapor barrier membrane, overlap the seams by at least 4″ – 8″ or more. Under these seams, run a bead of polyurethane caulk and finish with seam tape.
Take the time to rub these seams flat to spread the caulk and promote adhesion of the seam tape.


- Seal membrane around pipes, columns and other penetrations.
When you encounter pipes, support columns, or other objects that will penetrate the membrane, you will need to cut the membrane and seal the membrane to these penetrations.
For pipes and similar items, cut a hole in the main membrane around the penetration. Then, use a separate, oversized, overlapping patch piece of the membrane to conform to and seal to the penetration. Seal this patch to the penetration and main membrane using polyurethane caulk and seal tape.
Support columns should be finished in the same fashion as foundation walls, running the membrane up the support several feet. At the foot of the column, overlap the main membrane by at least 6 – 12″.
Seal the membrane to the support block in the same manner as the foundation walls (double-sided tape, caulk, mechanical fasteners) and seal the overlapping membrane with urethane caulk and seam tape.
Once all the seams and penetrations have been sealed and taped go back and check your seams to ensure you haven’t missed any. Seams in areas of foot traffic or those at risk of higher stress or wear can be reinforced with a second layer of seam tape.
While a vast major of vapor barrier installs should be sealed, secure and complete at this point, I took my vapor barrier project a step further.
For my project, I added a band of spray foam at the top seam of the barrier attachment to the foundation walls. My walls had an existing irregular layer of spray foam in place that made connecting to and making a seal to this surface difficult. The spray foam was my secret weapon to help complete the job.
The other huge benefit of the spray foam is that it allowed me to secure and seal several sections of the membrane in areas that I could not completely reach due to very low clearances.
In some areas, I could just barely touch the foundation wall with my outstretched arm, making it nearly impossible to fasten and seal the membrane to these areas using standard tape-caulk-fastener methods.
The foam also helped me seal the membrane around a section of very irregularly shaped walls that were the foundation of a fireplace and built with fieldstone.
DIY foam kits make this easy to do. You can order kits online that are ready to use for this purpose.
Be sure to read the safety and use documentation from the spray foam manufacturer carefully. You will need a quality respirator with cartridges suitable for use with spray foam. Additionally, a disposable coverall, hat, gloves, and goggles is recommended when using spray foam systems.


- Plan and pipe the remaining components of the evacuation system (Optional).
If you plan to use a sub-membrane depressurization system with the membrane, it is now time to run the piping for the system and install the vacuum pump (radon pump). I will assume you already installed the flexible corrugated drain tile pipe under the vapor barrier membrane or have an existing drain tile or similar system you can connect to.
As illustrated above, you should have access to the drain tile system by way of one or more roof boot sealed PVC riser connections through the membrane.
The riser pipe used to connect to the flexible corrugated drain pipe tee fitting needs to be thin wall type PVC (waste pipe) and thus this thin wall PVC riser pipe will need a thin wall to standard (schedule 40) PVC adapter. To this adapter, connect the PVC pipe run to the vacuum fan (radon pump) you will be using.
Most system designers and fan manufacturers recommend placing the fan outside of the living space of your home — typically in the attic, along the outside of your home or in the garage. The main reason for this help prevent high levels of exhaust gasses (radon) from spilling into the living space if a leak should develop.
My system is not targeting radon since our levels are low, but the consideration still makes sense, and I planned to install my system fan in the attic. Decide where you will route the PVC pipe run to the pump.
I chose the back of a closet and planned the placement of the membrane riser connection just below it to minimize pipe runs and elbows. You will need to cut a hole through the floor(s), and ceiling(s) involved in your pipe run. Use a slightly over-sized hole saw on a heavy duty (1/2″) drill for easy, clean cuts.
Once the pipe is run through the floor and ceiling holes, seal the pipe hole with caulk.
Connect and install the radon fan in the depressurization system.
Once the PVC piping from the membrane riser connection (in the crawl space) is in place, then the next task is to connect a radon fan (pump) to the system. As previously mentioned, radon fans can be installed inside or outside of the living space or crawl space. I plan to install mine in the attic of the cabin.
With the PVC pipe to the attic, pick a suitable mounting location for the fan and connect the crawlspace PVC to the fan. Finally, continue the PVC pipe from the fan to the outside, either through the roof or side of the home.
The fan will need a source of 120 AC power. In my attic, there was not an outlet near the planned fan installation, so I installed one prior to connecting the pump.
I used the fresh outlet install as an opportunity to “upgrade” my fan system by adding a heavy-duty fan speed switch to the electrical circuit I installed for the radon fan.
Heavy duty fan speed controller This fan speed switch allows speed adjustment of the radon pump and, in turn, control the amount of suction applied to the membrane. Check with the fan manufacturer literature to ensure the fan you plan to install is compatible with speed controllers. Some are not and should only have on and off control.
For radon installations, the use of a fan speed controller is typically not recommended, but since my system is just to control moisture and odor, I welcome the flexibility a speed control allows.
Connect the fan using rubber couplings to connect the PVC pipe to the fan. The couplings limit the transmission of vibration and allow for easy fan replacement if needed.
- Connect the exhaust circuit from the sub-membrane depressurization system to the outside of the home
Complete the system by piping the exhaust end of the fan to the outside of the home, in my case through the roof. If you chose the through the roof option to exhaust your system, be sure you complete the proper roof work to ensure a leak-proof install.
The exhaust circuit can also be passed through an exterior wall, avoiding an additional penetration through your roof. If you decide to use an exterior wall to exhaust the system, consider the system’s proximity to windows, decks, and other areas were exhausting gasses may be undesirable.
To cut the exhaust circuit hole through the roof, I used a drill with a hole saw bit. Next, I passed a length of PVC pipe from the exhaust end of the radon fan through this hole and out the roof. Use care to align the pipe so that it is plumb and straight as it leaves the attic.
Other than the cap that comes with the roof flashing boot, there is no need to add a cover or tee fitting to the end of the exhaust pipe.
The system is designed to get wet and in cold environments, the addition of a cap to the end of the pipe tends to accumulate ice from the moisture in the exhausted air.
- Turn on the system and check for leaks
With the depressurization system connected, power on the radon fan and inspect the membrane for leaks.
The radon fan will provide substantial negative pressure below the installed vapor barrier membrane.
Depending on the characteristics of your membrane install and how porous your soil and foundation walls are, the system should be able to develop a vacuum of several inches of water pressure.
The system will perform better if the membrane is well sealed to the foundation walls and all seams in the membrane are tight.
With the depressurization fan on, the vapor barrier membrane should draw down on the soil floor and against the foundation walls. This drawing down of the membrane highlights the importance of leaving slack in the membrane material when installing. Membranes installed without slack can pull apart at the seams when the vacuum pulls the membrane flat. Once you have checked the system and repaired any leaks, your system is ready to run.


Looks like you did a great job! I am in the middle of my encapsulation. What do you do with the tops of the foundation pillars? The center of them are hollow. This will introduce gases and moisture to the area. Did you cap them? If so, what did you cap them with? Or did you just foam the inside? Thanks for the article!
Hi Christopher,
That is a good question. I left them as they are.
You bring up a valid issue. I only had one block post, so not a huge issue in terms of total surface area. One solution, if your posts tops are solid (mine are), could be to cover the top with a paint-on waterproofing membrane like Redgard or Hydroban.
The same general problem applies to other penetrations like a fireplace base and, in likely at the untreated portion of the foundation walls.
My take is that by encapsulating the vast majority of the most permeable surfaces (soil ground, etc), you will retard a majority of moisture and gasses. This is likely especially true if you are adding a sub-membrane negative pressure system using a radon fan vented out of the space.
Thanks for pointing this out. Good luck with your project and let us know what you did.
Gary
Hi Christopher,
I just wanted to reply and let you know you were right about the block foundation pillar – mine is not solid but open. I went down into the crawl space to double check and what do you know….
So, I sealed the top of the rest of the exposed block with butyl tape and foamed the openings with Great Stuff pond and stone foam. Thanks for the heads up, I’m sure the system will be more efficient now, I actually have an additional 1/2″ of water pressure vacuum on the manometer after the repair.
Thanks!
Thank you for the kindness and generosity with freely sharing this well thought out article. I’m financially binded but have a terrible radon problem. Your wonderful article educated me on how I can DIY. Forever indebted gratitude.
Your welcome Matt. Good luck with your project and reply if you run into any issues.
Awesome article! I have several questions
1. We had a rare flooding condition in our crawl space this year and was just wondering if installing a depressurization system would it be harmed if the corrugated drain tile became submerged in water? Would water be drawn into the radon fan?
2. Did you do any type of special sealing around the sump pump?
Thank you
Hey Gary,
I don’t see how you hook up the tile drain to the pvc pipe under the boot. Do you have a picture of this?
Thanks!
Good morning,
We have a crawlspace in the middle of our house that we are in the process of getting estimates on mitigate, mostly for the moisture/mold. We had an estimate done, and we had a question about the process. This company uses a clear poly membrane for the vapor barrier. Do you have any opinions about clear materials like this vs. more opaque ones? Also, the barrier will only go about a foot or so up the walls. My husband has been reading, and it seems like a lot of people run their barriers all the way from the ground up to where the cinderblocks meet the wood framing of the house. Any opinions on how high up the walls the barrier needs to run?
Thanks for your time and your article!
Jess
Jess,
Sorry I missed your question until now!
Regarding the materials – sheet plastics come in a variety of quality and thickness. In general thicker is better. There is a big difference in quality between the cheaper clear “big box” sheeting and the higher quality reinforced material found at suppliers like CrawlSpaceBarrrier.net.
When installing the membrane, higher is generally better depending on the details of the install. Most leave the framing on the foundation uncovered for inspection purposes.
Hope things worked out,
Gary
Gary,
Did you notice any energy cost savings once your system was installed?
C. Chase
Hi Chase,
Not that I know of, but I really haven’t tracked it that closely.
Hi Gary,
I have been contemplating a system like Melissa described above – sump with a vapor barrier and dehumidifier – but after reading your write-up and the answers to all the questions above, I really like the active gas exhaust system; I think I could forgo the sump and dehumidifier.
My problem is access to one corner of my crawl space. Built in 1942 as part of a housing boom for mining operations, there was no grade work done before construction. Half of my crawlspace was dug out and has enough headroom for standing upright, but the other half is just as it was 75 years ago, and the space between dirt and floor joists under one bedroom and bathroom is a range from 6″-12″, making it impossible to reach that corner of the house.
Aside from tearing up the floor in the bedroom or renting a jack hammer to dig a trench under that corner of the house and removing all that dirt from the crawlspace (which were both suggestions from a foundation company with regard to shoring up undersized, sagging joists), are there any suggestions you have for completing the encapsulation process? It seems to me that if I just laid the VB down and pushed it back to the back corner, it would not have the seal it needs for both the VB and the gas exhaust system to do the jobs they need to do. However, because of the low clearance in that area, there is almost no foundation above grade to insulate and encapsulate.
Hi Danny,
Sorry for the delayed reply. I have been thinking about your issue a bit. I had similar issues with a portion of my crawl space. The clearance of my crawl space is very low (8 – 12″ or so) in a portion of my space as well. I did the best I could to slide the membrane along the floor of the space in the narrow region leaving a rolled up leading edge that I “unrolled” and pushed up the foundation wall with a long push broom. Once the membrane covered the crawl space floor and was pushed up the foundation wall, I used the spray foam gun, extended as far as possible toward the foundation wall, to spray a coating of spray foam to embed and hold the membrane against the foundation wall.
Although your narrow portion of your space sounds much larger and further to the foundation wall than mine, you could use the same general approach and slide the membrane to and up the foundation wall the best you could and figure out a way to use foam to seal and hold the membrane. If you use a thicker, quality membrane (I used a reinforced 20 mil membrane), you will find it is fairly rigid and easy to slide. To help with the sealing and attaching the membrane to the foundation wall, you might even consider getting a spray foam contractor to do the foam part – they have very long guns that could probably reach the back of your low space.
Good luck and let us know how it goes!
Gary
Hi Gary,
Thanks for answering my earlier questions. I am very appreciative.
I spent several days doing my best Andy Dufresne impersonation (The Shawshank Redemption), and dug a trench about 3 feet wide and maybe a foot and a half deep toward the side wall of my house that is under the two rooms that have been inaccessible for 75 years – the crawlspace dirt is truly 2-3 inches below the bottom of the joists under a full 1/4 of the house. I discovered that certain shortcuts were taken during construction, namely using 12′ joists with 4′ scraps nailed to them to span a 13′ distance in this area. So, my next step before doing any ventilation/encapsulation will be to pull up the 75-year-old hardwood floor (very carefully) and replace all those “lengthened” joists with joists the proper length and spacing. I will then be able to access the foundation wall to attach the liner where I didn’t think I was going to be able to reach.
After not having significant rainfall to see how much moisture is actually coming in through the soil below the foundation walls lately, we are currently experiencing the outer bands of Hurricane Irma and rain is falling steadily, so this should give me a good indication of what I will deal with in the future with heavy rainfall.
My question is how to route the ventilation pipes under the liner. The house is a basic rectangle with half the space dug out to a depth of about 6′, and an addition behind the dug out end that has about 2′ of crawlspace, forming an “L” shaped house, with the original brick foundation wall separating the two spaces, resulting in two spaces that I will be encapsulating. There is a hole that was punched through to allow plumbing and electrical to pass through, and there is enough room for me to pass the perforated pipe through as well, so I don’t need to ventilate each space individually. The total area of the two spaces is a little over 1,300 sf. Would it be sufficient to just lay the ventilation pipe around the inside of the perimeter of each rectangular space in a loop, or do I need to “snake” the pipe under the liner from side to side so that it will cross the middle of the spaces in various locations? (My apologies if my description causes more confusion than clarity.)
Danny
Gary,
I’ve been thinking about encapsulating my crawl space, and the insulation of foundation wall has been troubling me. I’d like to do everything up to code, and the code requires sprayed foam be protected by ignition barriers such as drywall. Have you thought about protecting your foundation wall insulation? It sounds like a lot of work!
Regards
EJ
Thank you for taking the time to post your project and knowledge!
I live in MI in an area where the water table is high and I have soil that sounds very similar to yours. A few years back I encapsulated my crawlspace by using foam board on the inside of the blocks and normal 6 mill plastic as a vapor barrier. I inserted a sump pump and drainage tile within the crawlspace. Sealed everything the best I could and put a normal dehumidifier (which drained into the crock) to help with escaped moisture (never thought about the soil gases issue). We recently had a flash flood conditions which almost reached the 100 year flood levels. My crawl space had 12″ of standing water, most of which stayed under the vaper barrier because the barrier floated on top. So, the time has come to “freshen up” down under and that’s when I found your post and has my thinking about soil gas.
My question: How do you think your vacuum system would handle being submerged in water under your home? Would you have to rip out your vaper barrier and start over?
Hi Melissa –
Sorry to hear about your flooding.
To answer your question, I don’t think the system would be affected by temporary submersion under water. Once the water is out of the space, I would inspect the membrane and repair and seal any obvious damage to the membrane. When I ordered my membrane, I also ordered a high quality water proof sealing tape used to seal the plastic membrane. This tape would likely be very useful repairing any damage to the membrane. Here is a link to the tape: High quality crawl space liner tape.
And regarding the vacuum system, again, I doubt any damage would occur from the flooding. All of the components of the system are generally plastic and the pump (located in the attic) is designed to operate in “wet” conditions. As a benefit, the vacuum system would likely drastically improve removal of the water and humidity under the membrane after the flood.
I hope this answers your question.
Gary
Cool project and great documentation. Thanks for sharing.
Now that you’ve had it installed for a couple years, have you had any rodent or pest problems?
Or did this system effectively exclude them?
Thanks again.
Hey Chris,
No problems after install. The main reason I did the install was to help control moisture and silt movement into the living space. Both of those problems have essentially been eliminated. The combo of the sealed 20 mil liner with the radon pump vacuum has eliminated moisture entering the crawl space. Prior to the install our sump pump in the crawlspace was quite active, but now almost never is triggered to run. The project is totally worth the effort, I highly recommend sealing your crawlspace.
Gary
Thanks Gary.
Noticed you had spray foam on your walls already. I am removing foiled back fiberglass insulation from my walls and plan to go back with foil backed foam insulation. Do you recommend taking the vapor barrier all the way up the wall? If yes, should it be behind the insulation or in front of it?
Regards,
C. Chase
Hey Chase,
Yes, the foundation walls had spray-on foam applied before we purchased it. As far as insulation of a crawl space goes, insulating the foundation walls is, in most cases, ideal. It does make it more difficult to attach a vapor barrier.
Regarding your questions, I would carry the vapor barrier up the wall some distance, and up the entire wall if possible. Framing on the top of the wall should be left exposed for inspection purposes. For most installations, the vapor barrier should probably be installed over the insulation. Check out this excellent article at Building Science
Gary
Gary,
Your install is awesome. I have a large crawlspace (20X45ish and its 4.5Ft in height) and have a couple of questions:
1) Did you have to remediate any mold in your crawlspace? If yes, what did you use?
2) Are the ends of the depressurization hoses capped?
3) Noticed you joined the hoses in the middle of your crawlspace, does location matter?
Thanks in advance
Chase
Hi Chase,
Thanks for the questions.
1) No. But I have used Mold Armor a bleach-based product, to remove mold on other project and it works well.
2) I did cap the ends, but mainly to keep debris out.
3) I did join the perforated pipe just about in the middle of the pipe run. I attached the suction to this junction. From what I have read, I don’t think it matters a great deal where you apply the suction for reasonable sized spaces, but it would seem the closer to the middle the better, depending on the limitations of your space.
G@CDIY
Gary as other have said great work and great write up! Maybe I missed it, but how many sq ft is your crawls space and approx. how much do you think it cost just for installing the vapor barrier part?
Erik
Hey Erik,
Thanks for the kind words. My space is ~ 600 sq. ft. and I spent a total of $1,100 for: a 20 mil barrier, the Felt550 underlayment, tape and foundation pins. All of the products were ordered from CrawlSpaceVaporBarrier.net, which I highly recommend.
Gary
Hi Gary,
Awesome work and posts. Thank you. I’m wondering, what if future work needs to be done in the crawlspace? Can the materials tolerate you or other people crawling on them? What is the chance of damage?
Hi Ralph,
Sorry for the late response – somehow I missed your question.
Regarding the question of future work, I find the crawl space much easier (and more pleasant) to work in after the membrane is installed. It is clean, dry and the 20 mil membrane is easy to slide on when moving in the space. Also the membrane is very durable and I have not noticed any durability issues from working on the membrane. That said, I do use care when working in the space and will remove my shoes if possible or make sure the soles are clean to help avoid abrasion or puncture of the membrane. Also, I will use an inexpensive runner style rug in the crawl space to work on if I plan to spend any significant time on any one area of the space.
I have had a few holes, typically caused by sharp rocks under the membrane. To repair these areas, I simply cut a patch of left over membrane material and tape it over the penetration. If the underlying debris seems to present continued risk for future injury to the membrane, I will double or triple the patch to reinforce the membrane over the trouble spot.
Hope this helps!
G
Gary, great write-up and congratulations on doing the work, documenting it so well while doing it, and staying engaged with questions for more than a year! I’m wondering what keeps the membrane from being sucked up against the perforated pipe and blocking the holes, particularly because you advised to not make the membrane too tight so it would be able to be drawn down toward the soil when the fan pulls the air. Thanks for helping me understand.
Hey Ted,
Thanks for the kind words. The membrane does get drawn down around the perforated pipe, but I don’t think it can significantly “block” the negative pressure developed under the membrane.
The pipe is perforated around the entire circumference of its surface. The membrane typically only covers 60% or so of the pipe surface, leaving plenty of perforated pipe unobstructed. In addition, even if all of the pipe perforations are obstructed by the membrane (essentially created solid pipe), as long as the end(s) of the corrugated pipe are not sealed, the vacuum would still be developed under the membrane and likely spread throughout the space.
In reality, or at least in my experience, there are enough imperfections and minor leaks in the membrane and walls to which the membrane is attached as to not allow a very vigorous draw down of the membrane. This is likely not the case with well sealed and prepared concrete spaces, but with dirt spaces (like mine documented in the article) it doesn’t seem to be a problem.
Despite all of the above, the membrane still works well and is one of those “I can’t believe I didn’t do it sooner” projects. Not only did I significantly reduce the grit, dust, and odors in our cabin, but the active system has done an amazing job of keeping the crawl space dry. Prior to the membrane, our sump would cycle dozens of times during a rainy period of a few days. Now, with the membrane, the sump pump cycled maybe two or three times during the entire season!
If you have the time and resources, just do it. Good luck and enjoy.
Gary
Dave,
Kudos for a fantastic write up and DIY. Exactly what I was looking for and more. I had not even considered a depressurized setup and am going to add it to my system.
Do you have any idea how much it costs to run that radon fan 24/7?
Hi Rich,
Thanks for the comments and question.
RadonAway has a cost calculator on their website here: RadonAway Cost Calculator
According to their calculator, our unit (RP 145) costs about $5 a year to run 24/7/365!
Gary
Gary,
Do you have any ideas on how to attach the 20mil membrane to a field-stone foundation in the crawlspace. I have also dug out the floor for more headroom and now have a 2 foot wall of dirt to cover before attaching to the field-stone. Any suggestions would be appreciated.
Thanks
Dave
Hi Dave,
Use spray foam.
I had the star problem with a portion of this project. I had the base of a fieldstone fireplace to secure the membrane to. I used spray foam to fill in between the stone and level the surface. While the spray foam was still wet I hung the membrane smoothing it spread the foam and seal it to the foam covered stone surface.
I would consider misting the stone surface with water prior to foaming it as most foams require moisture to cure. You should obviously research the product you plan to use if you plan to do this.
To hold the membrane while the foam is curing, you could use heavy duct tape and maybe an occasional masonry screw after pre drilling to help prevent cracking of the masonry.
In addition to the foam between the stone surface and the membrane, you could add a layer of foam over the top edge (like I did) to help hold and seal the membrane.
I might have a few photos of my coverage around the field stone in my crawl space – I will check and upload if I can find one.
Good luck!
Gary
Gary,
Thanks for sharing your wisdom. During the last 4 months, I have sold my home, moved into a cramped condo (with family of 4) bought a lot, and have spoken with multiple builders. As of last week I have signed a contract to build our dream home. But as an engineer by education, I have struggled with how to properly design a crawl space (living in knoxville, TN). You have solved the puzzle(moisture + radon). It’s amazing that builders and building codes are so conflicted regarding crawl space design (Closed vs vented). I have a couple of questions for you: 1. is your solution commonly done by encapsulation companies(most around here seal it and throw in dehumidifier) and charge you 15k. 2. As a new construction, what type on panel insulation should I use on the block brick . Thanks jon
Hey Jon,
Thanks for visiting and thanks for sharing your situation.
To answer your questions;
1. To be honest, I’m not sure how many of the encapsulation companies install active systems for moisture and air quality only. I would guess if you start with a radon mitigation company, they would likely be very comfortable installing an active membrane system. Since you are starting from scratch, you would likely benefit from working with the building to ensure a quality membrane is installed during the dig out of whatever your foundation will be. If you plan to utilize a crawl space, a simple slab of concrete (“rat slab”) of concrete with a barrier below or within it would likely provide you with long term benefits.
2. For insulation, most experts would recommend focusing on installing the foundation walls. Polyisocyanurate foam board and spray foam are good choices. If possible, you may want to seal and insulate the foundation walls along the exterior surface. This is an excellent article regarding crawl space construction by Martin Holliday from GBA discussing many of these issues, I recommend taking a look.
Good luck with the project. Let us know what you do and upload a few photos if you can.
Gary
Gary,
Do you cap the open ends of the perforated tubing?
Thanks,
Tim
Hey Tim,
Yes I did cap the ends of the perforated tubing. Not sure how much it matters as the vacuum is likely fairly distributed by the end of the tubing run. Probably more important for short runs of tubing. My thought was that it may help equalize the draw through the entire tubing run and help keep debris from possibly entering the circuit.
To cap the ends I used the appropriate size DWV PVC cap, for example: This 4″ DWV PVC Cap.
Gary
Gary,I am having a hard time visualizing this step;
To connect the drain pipe to the PVC riser, use a system of 2 rubber roof boots (4″) is used. Sandwich the vapor barrier membrane between a bottom and top roofing boot through which, a piece of thin wall (DVW) 4″ PVC is passed and attached to a DVW Tee fitting. This Tee fitting connects to the corrugated vent pipe network.
Does the 4″ pvc penetrate the drain pipe? is it capped on the ends? any help to help me understand this peice would be appreciated.
jeff
Hi Jeff,
This step describes how to connect the discharge circuit to corrugated drain tile placed under the crawl space membrane if you plan to add suction under your crawl space membrane (an active membrane system).
In an active membrane system (a membrane with suction), a radon pump is connected to the crawl space membrane to help remove moisture and gases. This step suggests that you use plastic PVC roofing boots to seal this suction circuit (heading to the radon pipe) to the crawl space membrane.
With the technique I describe, the suction from a connected radon pump is distributed throughout the crawl space using flexible corrugated plastic drain tile spread out throughout the crawl space. This drain tile is installed under the crawl space membrane.
You will need to connect this drain tile to a PVC pipe that connects to a radon pump (supplying the suction) and exhausts to the outside (through the roof in my example).
This step that you are referring to described the connection of the drain tile pipe system (under the membrane) to the PVC circuit heading to the radon pump.
Corrugated drain tile pipe typically will connect to thin wall DVW (drain vent waste) PVC pipe. Use type of PVC pipe to connect to the drain tile pipe circuit (under the membrane). This connection is the connection that will connect to your radon pump.
If you have a small crawl space and a shorter run of drain tile pipe, you could connect to one end of the drain tile and just cap the other end.For my somewhat larger crawl space, I connected to the middle of the drain tile pipe by using a DWV PBC “Tee” fitting, with one half of the drain tile circuit to end if the tee fitting and the riser DWV PVC circuit to the third end of the tee.
The PVC boots seal this connection to the membrane. These boots has a pliable rubber seal that the discharge circuit pipe passes through and seals to. One boot is under the membrane and one is on top. Caulk is spread over the membrane under the top boot. The boots are then drawn tightly together useing sheet metal screws.
The boots just seal the connection of the suction circuit to the crawl space membrane.
I hope this helps. I will look for further photos to post.
Gary
So, I have been prepping my crawlspace getting ready to encapsulate it, I’ve done some homework on it, however, i like how you did your set up. My humidity under my home is high 80s to 90s right now. I was planning to just seal it up and add a dehumidifier, and seal all of the vents. My theory was that the barrier would eliminate 90% of the humidity and the other 10% the dehumidifier would take care of. Do you agree, i just havent seen it done the way you did, also do you think it would have been possible to run the pipe out the side of the foundation wall and not out the roof? Btw, you install looks great, really clean job!
Hi Will,
Thanks for visiting and the nice comments.
I really like the idea of adding a radon pump to most encapsulation projects, as it actively removes moisture and gasses trapped under the membrane.
Many do use a dehumidifier, but you will still need to remove the water the humidifier generates. And, I like the removing the trapped and accumulated moisture and gasses under the membrane before they can get into your crawlspace.
To me, it seems better to remove the moisture and gasses under the membrane instead of allowing them to accumulate and escape through whatever imperfections you have in the system and hoping a dehumidifier can keep up.
As I mentioned in one of the comment threads above, before my encapsulation/radon pump system, my crawl space sump pump cycled quite frequently (up to several times a day). Now with the active encapsulation system, I can’t remember the last time my crawl space sump pump has cycled!
Also, an active system using a radon pump will remove gasses in addition to moisture. For me that was huge – we had a far amount of soil gas.
Oh, and one more thing, I would bet a radon pump active system is cheaper. Most of the large crawlspace dehumidifers I have seen start around $1,000. A radon pump and some PVC can be had for $200 or less. I would also guess that the radon pump uses less electricity and would be much cheaper in the long run.
Regarding the exhaust circuit for the active system, you certainly can run the circuit outside your home, exiting through the foundation wall or rim joist. Most radon pumps are designed for outdoor use and can be mounted outside. In addition, unless you are exhausting radon gas, you probably don’t need to run the system to the roof – you could mount the radon pump in the crawl space and just exhaust it through the wall similar to a dryer vent.
Enjoy your project and upload a few photos if you like using the “upload image” button below.
Gary
Hi Gary: I am about to embark on encapsulating the crawlspace under my cabin and will follow your process. I like, very much, how you have laid this out. Very informative and it’s very helpful that you la out what products you used and where you purchased them. A few questions:
1) The vacuum system you installed. Do you have any thoughts on what the RH was in the crawlspace prior to the install and what it is now?
2) How often do you run the radon fan? Continuously or?
3) Do you worry at all about creating a negative pressure situation in the rest of the house where there is an impact on the exhaust gas from a furnace, i.e. the burned exhaust gas is actually pulled back inside the home? Or is the fan speed so low that there is enough make up air in the crawl space?
I’m looking forward to starting and the quotes I received back to have an outside source do this were quite expensive.
Regards: Pat
Hi Pat,
Thanks for the positive comments. To answer your questions:
1) I haven’t compared the relative humidity in a controlled fashion, but judging from indirect measures, the humidity in the crawl space and our cabin has dropped substantially. The sealed crawl space membrane certainly helps prevent moisture from moving into and through the crawl space into our living space, but the radon fan seems to contribute substantially to drop moisture levels. One example is our crawl space sump pump. Prior to this project, our sump pump would cycle many times per week. Since the membrane install and use of the radon pump, I cannot remember the last time the sump pump ran. I did open the sump pit cover just to make sure the pump was still working, and it was bone dry. This has to be the result of the active suction under the membrane. The membrane alone should have no bearing on the moisture entering the sump pit.
2) I run the radon fan continuously. As you probably read, I installed a fan speed controller so I could vary the radon pump speed. I do sometimes vary the fan speed based on season, or conditions.
3) Good questions. I haven’t noticed any significant evidence of negative pressure within our cabin living space – the fireplace works well with proper chimney function, the kitchen exhaust fan works well, etc. Our furnace is located in a separate small attached utility room outside the cabin, and hasn’t had any issues. I assume the make-up air comes through the block and foundation walls, but some of it probably comes from the crawl space and indirectly the cabin living space. It would be interesting to test airflow in the crawl space and cabin living space. Part of my indifference regarding the potential negatives of use of the radon pump with regard to negative pressure comes from their widespread use. In my reading I haven’t come across much discussion of issues with negative pressure when using a foundation radon pump. Obviously, this doesn’t mean it doesn’t happen or isn’t worthy of consideration, but I haven’t had any issues to speak of. You could certainly install some sort of makeup air circuit within the crawl space to limit the amount and to limit the pressure cycle to within the crawl space.
In the end, I would do it the same way if I had to do it again. Having a radon pump in the system offers tons of potential benefits and you could always limit its use. I would assume a system with just a “sealed” membrane simply concentrates moisture and gases under the membrane which probably find their way out through flaws in the system. Its nice to have a way to exhaust all the junk your are trying to block.
Enjoy! Feel free to give us some updates and maybe a photo if you have time.
Gary
Hats off to you for a lot work. I thank you for your education. I have a 100 year old money pit ( Charactor means be prepared to spend). I am sealing under my leaving room floor. There is no access so I have to tear up the exsisting hardwood floor. People say what a shame to destroy the floor. Well should be here in the winter when cold wind blows through the footing and sill plates. Also I have to level the floor. At the front end I had to dig out the dirt as it the was between the joistes. The only peice of the puzzle and I should have figured it out was to seal the vapour barrier with spray foam . I am very greatful for that information. I am doing all my renovations by myself and at times it gets to much. So with people like you it helps to take the edge off. One thing my footing is stone and cement not easy to seal. So the foam did the trick. Thanks again.
I would like to pass on some information. I highly recomend not using any type of fiberglass insulation in any none heated crawl space as it will attract the least bit of moisture and it sags over time. If foam is too expensive. Then there is a product they now sell in the US from Canada called Roxul. It is waterproof and fireproof and will not sag over time. So there is no worry of attracting mositure.
Mike
Hi Mike,
Thanks for the info and for sharing your project with us. Hope it went well.
Gary
Thanks for the great how to. I was planning to use a dehumidifier, but am considering the radon pump. My question is, my block foundation walls are not insulated. Spray looks difficult . What’s best? And should insulation go behind or over the barrier?
Hi Lynda,
Thanks for the comments and question.
If given the choice between a dehumidifier and an active system with a pump, I would favor the active system with the pump. The pump will not only remove the moisture before it gets to the space, but will help with other gasses as well – soil gas, odors, and radon.
Either way, the plastic liner should pass up the block walls some distance (the entire height is best). If you do plan to insulate the block with spray foam, the plastic liner should be applied to the block first. My situation was unique in that the spray foam was already on the block, requiring me to install the plastic over it (I could have removed all the foam first and reapplied it, but that would have been a huge job).
As far as insulation, spray foam is hard to beat. If you do insulate your crawl space, insulate the foundation walls (block) and avoid the underside of the floor above and joists.
Gary
Thank you for the very detailed explanations of projects and step-by-step details, photos and costs. This isn’t a project that I would want to attempt, but extremely helpful to understand the process involved and provides me with questions to ask when obtaining bids.
I installed the 20-mil this past weekend. It took 3 guys five days to install 20 mil, under-membrane depressurization system, and Compact Air Plus Dehumidifier under a 34′ x 56′ home. We’ll see how it goes. I am still awaiting the arrival of the radon fan (moisture / odor fan) so the outlet is just capped for the moment. The 20-mil is not that difficult to work with despite having forty 4″ steel pipes vertical into the ground supporting my house. I will post photos next weekend when I am off work. Thanks for all your help, folks!
Hey Zach,
I was just re-reading your post and I am wondering how the project turned out. I’m sure many would love to see a few photos too if possible.
Gary
Gary,
Thanks for documenting your project with great details. It is so encouraging to me that I’d give a shot by myself. The post is very informative for my planning to encapsulate my 20×36 square feet crawl space. Here are a few questions:
1. Is there a P trap to trap water accumulated in the vent system? Is the PVC pipe run perfectly horizontal or titling at an angle?
2. Could rain/snow get in from the PVC pipe on top of roof ? It seems open to the sky. I can see a picture here, but am not sure what it is.
https://img.cabindiy.com/how-to/Crawl-space-radon-soil-gas-evacuation-pump-roof-flashing-cap.jpg
3. Is 20 mil Vapor Barrier hard to work with?
4. I have a 18″ x 28″ window in my basement with its window well right under my wood deck. There is no sun light there. Could I pass the PVC pipe out of window opening and seal it off? I can run the pipe under the deck about 10 ft away from the foundation wall. That would be the shortest path out instead of getting to the garage and out to the roof.
Best,
Wayne
Hi Wayne,
Thanks for the questions.
1. No need for a trap in the depressurization vent line as this line is closed and vents to the outside (out the roof in my case). As you know, plumbing traps use water to prevent gas (typically sewer gas) passage in plumbing circuits. And, in the case of the circuit venting the underside of the crawl space membrane, you are not venting sewer gas.
2. Rain and snow do get into the open end of the vent on the roof. Even so, most authorities seem to recommend not protecting the vent with a vent cap or hood. The vented gas will tends to have a high moisture content and I would guess, could cause problems with ice formation on any obstruction above the roof vent.
Any water passing back into the circuit should exit fairly quickly with an active system. In addition, the fans used in these systems are designed to operate in wet conditions.
3. The 20 mil vapor barrier I used is excellent material. Although somewhat heavy, I didn’t find it that difficult to work with – it cut easy and was easy to secure using the methods and tape discussed in the article. Once finished, you will be glad you used the best material possible. I highly recommend the 20 mil product from crawlspacerepair.com.
4. Not sure if I would use the window to pass the PVC. Seems like in the long run it would be better to cut a hole through the wall or rim joist, that way if you ever need the window it is intact.
Enjoy the project!
Gary
CABIN DIY
CABIN DIY
CABIN DIY
Where did you get the HEAVY DUTY FAN SPEED CONTROLLER.
I need one but I cannot find the one you used.
Thanks!
z***********@hotmail.com
Awesome! Nice work Zach! Post some pictures when you get time.
The fan speed controller is the Leviton MNF10-1LW Monet Slide Fan Speed Control. I got it at amazon. They are expensive, I suspect you could use any fan speed controller that has a sufficient amperage rating for the fan you plan to use.
Thanks Gary. I will exhaust the pipe through the attic roof. I am not sure if I can have enough time to finish before it is too cold for the roof work. I could use roof ridge vent until next spring.
It seemed that you put the drain pipe on top of felt 550. In my case, I have a few inches of pea gravel on the ground. Could I just bury them in the pea gravel and make the floor level? The crawlspace is pretty dry, so I don’t expect water in the drain pipe.
Also will it be beneficial if I paint the wall below double-sided tape with dry-lock paint? I don’t think that I would go further to the foam route. Some reference I saw suggested the vapor barrier should be 3.5 inch below the top of concrete wall, and stapling the VB on the wood frame on top of concrete wall is not recommended.
Best,
Wayne
I recently started a project to seal my crawlspace – before I’d seen your article ), and I’ve run into a bit of a problem I think… or the barrier is doing its job, I’m not sure which.
I laid out the barrier but didn’t seal it right away and came back to it a few days later.
While I was maneuvering the barrier into place, I looked under and was surprised to see white mold that hadn’t been in the rocks/floor before I started.
Should I stop immediately and work on drying out the crawlspace first, or is the barrier doing its job? Will it keep the mold out once sealed?
Any help is appreciated.
Hey Adam,
Thanks for the question and thanks for using the site.
I would leave the membrane and seal it. It sounds like the barrier is doing it’s job and trapping moisture. Once the membrane is taped and sealed, you may consider wiping the surface of the membrane clean with a dilute bleach solution or some Chlorox wipes to kill any mold on the surface of the membrane.
Although it would be additional work and expense, you may consider adding a active depressurization circuit with a radon pump like I did, as it sounds like you have a fair amount of moisture under the membrane. An active system really works well to remove the moisture. As an example, since we have had the active depressurization system active, our sump pump has not triggered. Prior to using the active depressurization system, the sump would empty water fairly often – especially in the spring and fall.
Hope that helps. Let me know how it goes and upload a photo or two if you like or think it would help.
Gary
Thanks for your detailed post. If you don’t mind…I have a few questions.
How long did it take to complete?
Did you work alone?
Is that mold on the floor truss in that last photo?
Do you think it’s a good idea to run HVAC piping (small diameter) from my attic to the crawlspace after I seal it because I am weary of dehumidifiers (Fire risk)?
Thanks again!
Hi Zachary,
Thanks for the questions.
I did the work alone and completed it in about 5 days. I did have all the supplies and tools available when I started.
The white powder on the joist is I believe mainly drywall and plaster residue from older work on the cabin. There probably was some moisture on one of the joists and possibly a small amount of mold from years ago.
I’m not sure of what you are proposing with the HVAC run to the attic. From my experience, having a active system with a radon pump as I did, you will not likely need a dehumidifier. Since the install of my membrane and use of the active vacuum system, the moisture levels in my crawlspace have dropped dramatically.
Gary
My HVAC unit resides in the attic. I am planning to install a perimeter drain system as well as an under-barrier depressurization system w/ the Radon pump as you did. I will spray foam the walls, 20-mil on the dirt, and seal it all up. How do you recommend I condition the crawlspace air? Basically, it will have no air being supplied to it from anywhere…Will this be okay?
Zach –
Your plan sounds good. Now I get the HVAC question.
From my understanding a perfect crawl space is sealed from the floor to the top of the perimeter walls. This keeps moisture, soil gas and outside air out of the the crawlspace. The interior of the crawl space should then be treated as another room in your home — complete with HVAC sends and returns or a method of air exchange with the home living space.
Here is an excellent article discussing an ideal sealed crawlspace from the excellent resource, Green Building Advisor.
While this is the ideal treatment of your crawlspace, there may be some disadvantages to allowing complete air exchange with the space. Considering my crawlspace, even though I have sealed it and cleaned it thoroughly, I am not exciting about circulating our living space air (via the HVAC system) actively through the crawlspace. For years this space was wet, dirty and the ground of the crawlspace was made up of very fine silt. I suspect there is still a fair amount of residual dirt and dust in the crawlspace that I was unable to clean and remove.
That said, there will still be air exchange between my living space and my crawlspace. Given the age of my cabin, there will be many small penetrations that will allow air movement between these spaces, but in a slower fashion. If I was building new and could start with a clean, sealed crawlspace, then for sure I would run HVAC into the space, just like any room in the house.
I think every situation is slightly different, but the concepts should be similar.
Good luck and enjoy the project, sounds like you have a sound plan in place. Upload some photos if you get a chance.
Thanks,
Gary
What do I need to do with vapor barrier at framed stub walls set on concrete runners? Just wrap the VB onto the runner treating it like foundation wall?
Hi Brian,
Thanks for the question. Vapor barrier treatment of a perimeter concrete foundation wall is typically to bring the barrier up several feet or up to the beginning of the lumber framing (sill plate or similar). Vapor barriers are not typically not installed covering lumbar framing for inspection purposes, especially in areas with termites.
If your wall is a support wall inside the perimeter foundation wall, I would treat it like a concrete pier support and carry the vapor barrier up both sides (or all sides if it is not connected to the perimeter foundation wall). I would not cover the framing with vapor barrier.
Do you have a photo you could upload using the attach button below?
Gary
Excellent post. I have the same scenario. What would happen if I used an existing exhaust fan to vent an encapsulated space? Without the underlying under the vapour barriers suction tube . Would the fan run out air to draw ? especially if the space was totally sealed/foamed
Hi MIchael,
Thanks for the kind words.
I guess I’m not sure what your set up is. If you are asking about pulling air out of the crawl space directly using a fan, I would caution against this practice as it risks developing negative pressure within the crawl space and home above. Negative pressure can be dangerous in home as it can lead to back drafting of combustion appliances and furnaces which can lead to the buildup of carbon monoxide, natural gas, etc.
Even if you added make-up air through venting, you would be moving large volumes of outside air into the crawl space which, depending on your climate, can bring in a lot of water vapor by way of humidity in the air, into your crawl space.
Have you seen these systems work successfully WITHOUT a perimeter draining system…I do not have standing water in my crawlspace but I am wondering if it would build up somehow after installing a vapor barrier. I have poured concrete and brick perimeter that SHOULDN’T allow standing water in should it flood heavily. What do you think?
Hi Zachary,
My system works very well and does not use a perimeter drain system. I just use the perforated drain tile under the membrane to distribute the vacuum. I did have standing water originally, and installed a sump basin and pump at the low spot. Interestingly enough, since I have had the active (radon pump vacuum) membrane system, my sump pit has been generally dry.
The concrete perimeter will be helpful, but unless it has been treated with a sealant or has a membrane incorporated into its build, will allow water to pass.
G