
Electric in-floor radiant heat is easy to install, quite and efficient to use and a joy to have!
Radiant in-floor heat systems are a fantastic upgrade to any tile floor. Radiant in-floor heat provides some of the most comfortable and targeted heating for living spaces when installed and operated correctly. Radiant electric in-floor heat is also fairly easy to install.
This article walks through my installation of electric radiant in-floor heat in our recently remodeled sunroom and entry mudroom of our four season cabin in Northern Minnesota.
Electric vs. Hydronic Radiant Heat Systems
Radiant heat system are typically available as electric or water (hydronic) based systems. Each has advantages and disadvantages. Electric radiant heat is more expensive to run, but easier and less expensive to install. Water-based radiant heat systems are cheaper to run but require the complexity and cost of plumbing and boilers. In general, larger radiant heat systems, especially those used as the primary heating source (like whole-house heating) are water-based (hydronic), while smaller, accessory radiant heat systems make more sense in smaller areas as add-on bonus heating, and as remodeling work.
Both of my recent in-floor radiant heat system installs – a small cabin entry mud room and our cabin sunroom, – used electric radiant heat for the simplicity of installation and efficiency of use as a “add-on” comfort heat source.
Electric In-Floor Radiant Heating is Great for the DIY Floor Heating Project
Electric radiant heating systems are relatively DIY floor-reno friendly and are easy to add to floor re-builds or new construction. Electric in-floor heating cable systems are also reasonably priced and essentially maintenance free.
Electric in-floor heat also solves the problem of adding heat to add-on rooms that would be hard to connect to an existing HVAC system. Rooms like additions, mudrooms, porches, sunrooms and garages may be great candidates for in-floor electric radiant heating, especially if adding HVAC ducting or plumbing would be difficult. This is one of the main reasons I added in-floor radiant electric heat to my two newest projects – a small entry mudroom addition and a remodeled attached sunroom.
Last fall, I added the new entry mudroom to our cabin, adding electrical radiant heat mats under the tile install.
This summer, I tackled our sunroom, installing all new windows, doors, and floor tile. Under the tile, we installed electric radiant in-floor heat using radiant heat cable installed in a channeled decoupling membrane. These two recent installs are the focus of this article.
But first, a bit more about in-floor radiant heating systems.
In-Floor Radiant Heat Systems
Radiant in-floor heating systems heat the sub-flooring and slabs providing heat to the living areas by thermal transfer from the flooring to surrounding structures and space. Radiant heat has advantages compared to traditional heating systems and some disadvantages.
Radiant Heat Advantages and Disadvantages Compared to Traditional Heating:
Radiant Heat System Advantages:
- More efficient than traditional baseboard, radiator, forced air, space heater, stove heating systems.
- Very low or no maintenance systems – especially for electrical systems.
- Even gradual heat with pleasant warm floors.
- Efficient heat distribution closer to floor vs. ceilings for forced air systems (warm air rises).
- Little air movement, less potential for allergen movement, and improved air quality.
- No risk of contact burns (radiators, stoves).
- Very quiet or silent (electrical).
- It can be relatively easy to install if building or with floor renovation.
- Generally not for cooling or dehumidification.
Radiant Heat System Disadvantages:
- Installed under flooring.
- Water systems (hydronic) may leak or freeze.
- Relatively expensive installation costs (especially hydronic) complicates floor install.
- Increased floor thickness.
- It may not be ideal under solid wood flooring (rapid expansion/contraction).
- Slower onset and offset of heat.
- Forced air allows cooling and dehumidification in addition to heating.
Radiant heat systems typically use either warmed water (hydronic systems) or electrical resistance heat (electrical systems) as a heat source. Each system has pros and cons:
Water-based (hydronic) Radiant Heating System Advantages:
- Natural gas-fueled boilers may be less expensive to run compared with electrical systems.
- A single boiler may power multiple floors as well as domestic hot water.
- Highly efficient systems. Low noise (boiler, pumps).
- Low maintenance systems.
Water-based (hydronic) Radiant Heating System Disadvantages:
- In-floor water tubing is inaccessible if it leaks. Fasteners can damage the tubing.
- More complicated install, requires boiler, pumps. More complex than a DIY project.
- Some maintenance is needed – flushing, anti-freeze in some climates, etc.
Electric Resistance Radiant Heating System Heating Advantages:
- Install is less complicated – does not require hydronic plumbing, boiler, gas lines, exhaust, pumps, etc.
- Relatively easy DIY install.
- Highly efficient systems. No noise (some low voltage systems use transformers that create noise).
- No maintenance is generally required.
Electric Resistance Radiant Heating System Heating Disadvantages:
- Electricity costs may be relatively expensive, especially during peak times.
- Typically requires a dedicated electrical circuit(s). More extensive systems usually use 240v circuits.
- Floor fasteners may damage the radiant heating wires during construction.
No mater the type of radiant heating system you use, any in-floor radiant heat system may be difficult to install after your home is built.
Radiant In-Floor Heating Systems Can Be Difficult To Install As Old Work
In-floor heating systems are generally perform best when installed within the floor structure, usually above the subflooring and below the floor finish. Some systems install under subflooring, between flooring joists, but these systems tend to be reasonably inefficient depending on the specifics of your home.
If you happen to be remodeling or just starting to build or plan to build, in-floor heat is a terrific option. With our planned tile flooring install for our sunroom, electric radiant heat under the tile installation is a perfect solution.
Knowing we would like in-floor heat under the tile, we just needed to decide on electric or water radiant heat. This decision was easy. An electrical circuit would be easy to run to the sunroom. Plumbing, a boiler, a gas line and all the other complexities made a water-based radiant heat system an easy no for use for this project.
In fact, 10 years ago, after we bought the cabin, I updated our branch wiring and ran a dedicated 20 amp circuit to the sunroom anticipating in-floor heat in the future.
Now, I just needed to decide a format (mat vs spooled cable) and a system voltage (120v vs. 240v), then order the material and install it.
Electrical In-Floor Radiant Heat Formats
Electrical in-floor radiant heating systems use electrical resistance heating cable to convert electricity into heat. Depending on the manufacturer, there are often two main products; mats with embedded heating cable and separate heating wire secured onto subflooring with clips or grooved membranes.
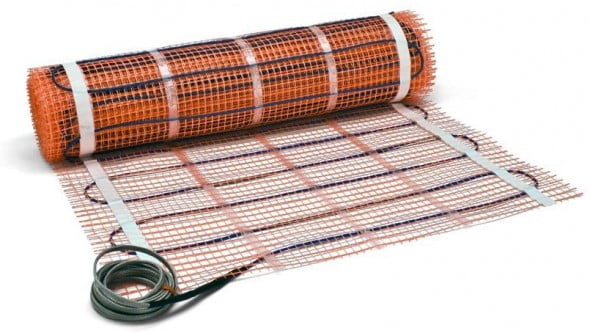
Smaller areas (less than 150 sq ft) generally work well with radiant heat mats, and larger, more complicated areas work well with radiant heat cable.
There are some exceptions, as some manufacturers will custom-build mats for your project’s plans.
You can order mats to size based on the room’s square footage. Heating mats are sold in rolls of 2-foot to 3-foot wide mats.

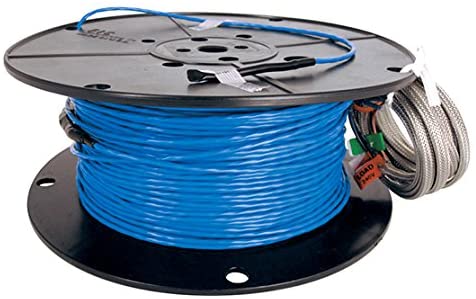
For our sun room of about 150 square feet, I used spooled radiant heat cable installed into a underlayment membrane matrix.
How Radiant In-Floor Heat Systems Work
Radiant in-floor heat systems use hot water tubing or warm electric cables to warm floors and living spaces.
Heat naturally moves across thermal gradients from more to less heat. Higher temperature objects transfer heat to lower temperature objects, warming them. This heat transfer process between bodies separated in space is described as radiant heat transfer, giving radiant heat systems their name.
Radiant heat moves between objects as invisible electromagnetic energy, similar to light. A typical example of radiant heat transfer is the sun warming distant objects. Most (50-70%) of the heat produced by radiant in-floor heat systems is in the form of radiant heat.
Conductive heat, which is the movement of heat within solid objects or between connected objects, is also generated by radiant heat systems. For example, conductive heat is the warmth you feel when walking on a floor warmed by a radiant heat system.
Conductive heat transfer also plays a role in heat loss of in-floor radiant heat systems. Radiant heat installed in mortar beds or concrete slabs will loss heat through conductive heat transfer away from the intended target. Conductive heat transfer depends on the thermal conductivity of the conducting material.
Metals, concrete, and stone have high thermal conductivity and readily transfer heat. Low thermal conductivity materials such as; air, wood, and insulation have low thermal conductivity and slow or block heat transfer.
This is why a proper thermal break/insulation layer is so important for a radiant heating system’s operation.
Insulating materials that slow or block conductive heat loss away from the intended heating space improve system performance and efficiency. An un-insulated concrete slab, for example, will result in enormous conductive heat loss from in-floor radiant heat systems, as heat moves through the slab and away from the floor and living space.
Convection, the transfer of heat by the movement of a fluid (air or liquid), plays a minor role in radiant heat warming, as air just above the surface of warmed floors rises and is replaced with cooler air from above.
Will The Radiant In-Floor Heat Be Enough To Heat My Room?
Is the heat created by in-floor radiant heat systems enough to be used as a primary heat source for installed spaces, like mudrooms and sunrooms? And, if so, down to what temperatures?
The answer depends on the difference between the heat generated by the system and the structures heat loss (heat load). The heat generated is easy to estimate based on the desired temperature difference, windows and doors, room size and design and installation level.
Radiant in-floor heat systems (electric or hydronic) generally produce between 10 – 15 watts per square foot of installed area. For example, a 100 sq ft installed heating mat typically generates between 1,000 and 1,500 watts of heat energy.
One watt of heat is about equal to 3.4 BTU (per hour):
1 watt/sq ft = 3.4 BTU/sq ft per hour
Therefore, a 100 sq ft system should generate between 1,000 – 1,500 watts or 3,400 – 5,100 BTU per hour.
Is this enough heat for your sunroom in mid-December when it’s 30℉ outside? The answer depends on the heat loss of the system.
Estimation of heat loss is relatively easy to generate using online calculators like this:
Heat Loss Calculator
To get an idea of the potential heating performance of an installed radiant heat system, use the calculator to calculate the heat loss of the room in question at various temperatures and compare this to the amount of heat generated by the radiant heat system.
Electric radiant heating mats are generally manufactured to produce 10, 12, or 15 watts (34, 41, or 51 BTU per hr) per square foot of installed mat while operating. Electric radiant loose cable systems produce between 10 and 18 wats per square foot of installed cable depending on the installed cable spacing.
So, can our electric in-floor heat warm our sunroom to 70℉ in December when it is 30℉ outside?
For this example I’ll use the following values:
- the outdoor temperature is 30℉
- sunroom is a ground-level 100 sq ft space
- 9 ft ceilings
- two exterior walls
- six windows
- one door has average (mediocre) insulation
- desired indoor temperature of 70℉.
With these valvues, our calculated heat loss is ~38W/K, or 2900 BTU per hour for the desired temperature change.
Can our in-floor heat supply the 2,900 BTUs?
Well, if your in-floor system covers the entire floor (except for the recommended 6″ wall setback), you would have a 90 sq ft heating electric radiant heat source. So if the system produces 15 watts/sq ft, the BTUs created would be 4,603 BTUs per hour (90.25 sq ft x 15watts x 3.4 BTU/watt/hr), assuming 100% efficiency of the radiant heat system.
Most radiant heat systems do not operate at 100% efficiency and will lose significant heat outside the target living space. Let’s estimate an 85% efficiency for our build. Therefore, our system should generate 85% of 4,603 or 3,912 BTUs per hour, more than the calculated 2,900 BTU required for our desired temperature gain within our sunroom.
For this example, you should be able to warm a 100 square foot sunroom to 70℉ when the outside temperature is 30℉ with a 74% on-cycle time.
Using the calculator, you can try different ambient temperature values to get an idea of the potential performance of your system at declining temperatures. For more accurate calculations, you could consider contacting an HVAC contractor familiar with heat loss calculations in your region. They often perform these calculations for heating and air conditioning installations.
Additional Considerations For In-Floor Electric Heat Installs
There are a few considerations to think about when planning your electric radiant in-floor heat install:
- Placement of an electrical box and circuit for the power connections and thermostat
- The in-floor radiant heat thermostat and floor temperature sensor
- Floor height considerations
- Slab/subfloor treatment and insulation
Electrical Box and Circuit For In-Floor Electrical Heating
Plan for your project before you begin. Consider the electrical needs of the floor heating you plan to install and decide on an appropriate power source for the system. Find the electrical amperage draw for the specific product you plan to install to help you plan for an electrical circuit source.
For smaller projects with energy draws of less than 5 – 10 amps, you may be able to use a circuit that powers other devices, as long as the total power draw is less than the capacity of that circuit.
Depending on the product you are using, 120v heating mats generally draw about 1 amp of 120v current per 10 sq ft of the mat. So, for example, if you have a 50 sq ft 120v mat, it will draw ~ 5 amps.
When deciding if you can tap into an existing wiring circuit, consider the other appliances and devices used on the circuit to determine if the circuit can safely be used for the radiant heat system.
Most household 120v electrical circuits are 15 amp circuits with a useable amperage limit of around 12 amp. However, some household circuits are 120v 20 amp circuits, with a safe useable amperage limit of about 15 amps.
To determine the amperage of the circuit you are considering, go to your electrical panel and find the circuit breaker for the circuit of interest. The breaker will list the amperage – generally 15 or 20 amps.
Additionally, the wire gauge can help determine the amperage of a circuit. For example, 15 amp circuits will usually use smaller 14 g wire (printed on the outer wire insulation (usually white insulation), and 20 amp circuits should use larger 12 g wire, often having yellow-colored exterior insulation.
Another hint is the receptacle (plugin) style of an electrical circuit. For example, 15 amp receptacles (plugins) have two straight slots, while 20 amp receptacles also have two straight slots, but the longer of the two slots will have a perpendicular notch extending outward from this slot.
Once you have determined the amperage of the circuit you would like to use for the radiant heat system, add up the total of the expected loads on the circuit, including the radiant heat system.
For example, if the total amperage is less than 12 amps for a 15 amp circuit or less than 15 amps for a 20 amp circuit, you should be able to use that circuit for your in-floor radiant heat.
This estimate is for 120v radiant heat systems only! Some radiant heat systems, especially those larger than 100 sq ft, are 240v systems and usually require a dedicated 240v circuit.
As with any electrical project, follow local and national codes and consult an electrician if you are unsure or unqualified to work on electrical circuits.
The cost of hiring an electrician to run a dedicated circuit for your flooring project is very likely well worth the price if you have any doubts regarding the appropriate work for the system.
Electrical Radiant In-Floor Heat Thermostat and Floor Sensor
There are many radiant heat thermostats available from different manufacturers. Most manufacturers offer several thermostat options, from the most basic to programmable thermostats with WiFi connectivity.
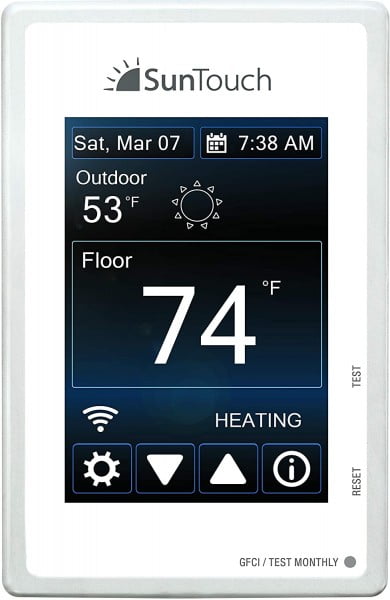
I’ve tried a few different thermostats, and my favorites are the Tekmar (SunTouch branded) touch screen programmable products. They are easy to install, very intuitive to use, and visually pleasing. They also offer a variety of display colors to match different home decors and styles.
We have them in our primary home and at the cabin, and I love them!
Most thermostats include a floor sensor with the thermostat. Floor temperature sensors are vital for the proper functioning of your in-floor heating system. They should be installed per the manufacturer’s instructions and connected to your thermostat for the system.
Floor Height Considerations For In-Floor Electric Heating Systems
Adding in-floor heating mats to a floor build will generally add between 1/2″ and 1″ or more to the height of the floor. Consider adjacent floor heights, door heights and trim, and other finishing concerns when planning for the increased floor thickness.
Manufacturers are aware of the floor height concerns, and many offer thinner products to help decrease the amount of thickness the heating system adds. In addition, electrical in-floor heating systems are usually lower profile compared to hydronic systems.
Additional materials added to the floor build like tile backer board, decoupling membranes, and insulation or insulated backer board will add floor thickness. Many of these products are offered in various thicknesses to help address floor height. For example, most tile backer boards are offered in 1/4″ thickness for floor use.
Total floor thickness depends on a few variables like subflooring condition and need for re-enforcement, leveling compounds, tile backer or decoupling membranes, and insulation layers.
Radiant Heat Insulation Is Essential For An Efficient System
This one is important! Radiant heat systems, especially in-floor systems, greatly benefit from a thermal break and adequate insulation behind installed radiant heat sources.
The general rule for radiant heat systems is to place insulation of at least twice the R-value behind the radiant heat fixture compared to the front or desired direction of heating. For example, if the total R-value of the subfloor materials on the finished side of an installed radiant heat system is R-1, insulation of at least R-2 should be installed behind the radiant heat system.
If the radiant heat source is installed over a concrete slab, ideally, the concrete slab will be insulated under the slab. In addition, a thermal break or thinner rigid foam-based products like Go Board can improve the heating system’s responsiveness by reducing thermal loss to the large thermal mass of the concrete slab.
Suppose the radiant heat system is installed over a subfloor. In that case, the underside of the subflooring should be insulated per code with at least 3 inches of fiberglass insulation with or the equivalent in foam or a foil-faced polyisocyanurate rigid foam. More is better, especially if the underside is an unconditioned space such as a crawlspace or unheated basement.
Un-insulated sub flooring under a radiant floor heat system will generally provide inefficient and insufficient performance. This is because radiant heat moves in all directions down thermal gradients, not simply up like convection heat dynamics. Therefore, under-insulated spaces below radiant heat systems will be overly warm, and the intended living space costs above the radiant heat system.
Un-insulated radiant heat systems installed on concrete slabs or similar without a thermal break will tend to perform sluggishly and poorly, losing a large amount of heat to warm the concrete mass of the slab. This is especially true if the slab is un-insulated, as the heat that moves into the slab is lost to the surrounding earth.
In addition to insulation, consider the substrate and additional factors like the need for surface flattening/leveling in context with the desired floor finish.
You will need a reasonably flat floor if using tile, depending on the type and size of tile you plan to use. For tile, you will also need an appropriate surface to apply a thin-set mortar for tile installation. Plywood sub-flooring may be adequate but often requires treatment or sealing for proper thin-set curing.
With tile finishes and in-floor heat, it’s hard to beat a layer of Go Board over the slab, under the radiant heat. In addition, the GoBoard backer board provides excellent insulation for the heating system, a waterproof surface and vapor barrier, and an ideal surface to apply thin-set mortar.
Flooring For Radiant Heat
A variety of flooring can be installed over in-floor radiant heat systems. Tile is usually the best choice over radiant heating, but hardwood, some linoleum or vinyl flooring, and even carpeting can be installed over radiant heat. But, different materials will perform differently over radiant heat.
Ceramic, porcelain, stone, and similar materials transmit heat well, providing rapid transfer of underlying radiant heat. These materials also have significant thermal mass, storing heat energy and smoothing heat delivery.
Carpets, vinyl, carpet pads, rugs, and wood flooring materials, on the other hand, tend to have insulating qualities, slowing the transfer of radiant heat to the living spaces and decreasing system efficiency. As a result, these materials are less durable over heat sources and typically should only be used in areas where floor heating is limited to a maximum operating temperature of 80 ℉.
According to guidelines published by the National Wood Flooring Association (NWFA) in 2019 suggest a maximum temperature of 80 ℉ for radiant heat systems with wood flooring finishes.
If you plan to install wood flooring over a radiant heat system, research the wood products you consider for suitability over in-floor heating systems. Generally, engineered flooring products that are built with a plywood core perform well with in-floor heating systems.
Solid wood products, especially wider cuts, tend to expand and contract with the abrupt temperature changes when installed over radiant heat and will typically result in flooring cupping, cracks, bowing, and other issues related to movement. If solid wood products are used, narrower boards with vertical gain saw angles (quarter sawn, rift sawn) tend to be more dimensionally stable and have better choices for radiant heat floors. Wood flooring will benefit from temperature limitations – say
If installing wood flooring over radiant heat systems, check with the product manufacturer to ensure compatibility. When installing wood flooring over electric or hydronic in-floor heating, consider the possibility of fastener penetration and damage to the heating components when planning a fastening system. Adhesive, glue-on techniques may be best, but ensure that the adhesive you are using is approved for use over in-floor heat. Manufacturers often suggest a maximum operational temperature for flooring products as well.
If you consider linoleum, vinyl, or other products as finishes over in-floor heat, check with the product manufacturer to verify compatibility with floor heating and only use adhesives made to use over-floor heating.
How I Installed Electric In-Floor Radiant Heat Under Tile In An Unconditioned Sunroom Porch
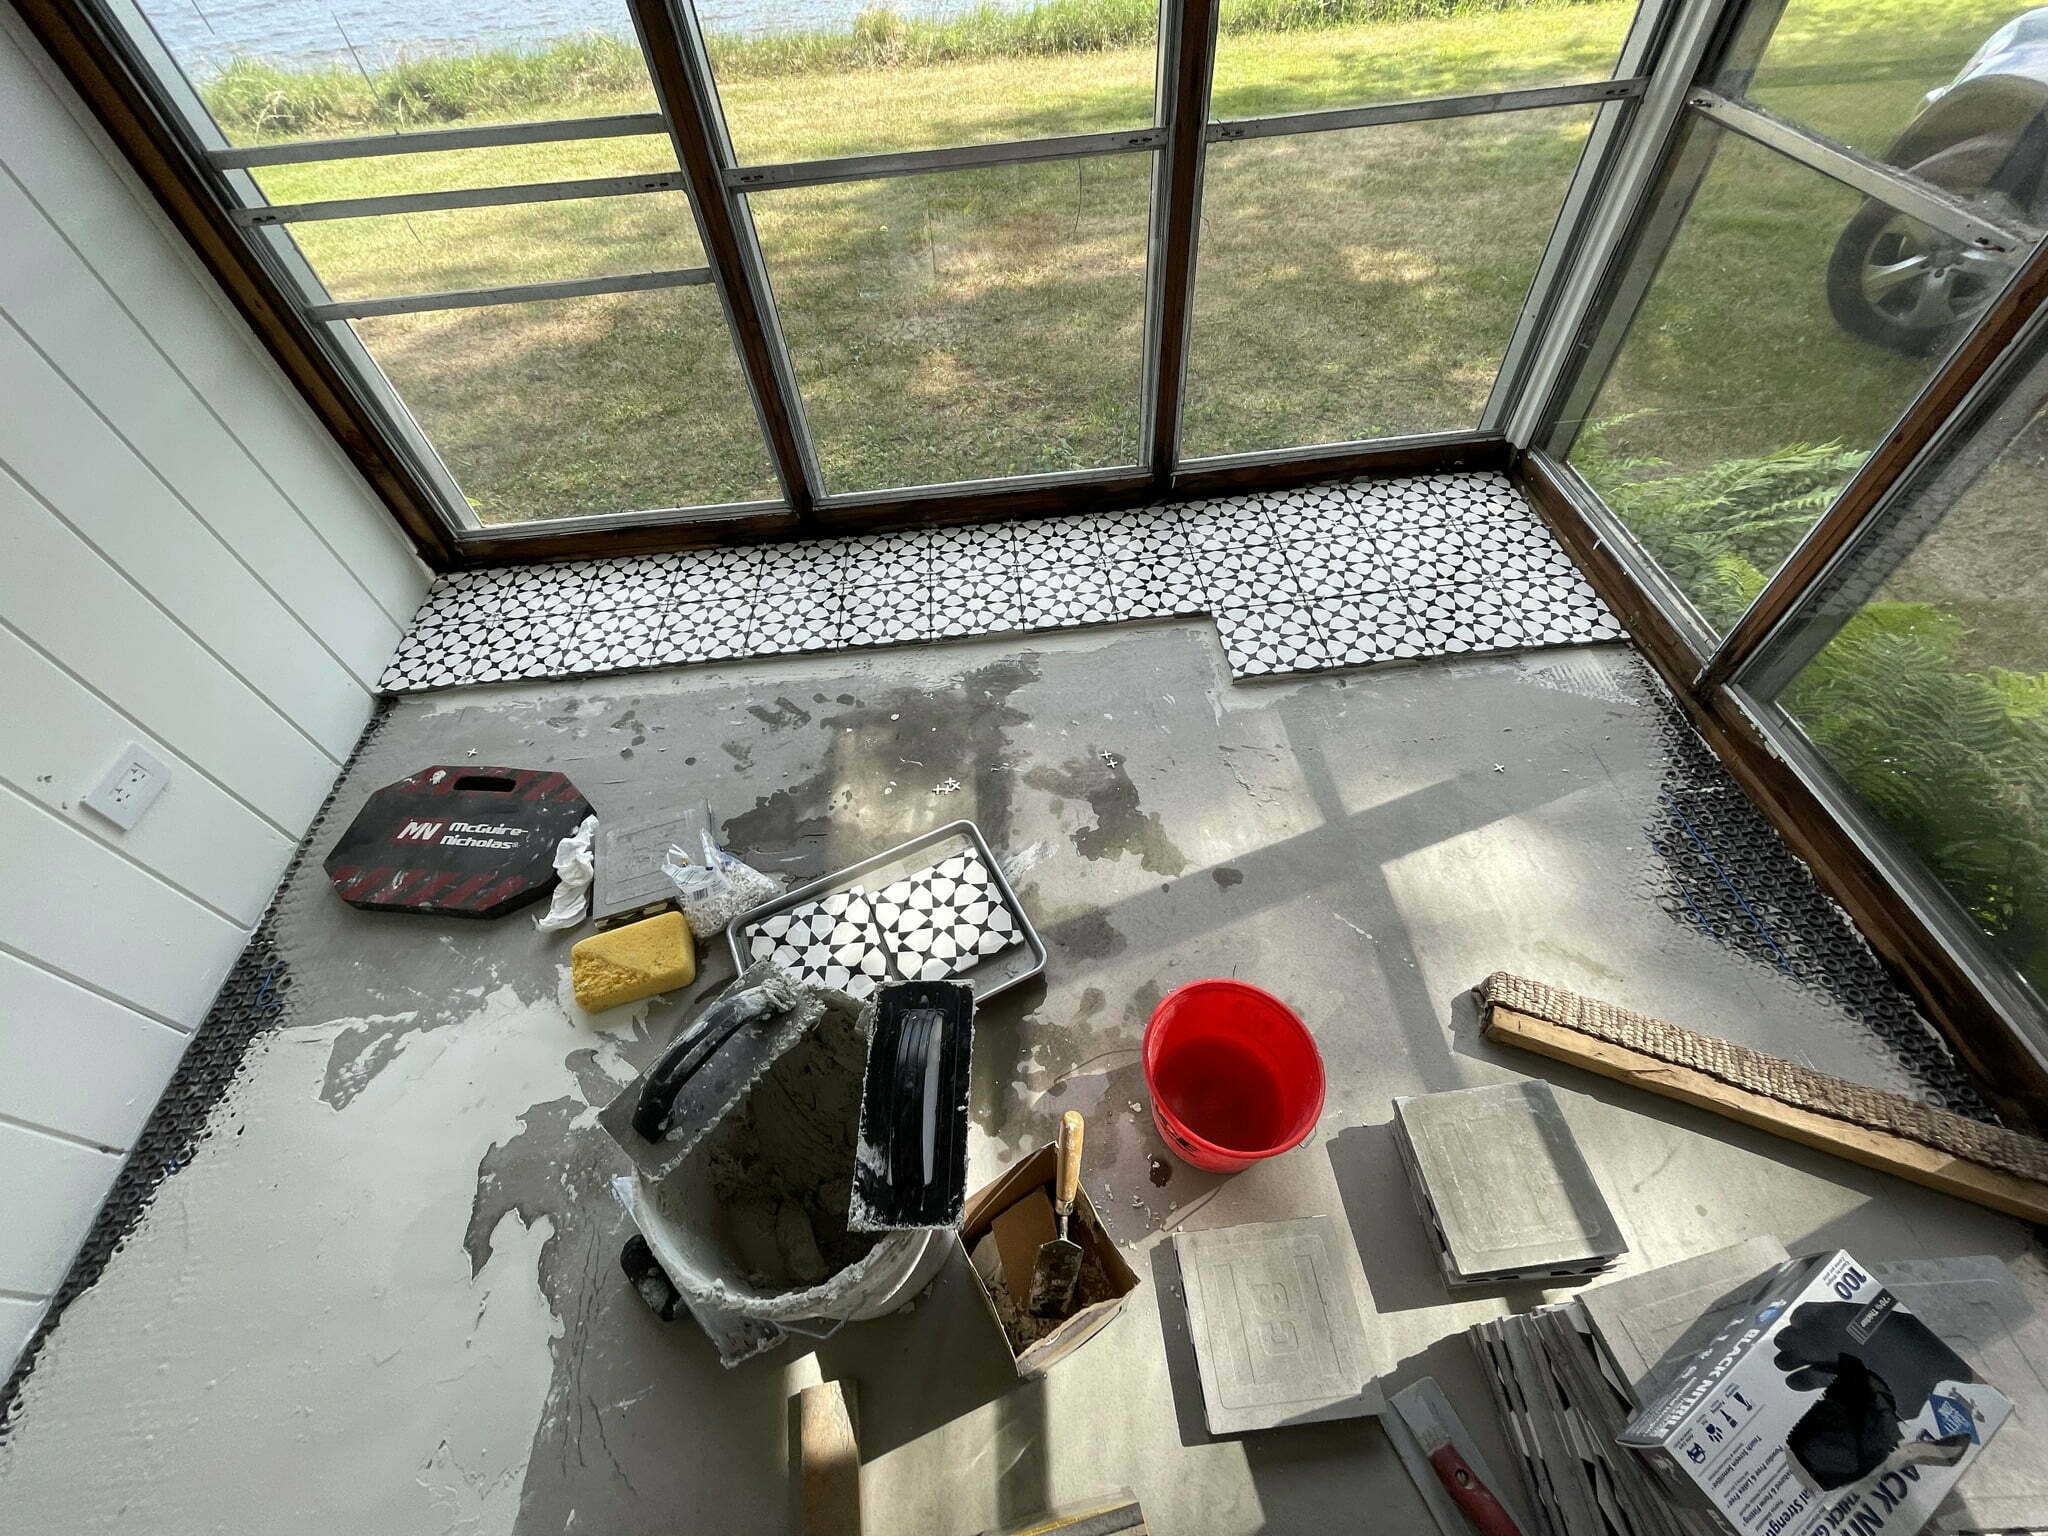
During the renovation of our sun porch, we planned to finish the concrete slab floors with tile. Under the tile, we installed electric in-floor radiant heating. Here’s how we did it:
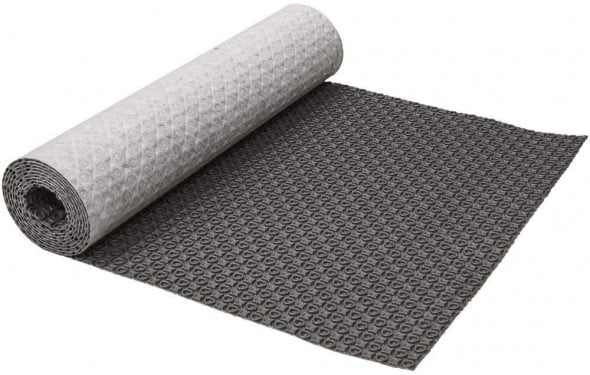
To finish the unfinished, concrete slab sun room floors, we planned to install cement (encaustic) tile, and warm the room with in-floor heating installed under the tile. Because the floor is an un-insulated concrete slab, adding a thermal break insulation layer was a must if we wanted the system to perform well enough to add significant heat to the room during the colder months. An un-insulated install would also be less responsive, taking much longer to warm up. For this insulation layer, I decided to use a 1/2″ GoBoard tile backer board. The 1/2″ material has an R-Value of R-2.3. Not bad! And, the product is approved for use as a tile back for floor tile installs.
Our sun room measures 15.5′ x 10′ or about 155 sq ft. Rooms of this size and larger generally benefit from using 240v electric radiant heating systems. Lower voltage 120v systems are typically limited to a maximum of 15 amps (if on a dedicated 20 amp circuit). The heat produced by electrical heating systems is limited by the total watts the system can safely produce.
Watts are the sum of the amps and volts, or 15 amps x 120v in our example or 1,800w. Knowing that most in-flooring radiant heating systems are designed to produce a maximum of 10 – 15w per square foot, or 120 – 180 square feet of floor coverage. So, in general any system covering a floor area of ~ 150 square feet, will require multiple 120v systems or shifting to 240v systems.
So, for our 155 sq ft sun room, we decided to use a 240v system for our electric radiant heating. Our next choice was what type of electric radiant heat wire – heating mats with embedded wire or spooled wire we would need to install. We decided on spooled radiant heating wire installed into a decoupling membrane. Here is a summary of the set up.
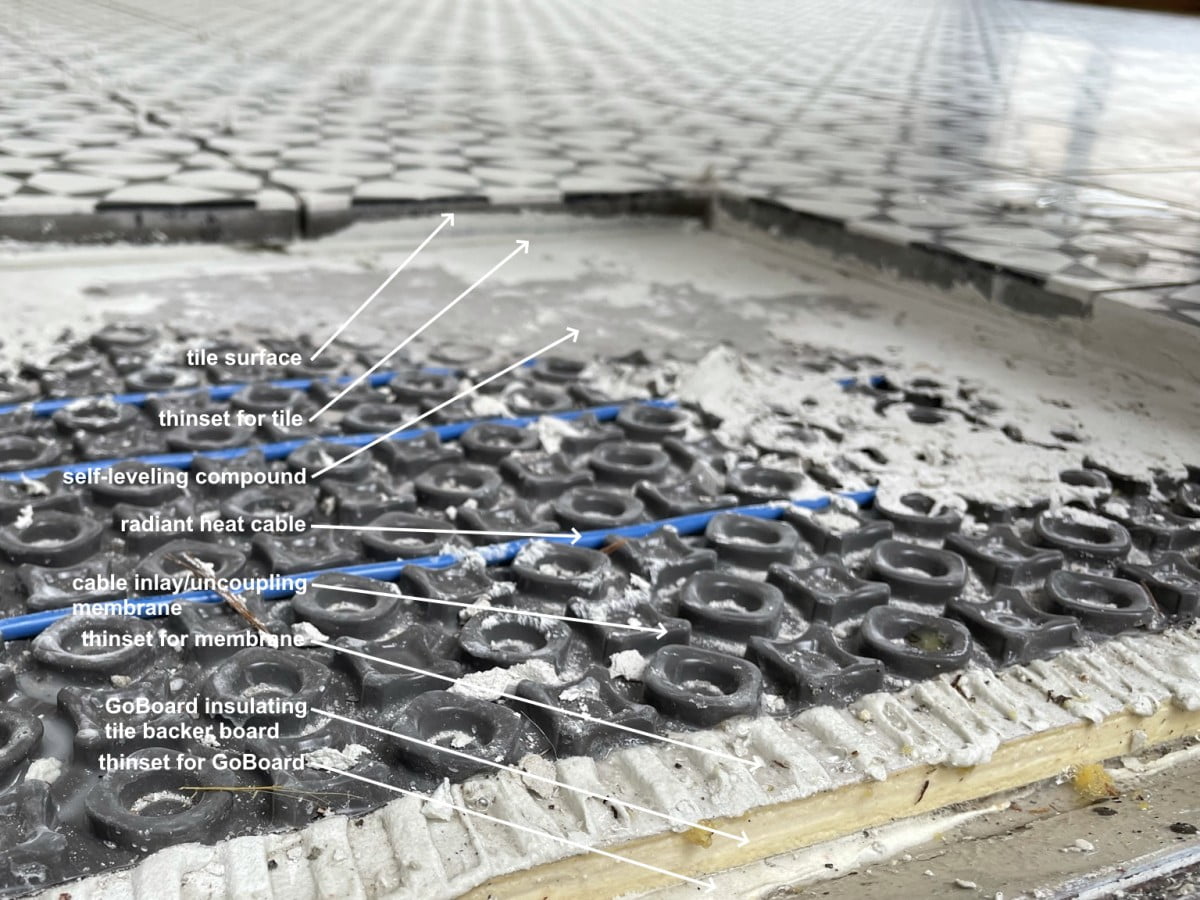
Electric radiant heat under tile – floor layers, top to bottom:
- Concrete slab (un-insulated)
- Paint-on liquid waterproofing membrane (RedGard®)
- Polymer-modified thin-set mortar, 1/4″ square notched trowel
- GoBoard 1/2″ insulated, waterproof, tile backer board for insulation, moisture barrier (seams sealed)
- Polymer-modified thin-set mortar, 1/4″ square notched trowel
- Felt-backed polymer decoupling matrix membrane to mount heating cable, isolation layer
- Self-leveling underlayment compound (LevelQuik® RS) for leveling/flattening
- Polymer-modified thin-set mortar, 1/4″ square notched trowel
- Encaustic cement 8″x8″ tile, 3/16″ polymer-modified sanded grout (Polyblend®)
Here are the layers in a few images:
Read on for a walk through of our in-floor electric radiant heat install using SunTouch electric heating cable and uncoupling matrix mounting membrane.
Electric Radiant In-Floor Heating Over Tile Flooring Layers
OVERVIEW | Electric In Floor Heat
SUPPLIES LIST | Electric In Floor Heat


-
 GoBoard Insulating Backer Board
Johns Manville
(cheaper locally)
GoBoard Insulating Backer Board
Johns Manville
(cheaper locally)
TOOLS LIST | Electric In Floor Heat


STEPS | Electric In Floor Heat
- Measure the room, create a heating floor plan, and order the necessary supplies and materials.
Plan the size and specifics of your in-floor heating layout and create a heating floor plan. Then, order the needed supplies and materials.
To start, measure the room’s dimensions. Then, from the room dimensions, remove the area 3″ – 6″ adjacent to any walls and the room’s perimeter as a setback for the heating system.
In addition, remove any areas that typically should not be heated, like under built-in cabinets, vanities, or closed areas that tend to trap heat, like small closets or storage areas.
Use your heating floorplan’s remaining floor area to order appropriately sized heating mat(s) or heating cable materials and supplies.
Order To Right Size Radiant Heat System
To calculate the square footage of your to-be-heated room, multiple the dimensions of the room. For example, for a simple rectangular room 15′ wide by 10′ long, the surface area is 15′ x 10′ = 150 sq ft.
To calculate the total square footage to be heated from this total surface area, subtract a wall set back (4″ – 6″) and other not-heated areas.
For example, in the above example 15′ x 10′ room with a 4″ (.33 ft) perimeter wall setback, the net heated floor surface area would equal the sum of the new smaller area, or in this example: 14.67′ x 9.67′ (4″ or .33′ perimeter set back) = 142 sq ft. If you planned for a 6″ setback instead of a 4″ setback, this calculation would be 14.5′ x 9.5′ = 138 sq ft.
Now, order radiant heating materials for or slightly less than this calculated area using this calculated square footage.
Do not order more radiant heating material than the area to be heated. You cannot cut the mat or heating cable to fit a space. You must use the entire radiant heating mat or cable, as the mats or cable should not be modified. And, heating mats and cable should not be crowded or overlapping as overheating may occur.
If you plan to used heating mats, the square footage of the mat is set and cannot be significantly altered with installation. You can cut the mat mesh for turns and other manipulations during the installation process, but the heating cable spacing is generally set with manufacture.
Radiant Heating Cable Coverage Depends On Cable Spacing
If you plan to use spooled cable, the surface area covered by the heating cable will depend on the spacing of the installed cable.
Most manufacturers recommend installing the cable spaced between 2″ – 4″, with 3″ often the suggested heating cable spacing. spacing most radiant heat cable at 3″ intervals typically generates about 12 watts (41 BTU/hr) per square foot of installed cable.
If you plan to space the cable installation different from the standard cable spacing, make sure you order the correct cable length as the cable is typically sold for a standard (3″/12 watts) spacing. Most manufacturers include tables in the product documents showing the coverage for various cable spacing.
Loose spooled radiant heating cable is installed one of two ways; 1) installed and spaced around clips secured to the subfloor or 2) inlaid within a channeled uncoupling membrane.
Clips are often used for non-tile installs, like hardwood, vinyl, or carpets, while inlay membranes are used for tile installs.
Don’t Forget A Floor Sensor And Thermostat
No matter which format of electric radiant in-floor heat (mats or loose cable) you install, you’ll need a thermostat and a floor temperature sensor.
Thermostats regulate the on-off cycle for the radiant heat system. Thermostats are available with a variety of features, including; programmability and WiFi connectivity.
Floor sensors help monitor and control the radiant heat system and are installed with radiant heat mats or heating cable.
Every in-floor radiant heat system should have a floor temperature sensor installed. Temperature sensors are essential for floor control and safety, and most radiant heat system thermostats are designed for use with a floor temperature sensor.
Order Electric Radiant Heat Systems À La Carte Or As A Kit
You can order the components for your system individually or as a complete package. Many manufacturers offer radiant floor heat install kits with the heating cable/mat, a thermostat, floor temp sensor, and any needed mounting materials.
If you plan to order your components individually, it is generally a good idea to order individual products from the same manufacturer (SunTouch, NuHeat, Schluter, etc.).


- Install the electrical box and circuit for the radiant heat thermostat and power source.
Before starting the floor work, install an electrical box and power supply circuit for the radiant heat system.
If you have any questions or concerns regarding the wiring and setting up a circuit for the radiant heat system, hire or consult an electrician.
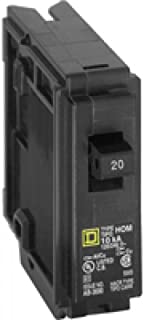
Radiant in-floor electrical heat systems require a 15 amp or 20 amp, 120v or 240v AC branch electrical circuit run to a deep, single-gang electrical box.
Different in-floor radiant heat systems have different power requirements. Check the specs of your system before planning and running wires.
Most smaller radiant systems (under 50 sq ft or so) can be run on 120v AC 15 or 20 amp dedicated or even shared circuits depending on the additional loads on the circuit.
Larger systems (100 sq ft or larger) are often connected to a dedicated 120v 20 amp or 240v circuit, depending on the specs of your radiant heat cable/mat again.
I used a 15 sq ft 120v mat (ThermoTile TT-15) for my small entryway mudroom that only draws 1.5a of 120v current. This small radiant heat system should be easily powered by a shared 15 or 20 amp 120v circuit, depending on the additional loads connected to that circuit.
For our bigger sunroom (the many projects I’m documenting here), I used a 548 ft length 240v radiant heat cable designed to cover 140 sq ft (SunTouch WarmWire 240v 140 sq ft). This heating cable draws 7a from a 240v dual pole circuit and was run directly from the electrical panel as a separate, dedicated circuit.
Once you’ve determined the power requirement for your planned system, run an electrical circuit to supply the power to a single-gang, deep electrical box where you plan to locate the thermostat for the system.
When placing the electrical box, keep in mind the limited length of the heating cable power leads coming from the floor (5-10′ or so) and the need to reach the new electrical box. If needed, you can wire an extension to the power leads, but this usually requires an accessible, code-compliant junction box.
Install electrical conduit, one for the power lead and one for the temp sensor, from the box to the bottom plate of the floor. Using conduit, even if not required by code, is ideal and protects the power lead and temp sensor wires. Do not run the temperature sensor in the same conduit as the power lead to help avoid interference and for code compliance.
Before wiring the radiant heat cable (or heat mat), measure the resistance of the mat or cable using a multimeter and compare to the expected values. Record this resistance value.
Pull the radiant heat cable (or radiant heat mat) power leads into the newly installed electrical box for the system thermostat and power connections. Use a wire puller or lite nylon rope (pull line).
Once the electrical connections are ready, move on to the floor work.


- Prepare floor surface for radiant heat cable and mat installation.
Before installing the radiant heat cables or mats, prepare the subflooring by 1) leveling and surface prep and 2) Installing a layer of insulation.
A level and flat subfloor is vital for usability and the proper installation and performance of the finished surface, especially large format or natural tiles. I planned to install unforgiving encaustic (cement) tiles and needed to have a reasonably flat subfloor.
The next item to address is insulation for radiant heat. For ideal radiant heat performance, you must install at least a thermal break or, if possible, a layer of insulation under the radiant heat cable or mat. This is important and doubly so if you are installing radiant heat over an uninsulated concrete slab.
An insulating layer below the radiant heat source will significantly reduce heat loss away from the living space and improve the efficiency and responsiveness of the system. This is especially true for systems installed over concrete slabs, which will act as an enormous heat sink and absorb massive amounts of energy from the system, slowing heating on startup and cooling when the system is turned off.
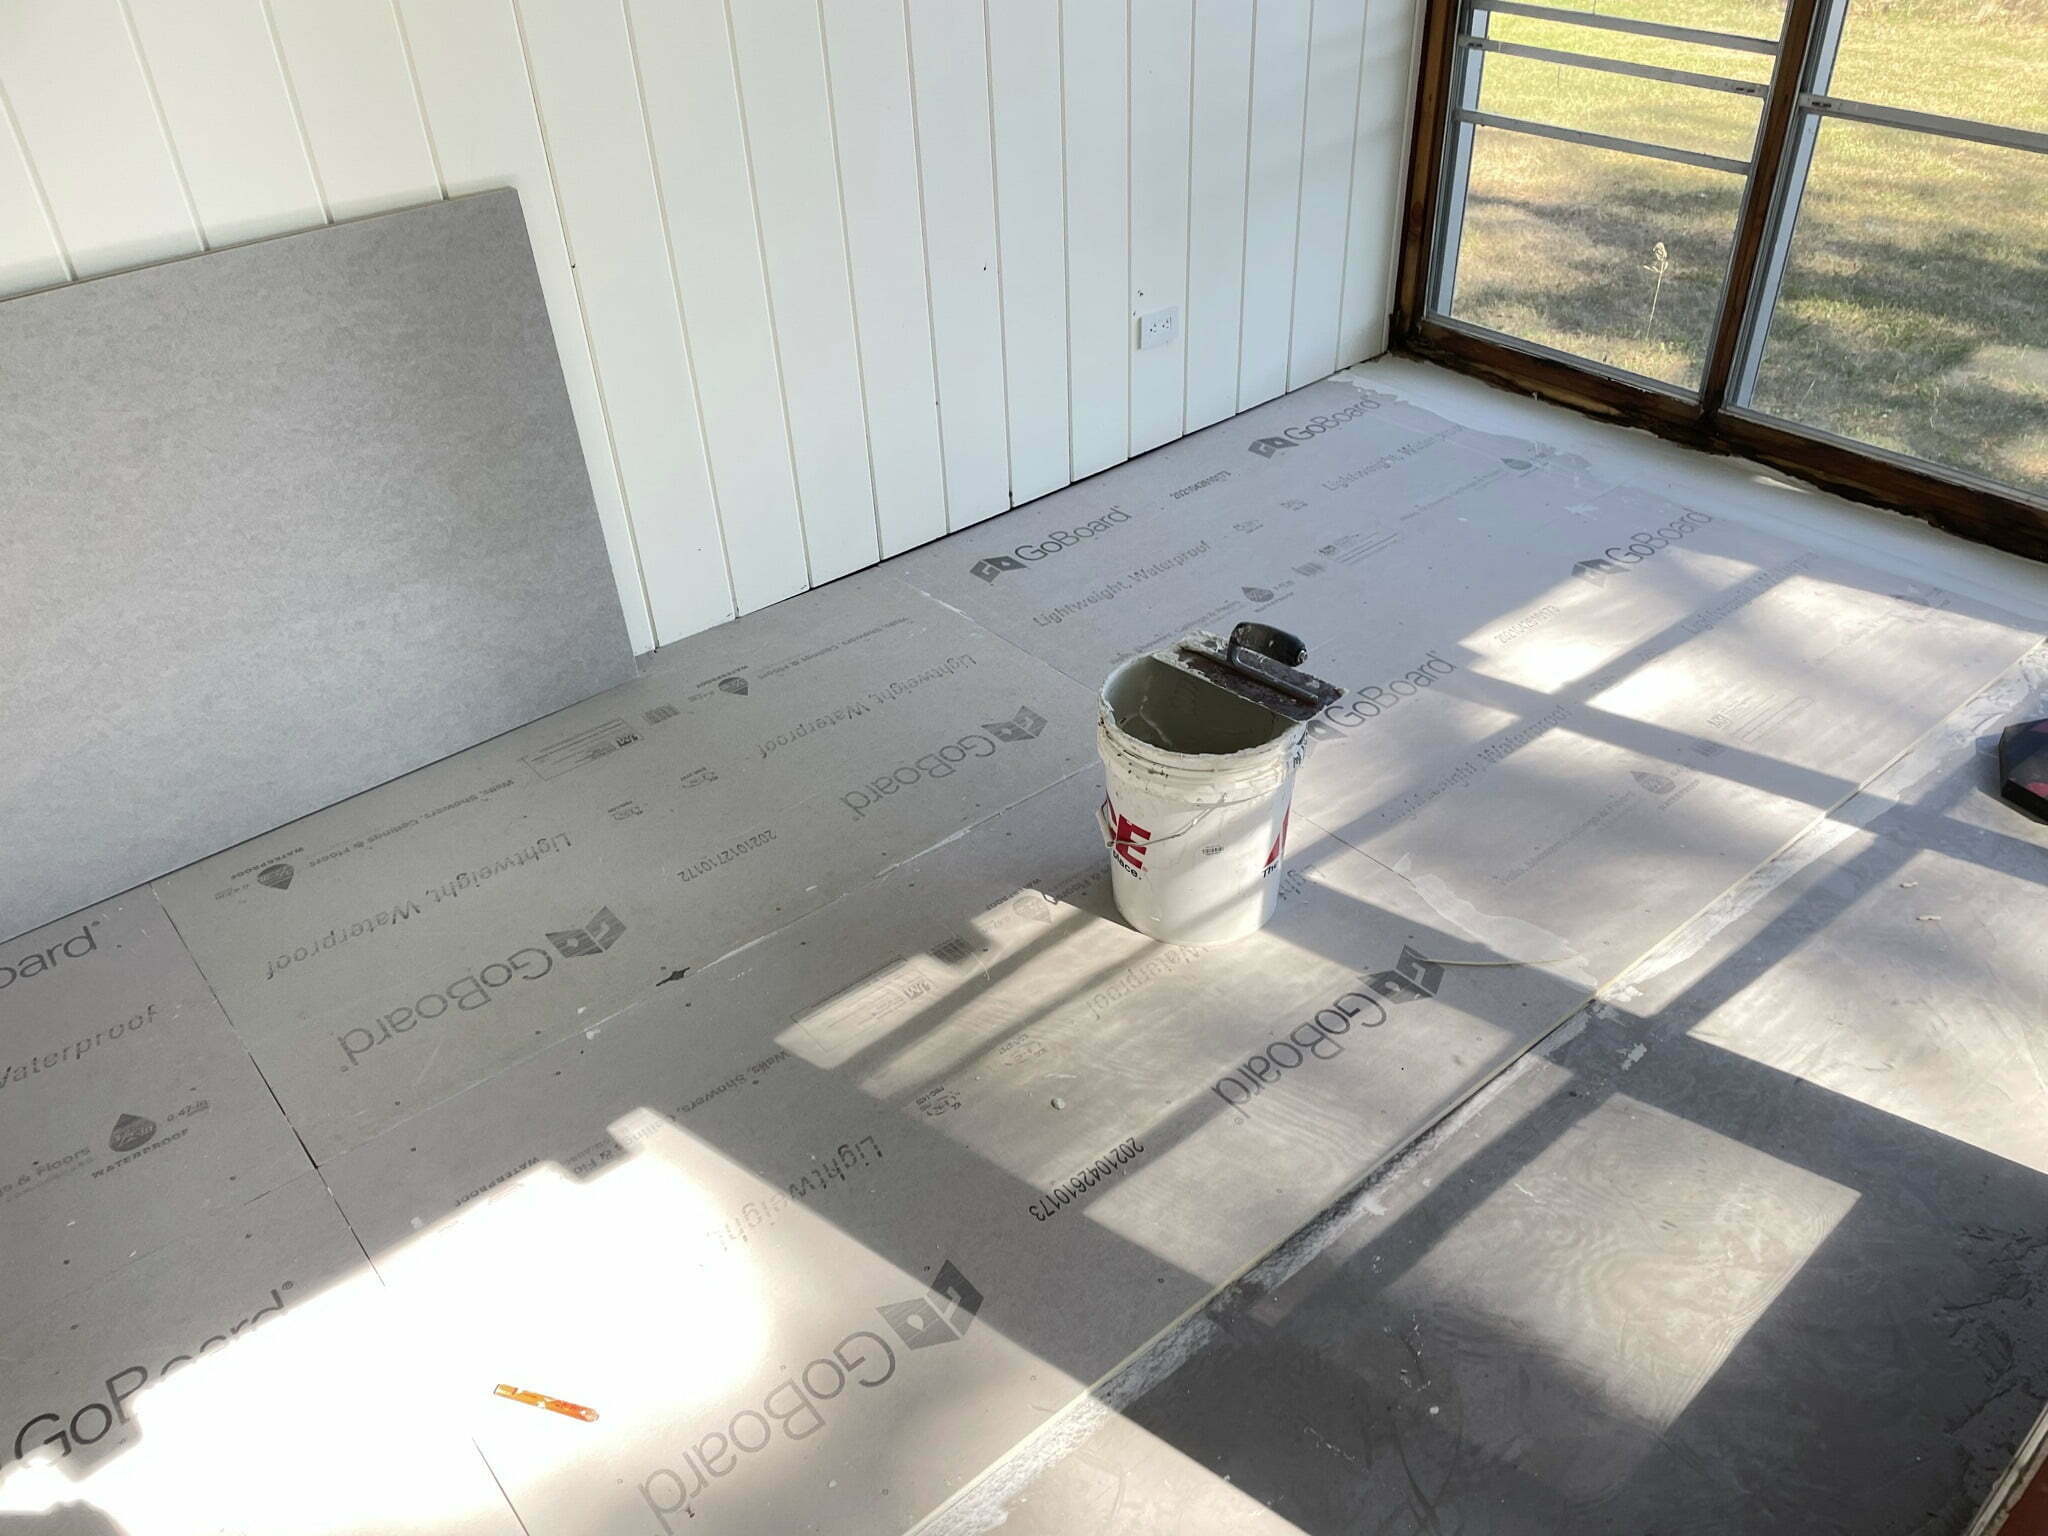
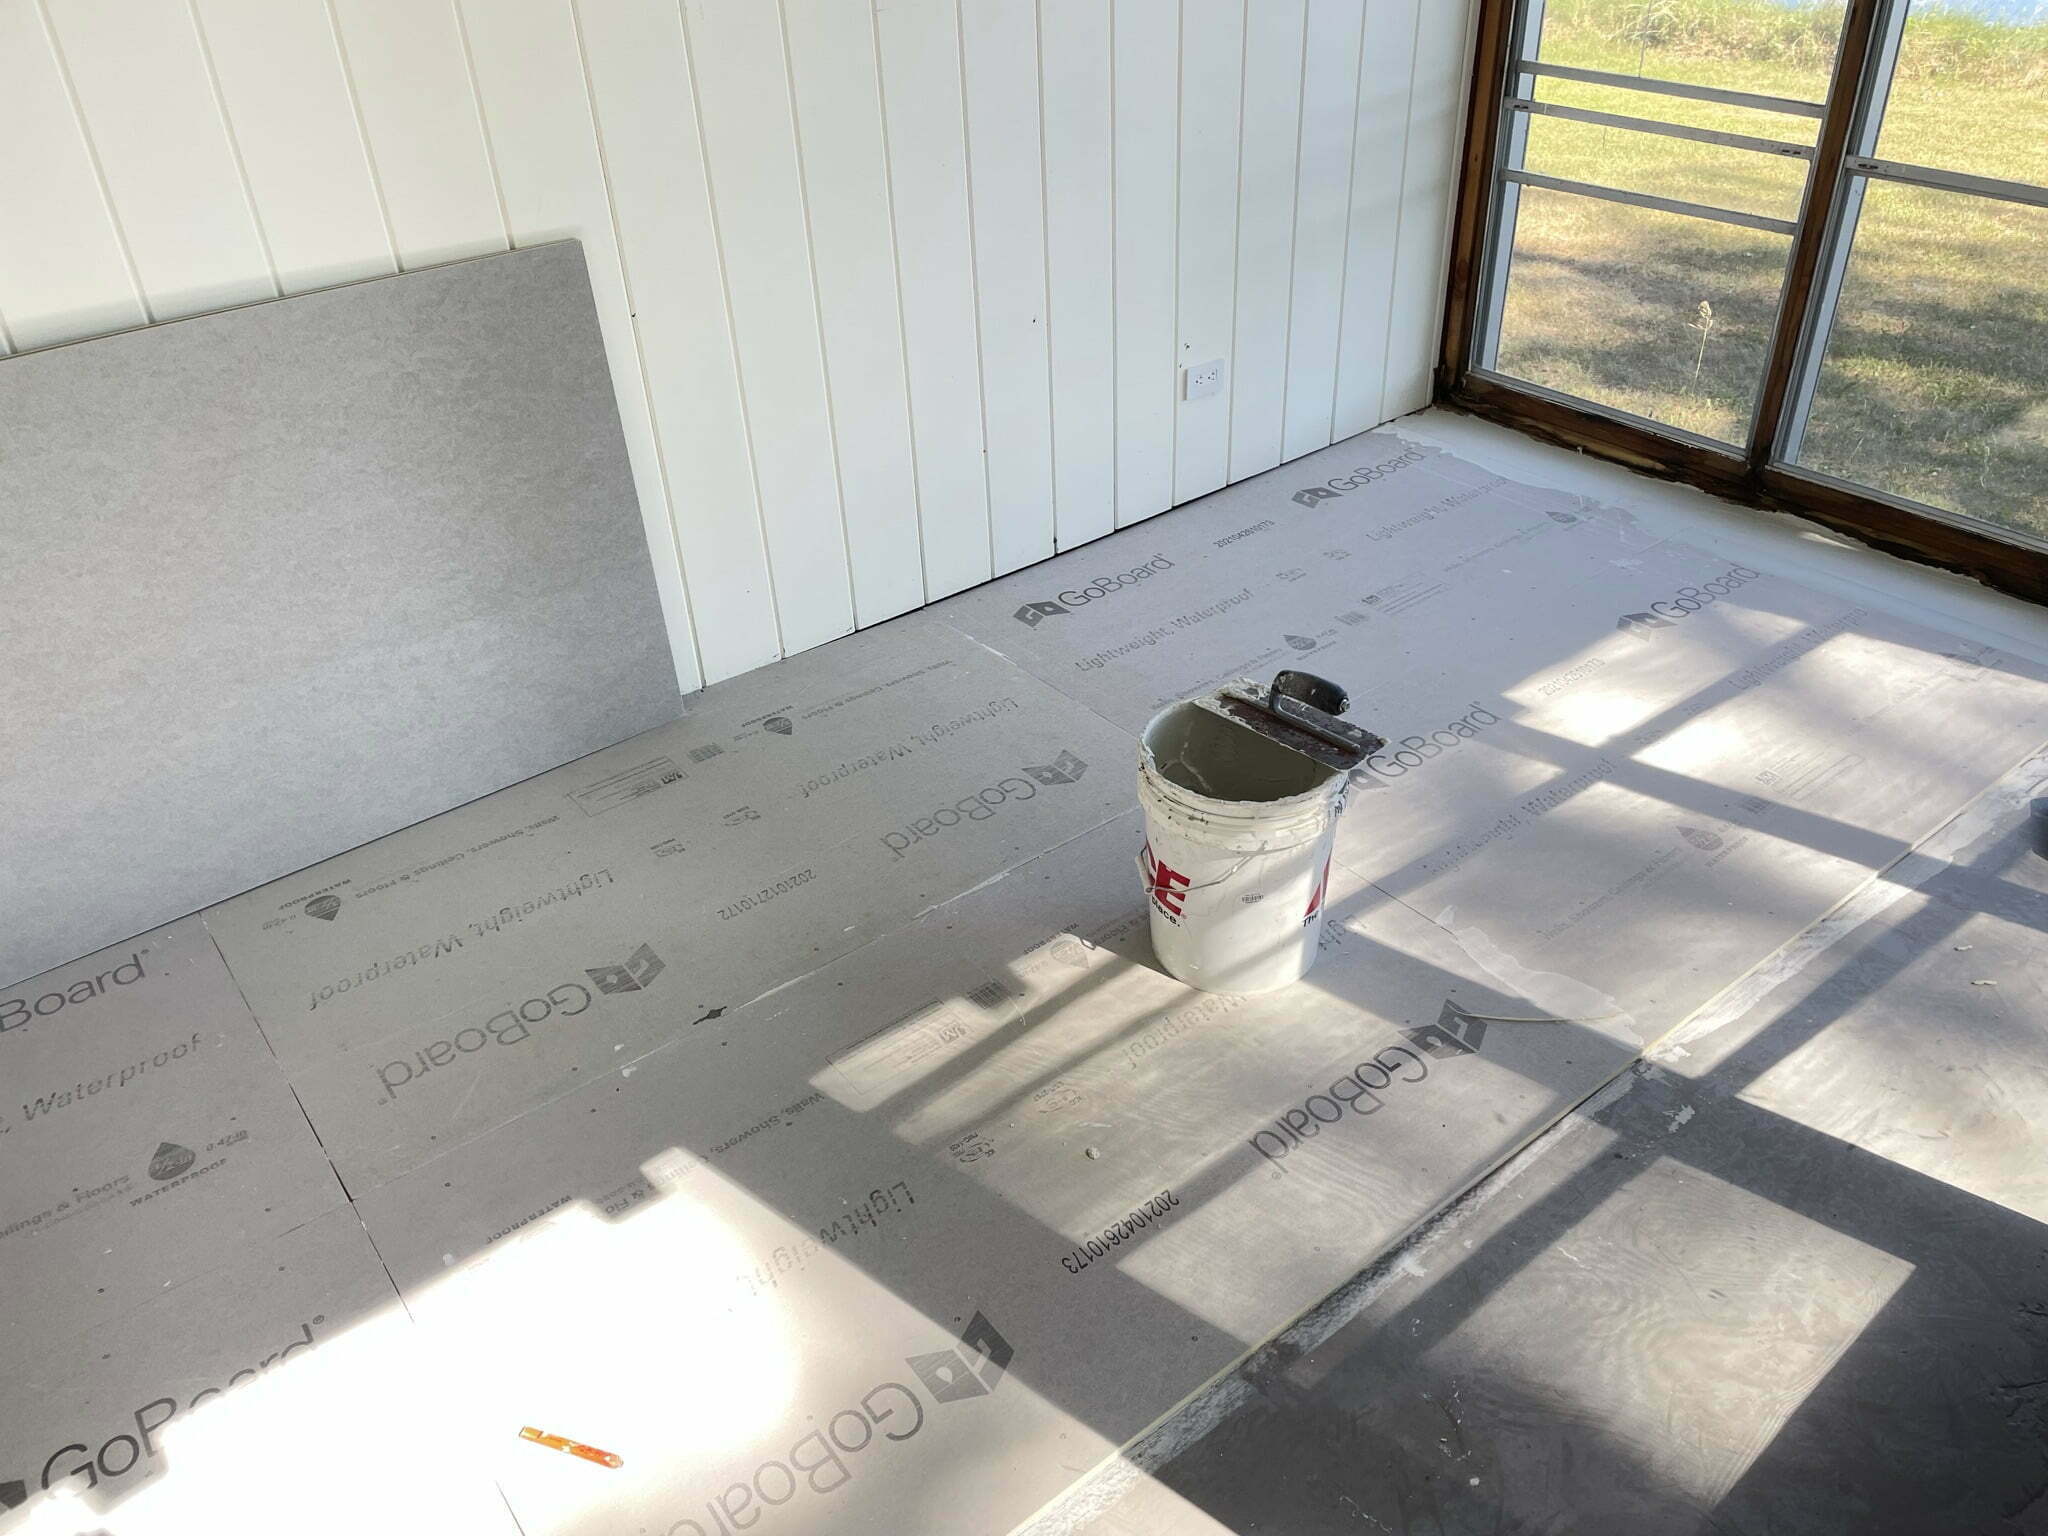
Unfortunately, the tradeoff of insulation is increased floor height. I found that using GoBoard, a rigid foam (polyisocyanurate) core backer board, is an excellent compromise providing some insulation while working well as a tile backer board. For this project, I used the 1/2″ thick GoBoard, which provides a reasonable insulation/thermal break and works well as a thinset bonding surface for tile installation. GoBoard is also waterproof, and when the seams are sealed, it creates a vapor barrier too. Awesome!
- Level and flatten the slab as needed using self-leveling underlayment.
A self-leveling compound may be needed for either tile or other flooring finishes installed over plywood subflooring.
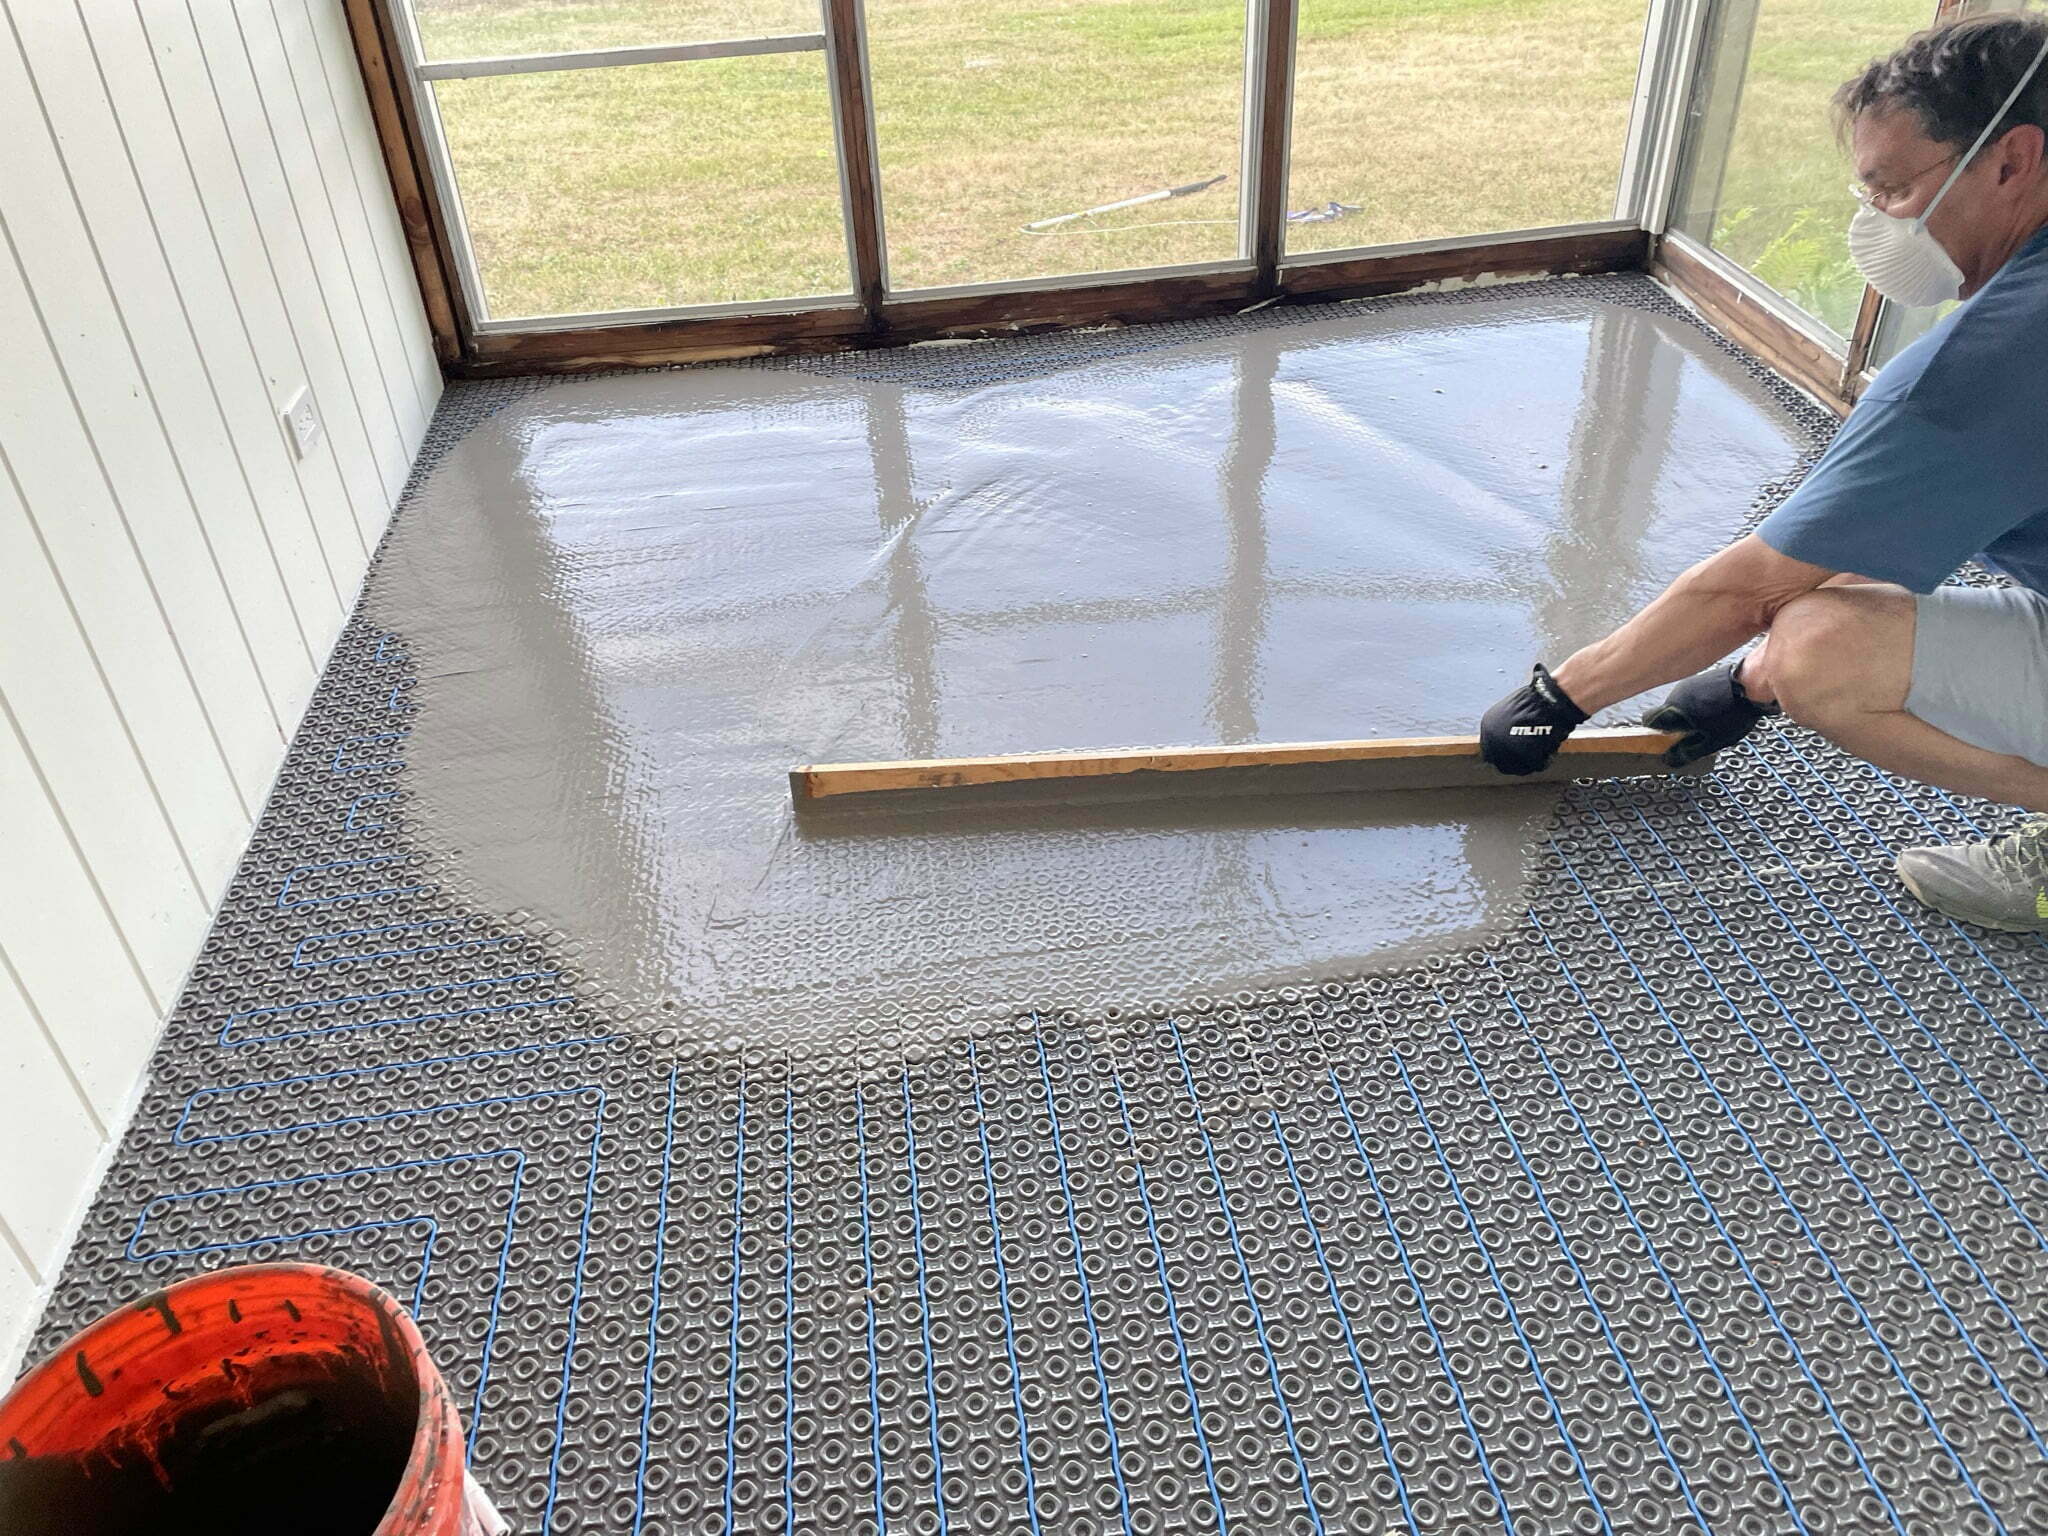
Tile surfaces benefit from flat, level subfloors or slabs. Self-leveling underlayment will correct most flat and level problems and be placed very thin to 1 1/2″ thick. Self-levelers can be placed first, directly on top of a slab or subfloor, or placed after and on top of the radiant heat install. I did both.
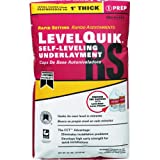
Follow the install directions for the self-leveling compound you plan to use (if using). Most will recommend a primer over cured concrete or plywood subflooring. Here is the install instructions for LevelQuik RS self-leveling compound, which I used for this project.
First, I placed a self-leveling layer over the concrete slab and applied the radiant heat decoupling channeled membrane (SunTouch HeatMatrix). After installing the heating cable into the HeatMatrix decoupling membrane, I noticed the floor was still significantly not flat, and rather than try correct with thinset while installing the tiles. Therefore, before installing tile, I decided to add a second layer of self-leveling compound on top of the membrane in the most out-of-flat areas.
I retrospect, I probably should have done a better job ensuring the first self-leveler placement was sufficiently flat before installing the HeatMatrix membrane. I could have added a second layer of self-leveler or just applied it a bit thicker with the initial placement for better results and not have needed the second application on top of the HeatMatrix membrane.
Another option is to install the heating cable HeatMatrix membrane first, directly to the slab, and do all of the flatness and leveling correction on top of the HeatMatrix and radiant heat install. One slight downside of this method is that you may have a slightly thicker layer between the heating cable and the floor surface. Ideally, the heating cable will be reasonably close to the surface of the flooring.
Suppose you use embedded cable mats (or spooled heating cable installed without a decoupling membrane) for your radiant heat. In that case, you can install these directly over the subfloor or slab and then self-leveler on top of the mats if you plan to use a self-leveling underlayment layer. Also, if you are installing spooled cable without a channeled decoupling membrane, use spacing clips. You will install this cabling with a clip first and then apply any self-leveler on top if using, just like heating mats.
If you are not planning to use a self-leveler layer, you can apply thinset to embed the radiant heating. You can apply thinset as a two-step process, with a preliminary layer to cover the heating cable or heating mats and a second layer to install the tile. You can use a one-step method to cover the radiant heat and install the tile simultaneously. Using the one-step thinset application, it is often easier to back butter the tiles with thinset during the application.
Suppose you install radiant heat over a wood (plywood) subfloor for non-tile floor finishes like hardwood or carpet. In that case, you will generally need to prep the subflooring for the eventual application of self-leveling concrete, which is typically applied over a radiant heat cable attached to subfloors.
Check with the manufacturer of the self-leveling compound you plan to use. Still, many will require a latex primer application over the subflooring to improve the self-leveler’s bonding and allow for proper curing of the self-leveler. Wood substrates tend to pull water out of Portland cement-based products and impede adequate curing.
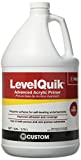
Application of a latex primer is often recommended over concrete surfaces to improve bonding if you plan to use self-leveling compounds immediately over the slab surface. I used self-leveling underlayment directly over my concrete slab and did prep it with the recommended latex primer first.
So, for me and this project, my next step is to apply self-leveling mortar underlayment to the concrete slab. Read the product install directions before placing the self-leveler. Generally, clean the concrete and prime with a latex acrylic bonding primer, then apply self-leveler. Help the self-leveler by screeding the compound or using a float or a gate rake or spiked roller. See my self-leveling underlayment placement article for more detailed guidance.


- Install thermal break/insulation layer and tile backer board.
With the subfloor prepped, install a thermal break / insulation layer. I used GoBoard foam-core tile backer board. There are a few other options including; Kerdi-Board XPS tile backer board, wedi XPS tile backer board, IsoRad XPS board.
The beauty of using a foam-core tile backer board is the triple function of; insulation layer, vapor barrier, and tile thinset substrate.
GoBoard (and the other tile backer boards) is installed using a modified thinset mortar. Using a notched trowel (1/4″ square notched trowel or similar), apply thinset mortar to the slab/self-leveler in a fashion that provides complete contact coverage of the backer board surface. Encourage uniform thinset spread and contact by applying pressure over the entire backer board surface.
Start at one end, walking sequentially across the panel in the direction of the trowel groves to help remove any trapped air. Full GoBoard manufacturer install instructions here.
Install the backer board gapped 1/8 – 1/4″ between panels to allow sealant application if you plan to seal the panels as a vapor barrier. Then, apply a manufacturer-approved sealant with a grout float to seal seams.


- Install radiant heat mat or spooled radiant heat cable and floor temperature sensor.
Next, install the radiant heat system on top of the insulation/tile backer board layer. Using factory-assembled radiant heat mats or rolled mats can be installed directly on the insulation/backer board. If you use spooled loose heating cable, install the cable directly onto the insulation/backer board using mounting strips or a patterned matrix membrane.
Many of the membranes made for mounting radiant heat cable also serve as an uncoupling/anti-fracture membrane. Most manufacturers that sell spooled heating cable also make a mounting membrane.
For Spooled Heating Cable Installs
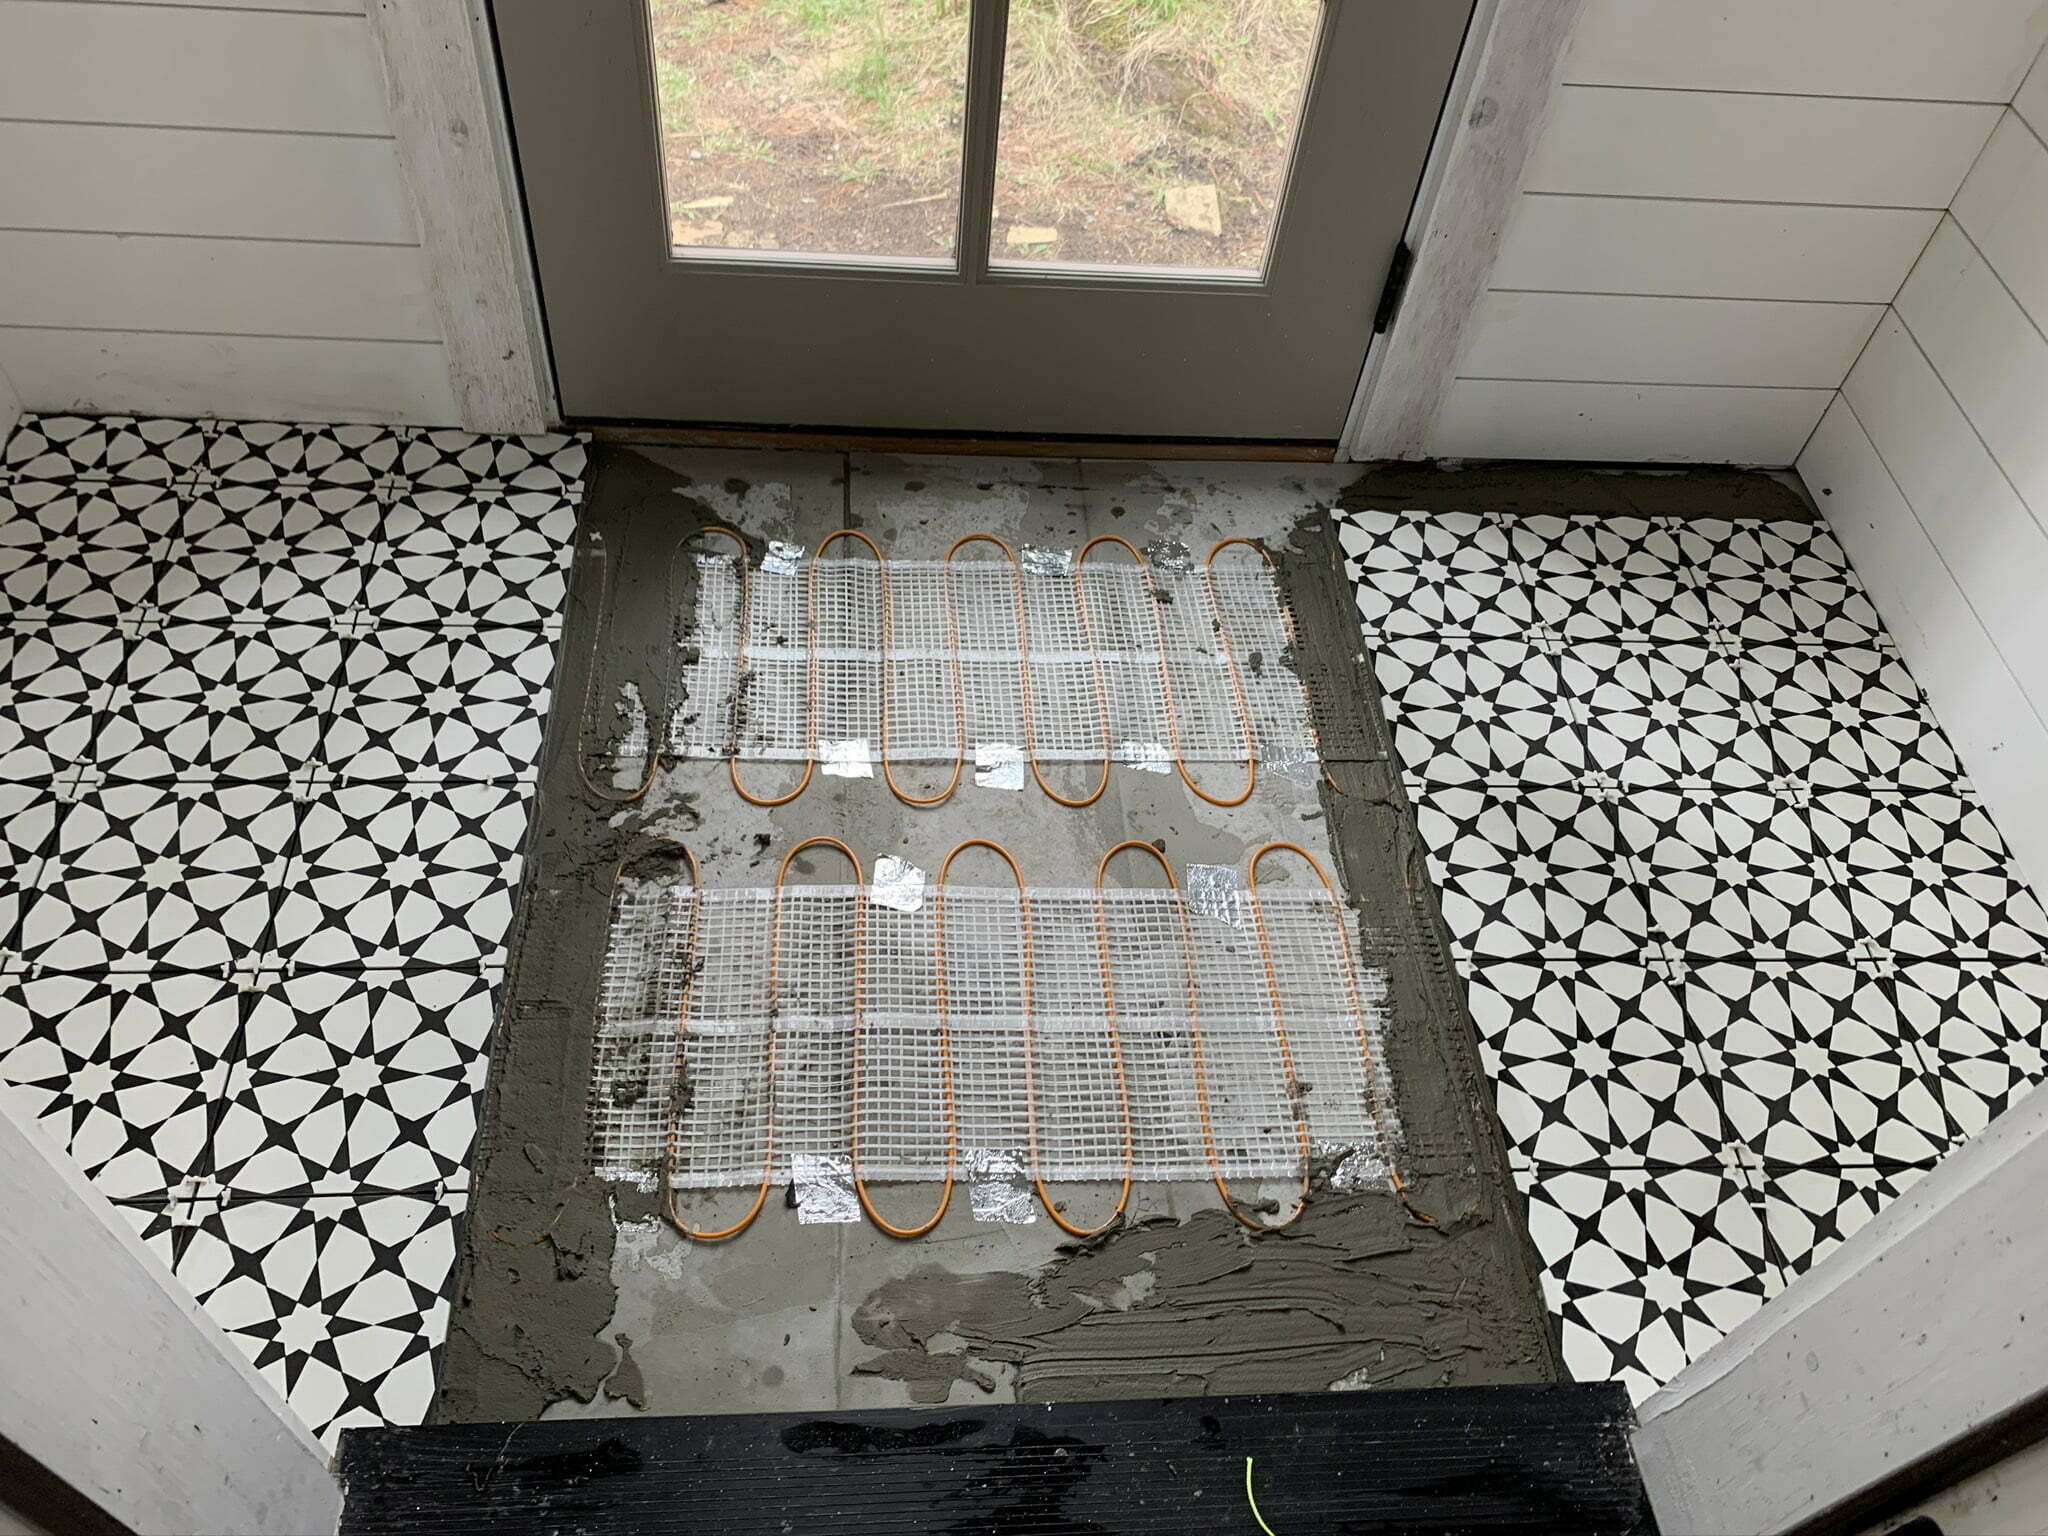
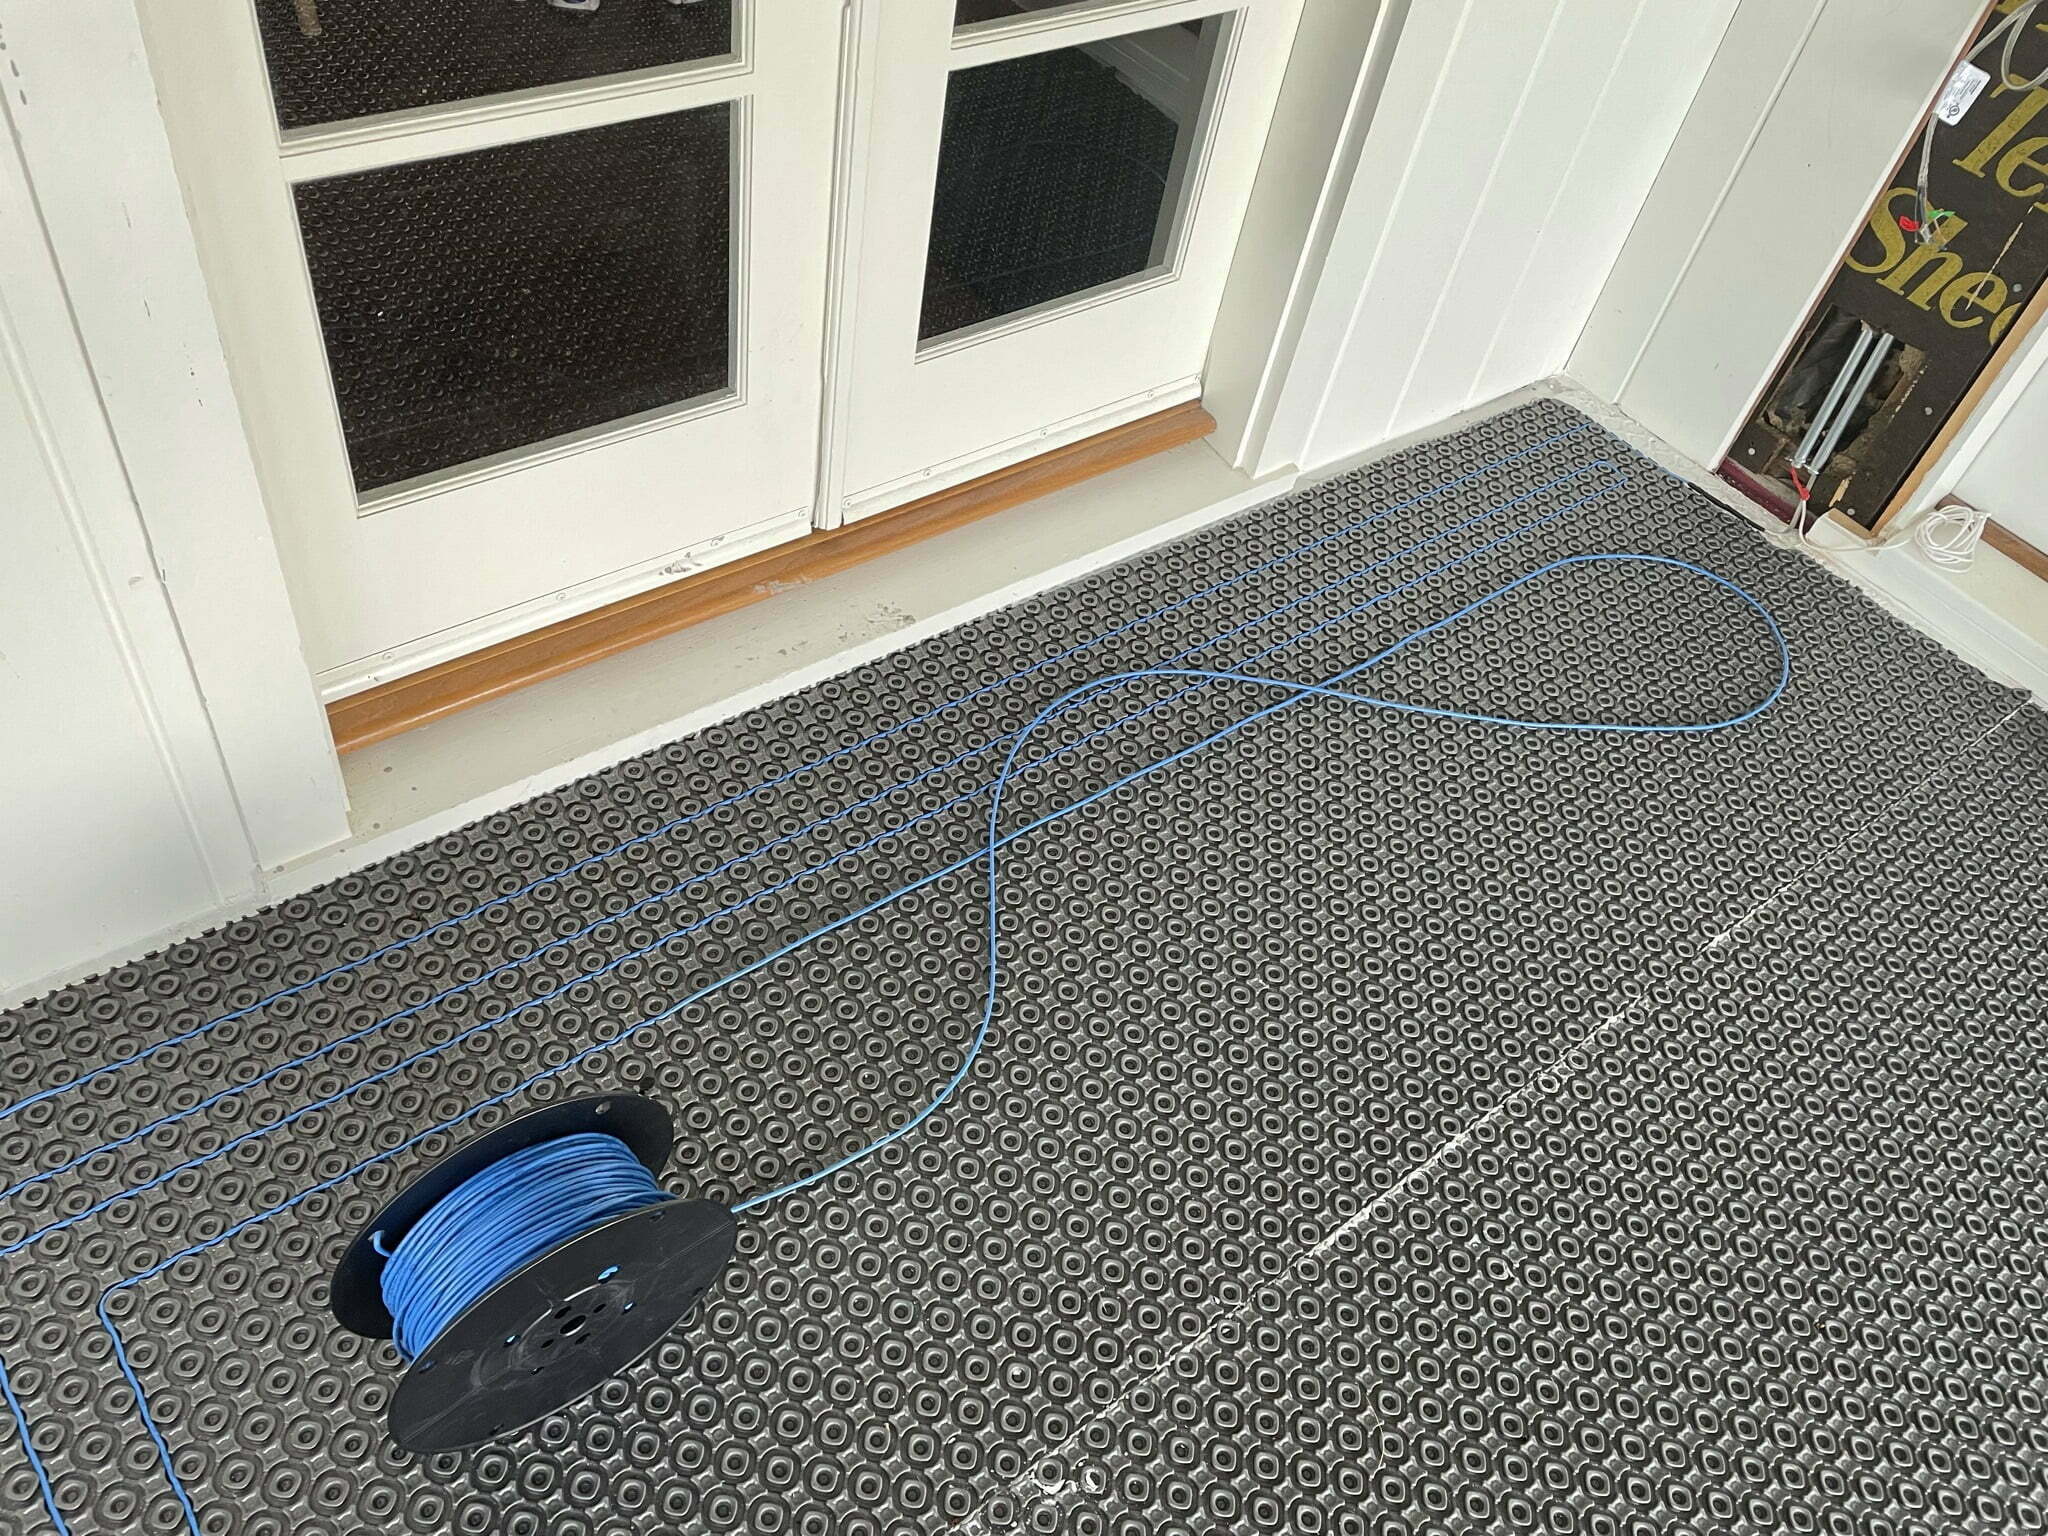
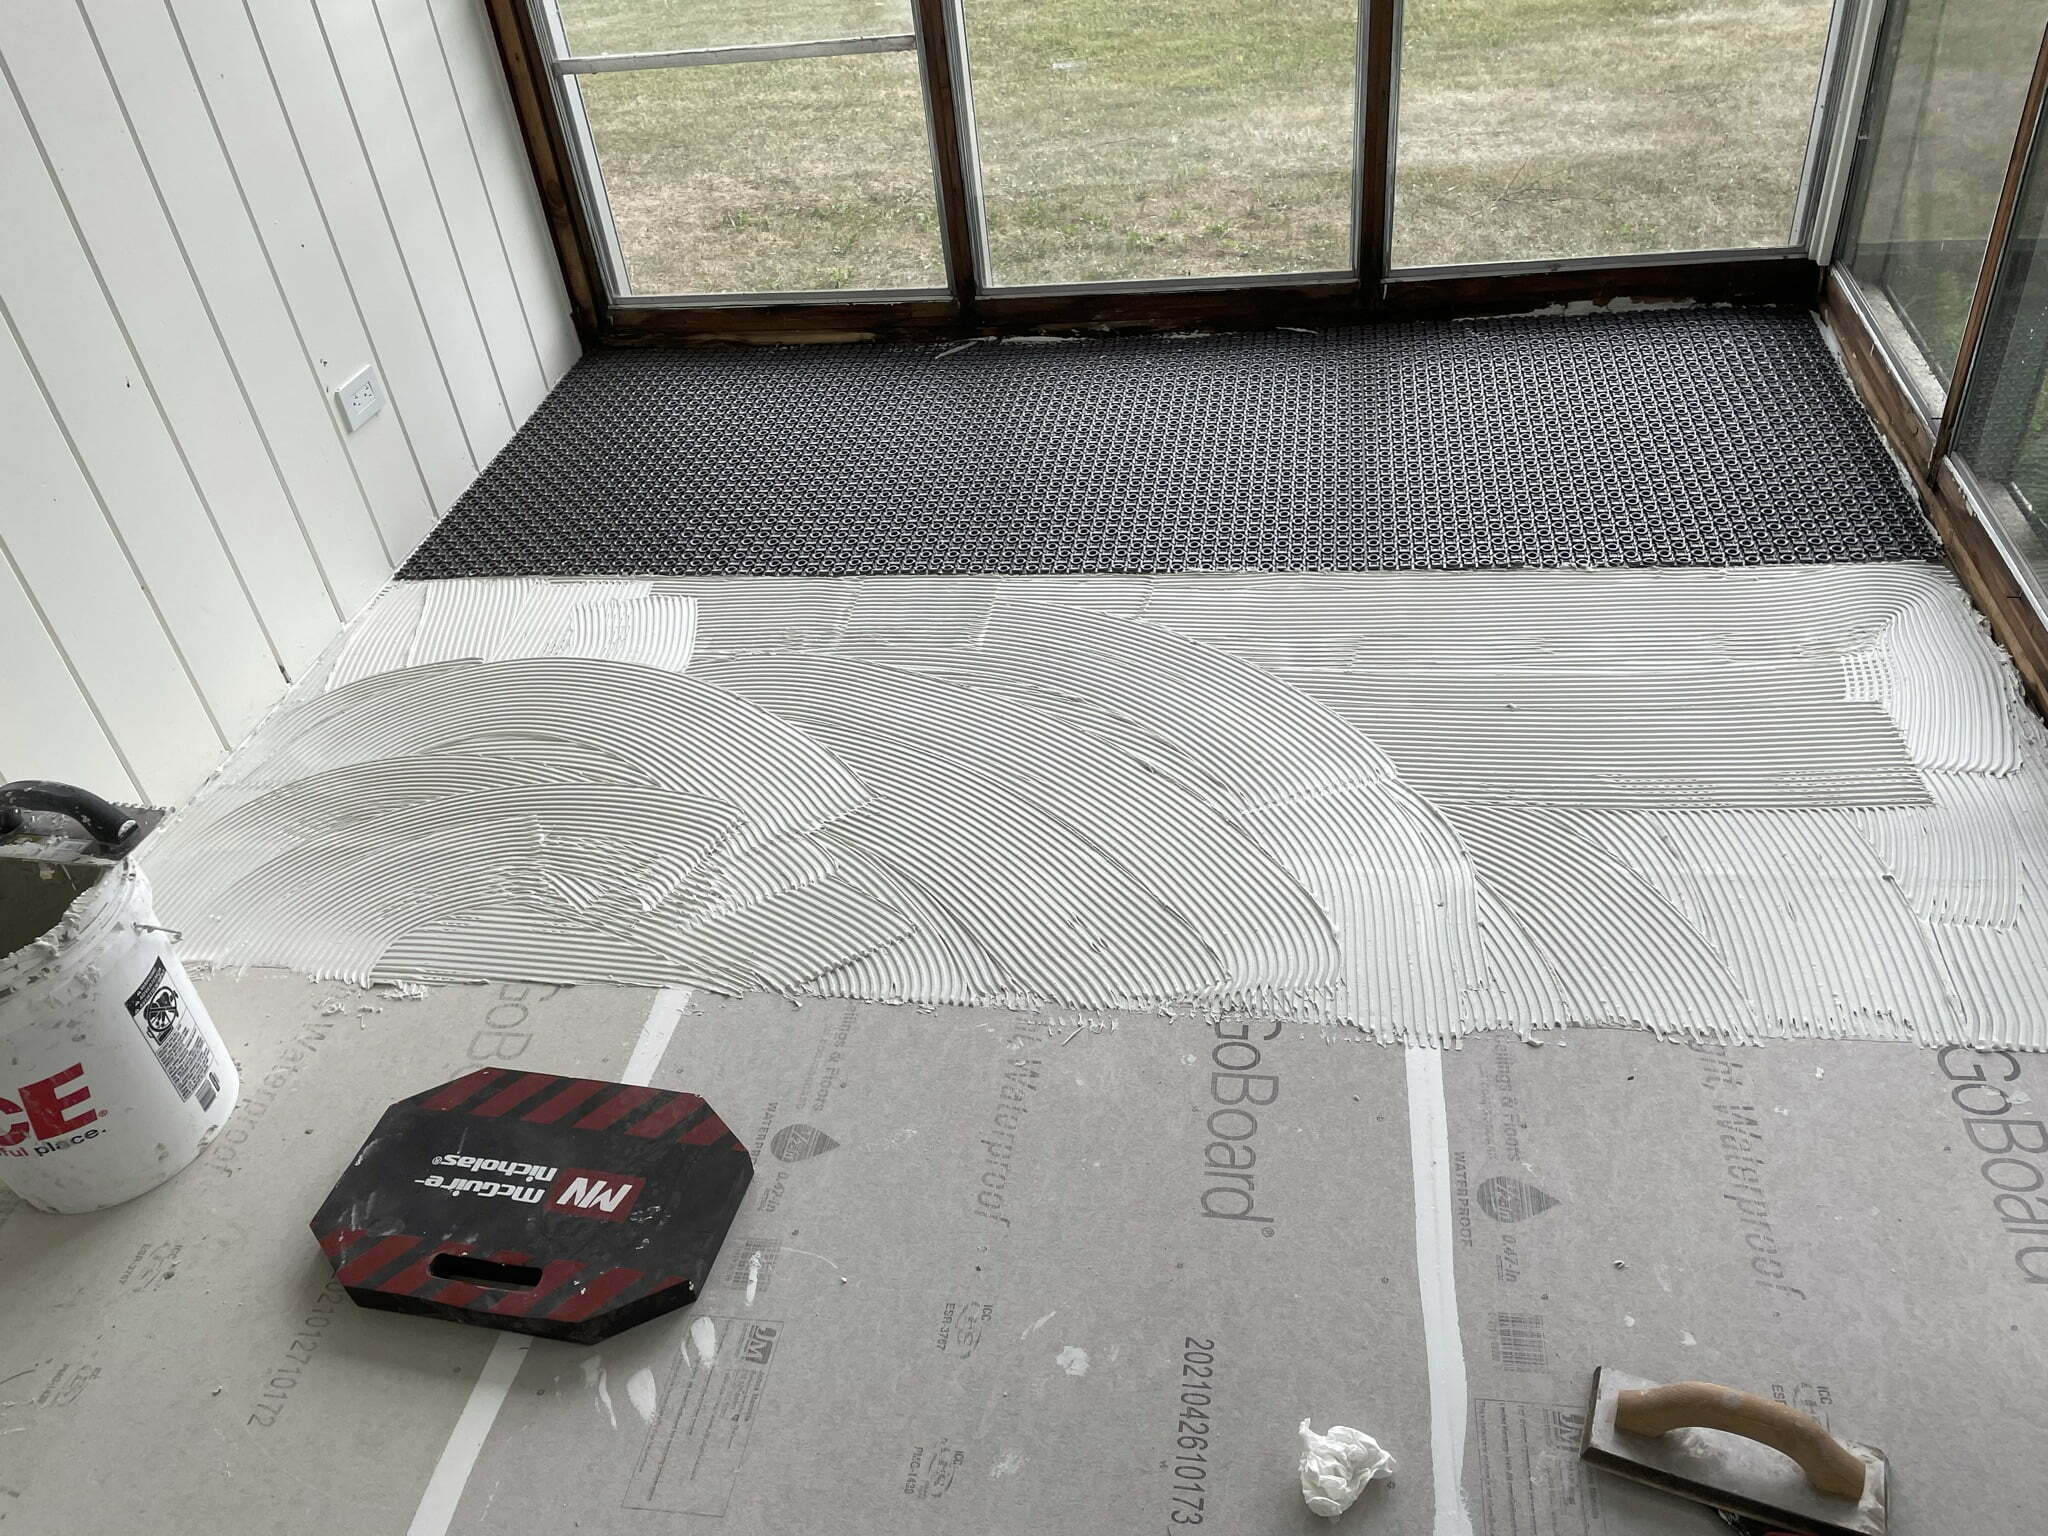
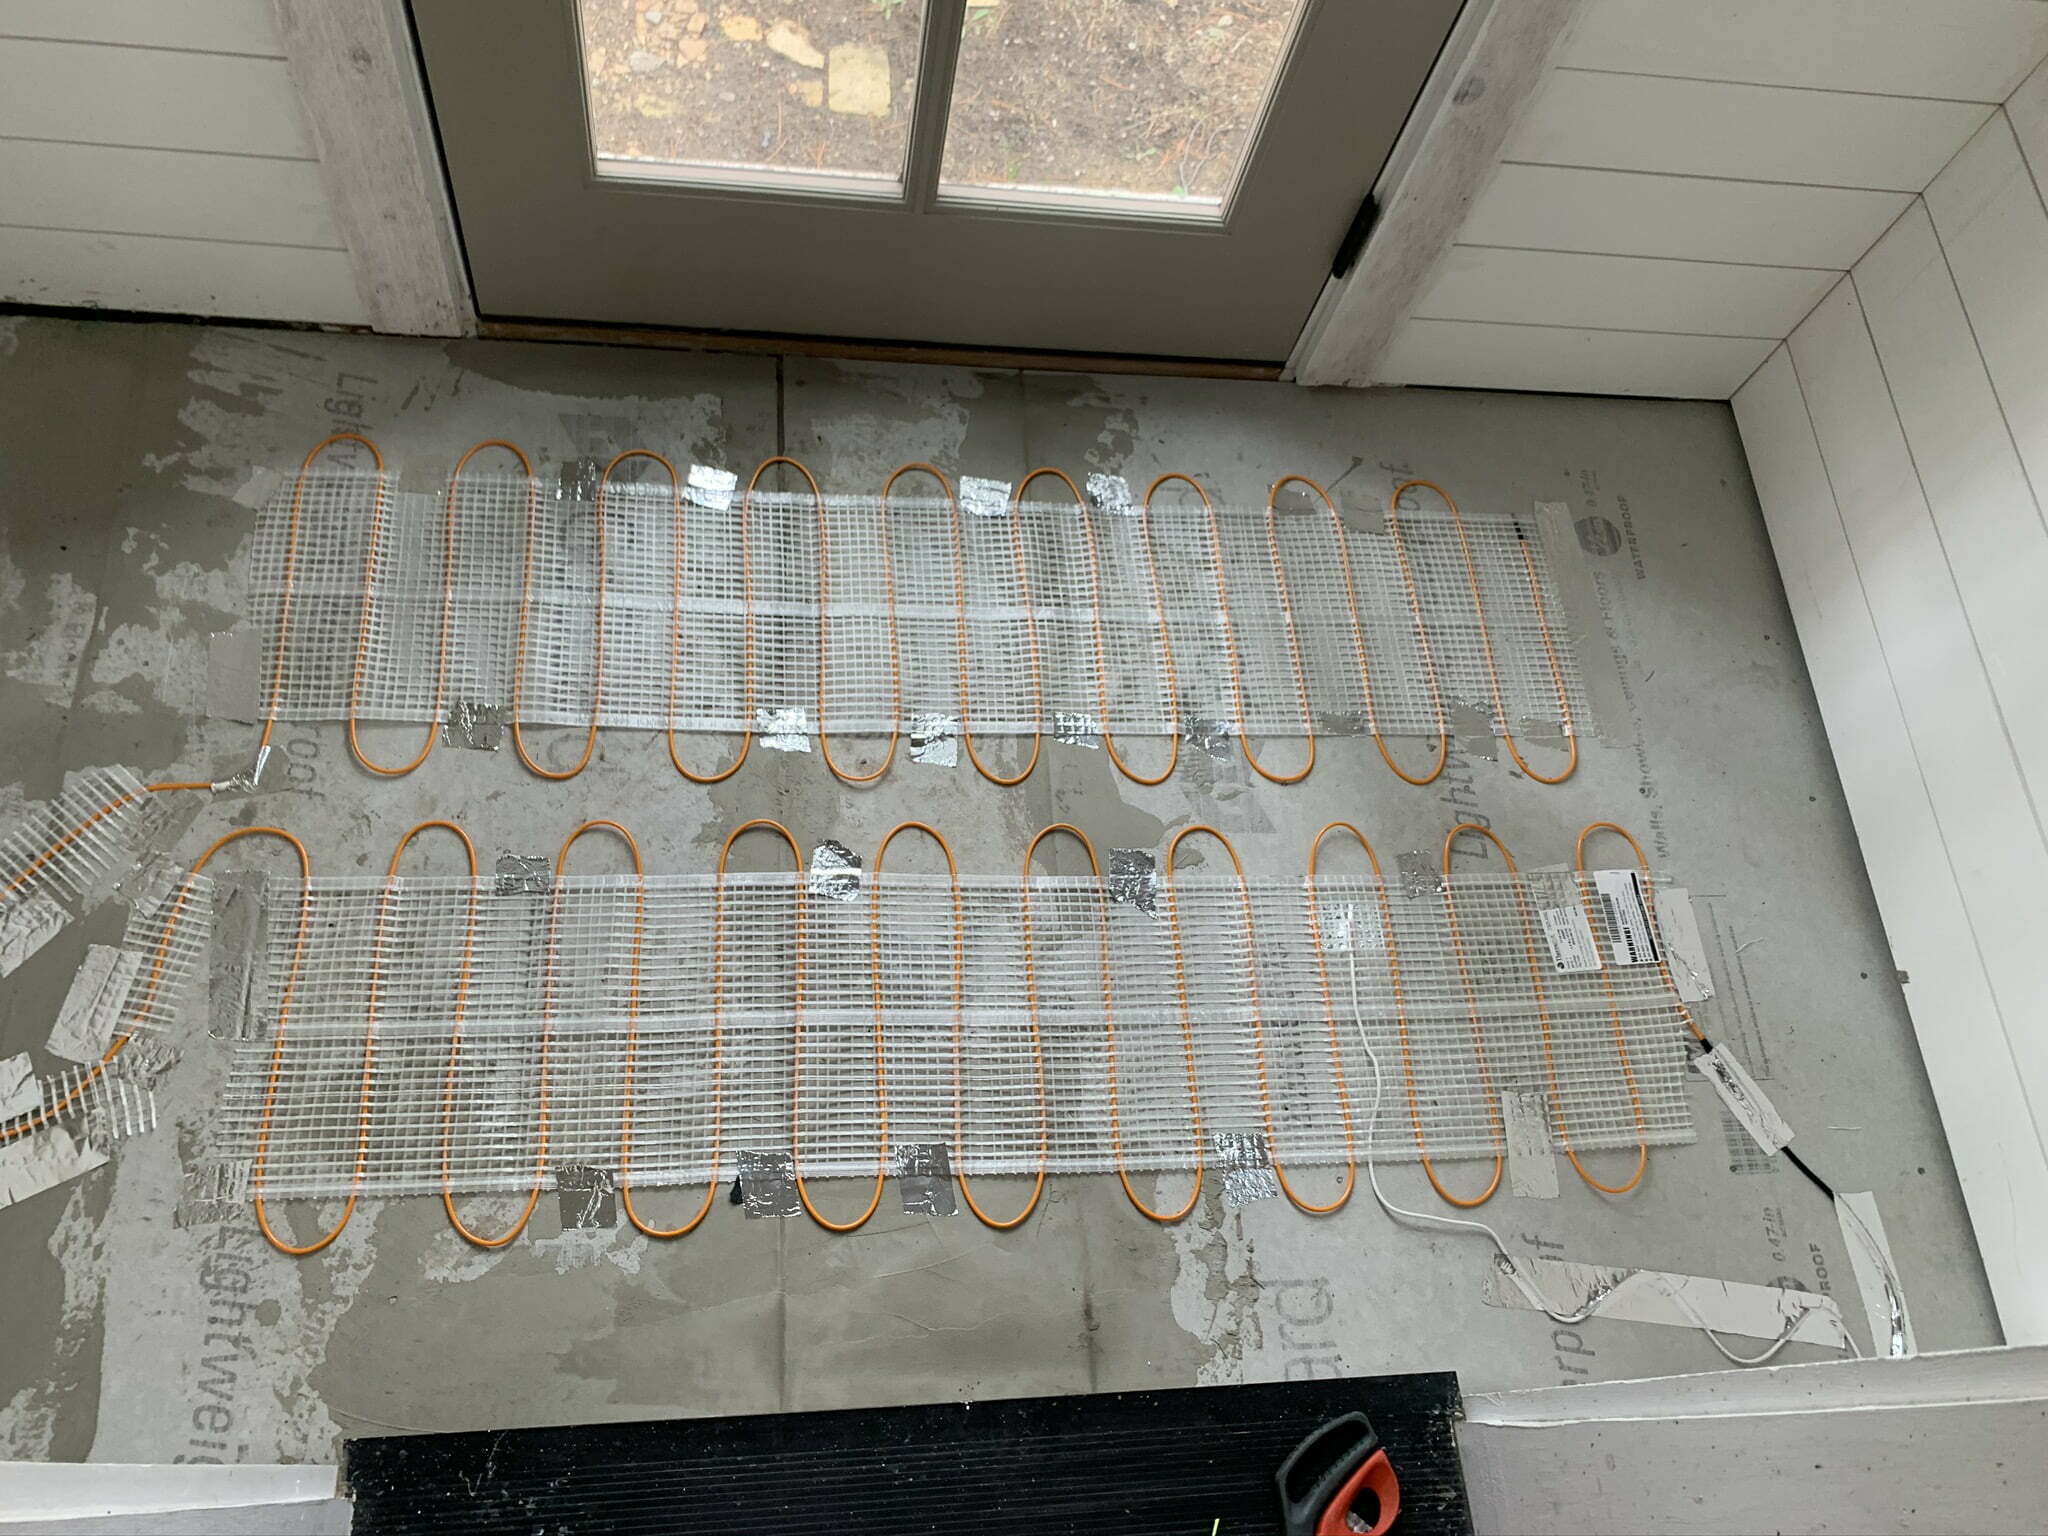
I used the spooled heating cable and an inlay/uncoupling membrane from SunTouch – WarmWire heating cable and HeatMatrix membrane.
First, install the HeatMatrix membrane using a latex-modified thinset applied with a 1/4″ x 1/4″ notched trowel. Next, apply pressure to fully embed the fleece covered the underside of the HeatMatrix membrane using pressure applied to a grout float and by walking over the membrane surface. Finally, ensure the membrane installs flat and level – this will be the surface over which you install your tile.
The HeatMatrix membrane is sold in 40″ wide rolls of 3′ length (10 sq ft), 12′ length (40 sq ft), and 49′ (161 sq ft). Measure the square footage of the desired install area, using a combination of the above available rolls to complete your install. My sunroom floor area was about 155 sq ft and I used the HeatMatrix 161 sq ft roll ordered from Amazon.
Once the membrane is installed, install the WarmWire radiant heating cable into the membrane. Refer to the manufacturers install instructions prior to mounting the cable.
Standard cable spacing is 3″, which generates a tad over 12W/sq ft of the installed system. The minimum spacing recommended by the manufacturer is alternating 2″ and 3″ spacing, which generates 15W/sq ft of the installed system area.
Starting with the factory splice to the power cable end, install the cable into the membrane. Use a gloved hand to push the cable into the channels according to your desired spacing. Space the cable 3″ – 6″ from the wall. Use a flat screwdriver to clean out any residual thinset from the membrane seams.
Continue installing cable, using all of the supplied cable. Do not cut any excess wire!
Install a floor temperature sensor spaced equally between the installed cable. Avoid installing the temp sensor in an area of the floor likely to trap heat, like under a rug.
For Heating Mat Installs
Using a heating cable mat will install directly on top of the insulation layer or subfloor surface.
Radiant heat mats are typically sold in 2′ – 3′ widths of various lengths. Electrical resistance cable is woven into a fabric mat material that can be unrolled and embedded easily within the floor build.
Install the mat according to the manufacturer’s recommendations. Depending on the specific mat, some mats are installed onto a thinset bed (similar to uncoupling membranes or tile backer board), and some mats are placed and then embedded in a thinset layer.
The mat products I’ve used in the past have a peel-and-stick tape strip or a tacky backing to hold the mat flat to the subfloor. A thinset layer is then placed over the mat to install the overlying tile.
Some of the fabric-like mats (nVent Nuheat) install similar to fleece-lined uncoupling membranes in a notced trowel placed thinset layer.
Before installing the mat, unroll and “dry run” the layout. Arrange the mat starting with the power cable end placed to reach the electrical box for the thermostat power connections.
Unroll the mat in rows to cover the floor surface. At the end of a row, most of the mats are designed to be cut to create a 90-degree turn back toward the starting wall. Repeat the process until the entire surface is covered. Do not stack or cross the mat as it may create overheating of the system.
Some mats have adhesive strips or a tacky coating to help the mat install flat. If the mat doesn’t lay flat, use hobby heat glue or tape to hold down the mat before embedding in thinset mortar or self-leveling compound.
I used foil HVAC tape to hold the mat and the power cable from the mat flat for the initial install.

Foil HVAC tape used to help hold the radiant heat mat flat prior to laying tile. Floor Temperature Sensor
Once the radiant heat cable is installed, install a floor temperature sensor for the thermostat. Some thermostats will include a floor sensor. Some will not and will have to be purchased separately. If buying a floor sensor separately, check for compatibility with the thermostat you will use.
A floor temperature sensor is important for the proper and safe function of an in-floor radiant heat system. The temperature sensor will monitor the temperature of the heated floor to prevent overheating and provide floor temperature control options for the system.
Install the sensor equally spaced between heating cable loops without crossing any heat sensor or sensor wire over any heating cable. It’s also a good idea to install a backup sensor to use if the primary temp sensor fails. Next, install the radiant heat system on top of the insulation/tile backer board layer.
Using factory-assembled radiant heat mats or rolled mats can be installed directly on the insulation/backer board. Alternatively, if you use spooled loose heating cable, install the cable directly onto the insulation/backer board using mounting strips or a patterned matrix membrane.
Many of the membranes made for mounting radiant heat cable also serve as an uncoupling/anti-fracture membrane. Most manufacturers that sell spooled heating cable also make a mounting membrane.
For Spooled Heating Cable Installs
I used the spooled heating cable and an inlay/uncoupling membrane from SunTouch – WarmWire heating cable and HeatMatrix membrane.
First, install the HeatMatrix membrane using a latex-modified thinset applied with a 1/4″ x 1/4″ notched trowel. Next, apply pressure to fully embed the fleece covered the underside of the HeatMatrix membrane using pressure applied to a grout float and by walking over the membrane surface. Finally, ensure the membrane installs flat and level – this will be the surface over which you install your tile.
The HeatMatrix membrane is sold in 40″ wide rolls of 3′ length (10 sq ft), 12′ length (40 sq ft), and 49′ (161 sq ft). Measure the square footage of the desired install area, using a combination of the above available rolls to complete your install. My sunroom floor area was about 155 sq ft and I used the HeatMatrix 161 sq ft roll ordered from Amazon.
Once the membrane is installed, install the WarmWire radiant heating cable into the membrane. Refer to the manufacturers install instructions prior to mounting the cable.
Standard cable spacing is 3″, which generates a tad over 12W/sq ft of the installed system. The minimum spacing recommended by the manufacturer is alternating 2″ and 3″ spacing, which generates 15W/sq ft of the installed system area.
Starting with the factory splice to the power cable end, install the cable into the membrane. Use a gloved hand to push the cable into the channels according to your desired spacing. Space the cable 3″ – 6″ from the wall. Use a flat screwdriver to clean out any residual thinset from the membrane seams.
Continue installing cable, using all of the supplied cable. Do not cut any excess wire!
Install a floor temperature sensor spaced equally between the installed cable. Avoid installing the temp sensor in an area of the floor likely to trap heat, like under a rug.
For Heating Mat Installs
Using a heating cable mat will install directly on top of the insulation layer or subfloor surface.
Radiant heat mats are typically sold in 2′ – 3′ widths of various lengths. Electrical resistance cable is woven into a fabric mat material that can be unrolled and embedded easily within the floor build.
Install the mat according to the manufacturer’s recommendations. Depending on the specific mat, some mats are installed onto a thinset bed (similar to uncoupling membranes or tile backer board), and some mats are placed and then embedded in a thinset layer.
The mat products I’ve used in the past have a peel-and-stick tape strip or a tacky backing to hold the mat flat to the subfloor. A thinset layer is then placed over the mat to install the overlying tile.
Some of the fabric-like mats (nVent Nuheat) install similar to fleece-lined uncoupling membranes in a notced trowel placed thinset layer.
Before installing the mat, unroll and “dry run” the layout. Arrange the mat starting with the power cable end to reach the electrical box for the thermostat power connections.
Unroll the mat in rows to cover the floor surface. Most mats can be cut at the end of a row to create a 90-degree turn back toward the starting wall. Repeat the process until the entire surface is covered. Do not stack or cross the mat as it may create overheating of the system.
Some mats have adhesive strips or a tacky coating to help the mat install flat. If the mat doesn’t lay flat, use hobby heat glue or tape to hold down the mat before embedding in thinset mortar or self-leveling compound.
I used foil HVAC tape to hold the mat and the power cable from the mat flat for the initial install.
Foil HVAC tape used to help hold the radiant heat mat flat prior to laying tile. Floor Temperature Sensor
Once the radiant heat cable is installed, install a floor temperature sensor for the thermostat. Some thermostats will include a floor sensor. Some will not and will have to be purchased separately. If buying a floor sensor separately, check for compatibility with the thermostat you will use.
A floor temperature sensor is important for the proper and safe function of an in-floor radiant heat system. The temperature sensor will monitor the temperature of the heated floor to prevent overheating and provide floor temperature control options for the system.
Install the sensor equally spaced between heating cable loops without crossing any heat sensor or sensor wire over any heating cable.


- Embed heat mat or heating cable in thinset mortar or self-leveling underlayment and install tile finish.
Embed the installed heating cable (or mat) entirely in thinset or self-leveling compound.
If you plan to install tile, you can either install tile with the same layer of thinset used to embed the heating elements or you can first apply a skim coat of thinset, and then install the tile over the dry skim layer.
Self-leveling compounds are also commonly used to embed in-floor radiant heat systems. They also offer the extra benefit of leveling and flattening compared to thinset. They are more expensive and can be moderately difficult to pour in larger spaces.
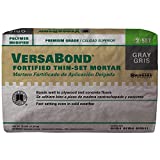
I used both a self-leveling mortar (LevelQuik RS by Custom Building Products) and a latex-fortified thinset mortar (VersaBond by Custom Building Products).


- Start system, program the thermostat.
After finishing the floor(s) with tile, allow the thinset mortar used to embed the radiant heating cable and install the tiles to cure, about 30 days, before starting the system.
Once the mortar has cured, start up the thermostat and check system function. Depending the specifics of your floor, it will take a bit to notice a change in the floor temperature. For my projects, I notice the warmth with startup in about 15 – 20 minutes.
After powering up the system, program and set your thermostat. I really like the SunTouch SunStat WiFi thermostat (Tekmar), and used it for my sunroom project. This thermostat can be connected to a WiFi network and using their app, controlled remotely and the room temperature viewed from your phone – a great feature for a cabin or second home.
In addition, the SunStat thermostat is very intuitive and is programmable for schedule, floor or room temp trigger, and display brightness and color themes. The WiFi model also displays weather information and can modify programming based on weather info. It’s a great thermostat, the best I’ve used and I’ve tried a lot of them.
After your thermostat is set and programmed, you should be good to go and on your way to warm floors and a comfortable room. Feel free to add a question in the comments section or share your project. Thanks for reading and let me know what you think.


References:
- Insulation is critical to radiant system's performance. Mark Eartherton. 11-24-15. Plumbing & Mechanical (pmmag.com).
- Radiant Heat Floor Design & Installation Mistakes to Avoid. Inspectapedia.

GIPHY App Key not set. Please check settings