What a winter it’s been for private septic systems! Frigid temps and very little snow has many septic systems in the colder areas of the country frozen solid. Our septic system at our cabin in Minnesota is no exception and has already frozen twice this year. Unfortunately this a constant problem for cold-climate homes and cabins. This is how I fixed ours.

High Efficiency Furnaces, Frozen Septic Systems and How to Fix them
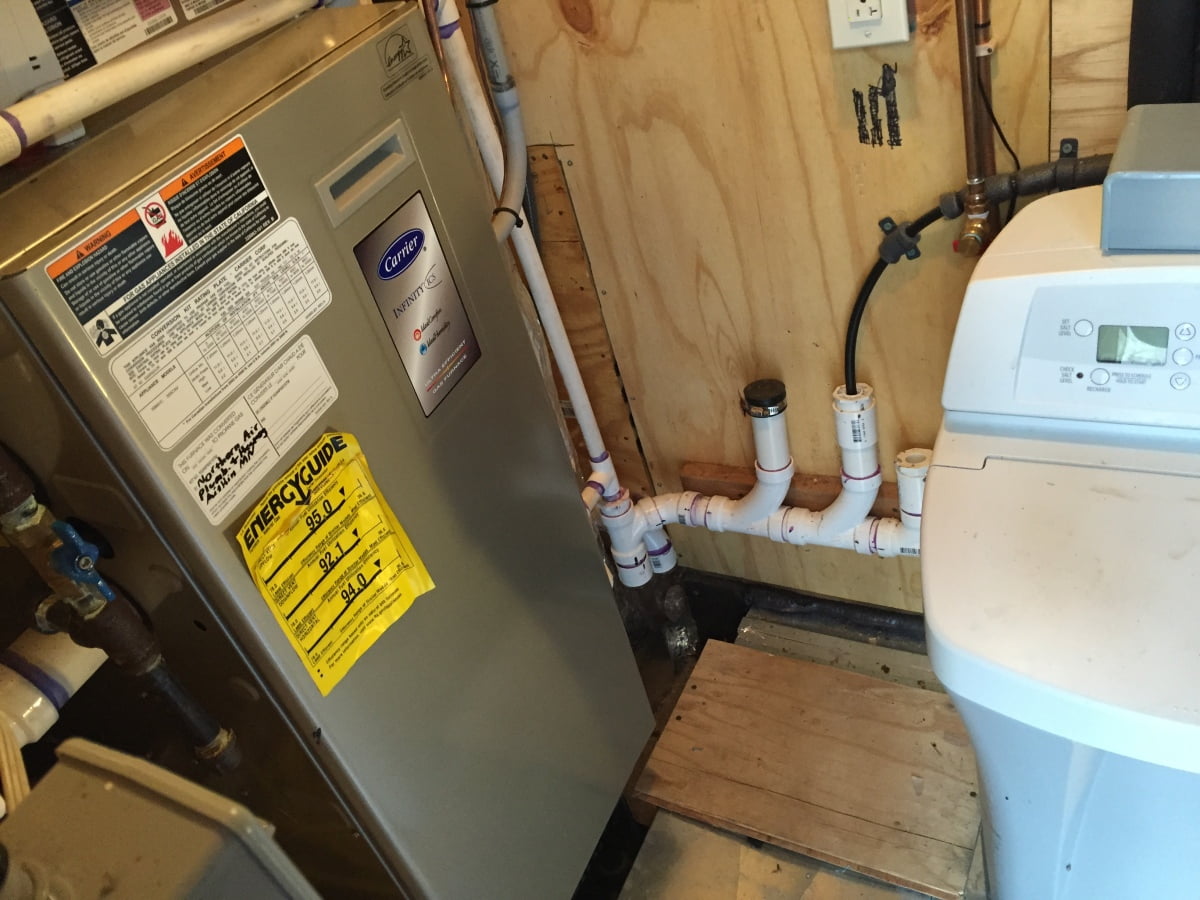
The problem with our system is our high-efficiency condensing furnace. Like most high-efficiency furnaces, our furnace produces an enormous amount of condensate water. This water, when drained into our septic line, eventually freezes and blocks the pipe.
To fix our problem, I plan to handle the furnace condensate water differently. Instead of allowing it to drip slowly into the septic line via a drain, I plan to build a high-capacity tank and pump system that will periodically discharge the water in large volume flushes.
These periodic, large-volume water dumps should help the system. Similar to normal system use, the large volume of water should add heat to the system and help flush the septic line.

Before I jump into how I fixed the furnace condensate issue, here is an overview of our winter cabin situation so you can get an idea of what we are dealing with compared to your situation:
Our Minnesota Cabin in Winter:
- Well insulated 700 sq ft 1 BA, 2 BR cabin used some weekends and long weekends
- Frequent 5 to 30+ day away periods
- High-Efficiency propane forced air furnace – set to 54 degrees when away
- Foundation insulated, sealed crawl space with furnace ducts running through – stays 54 degrees or warmer
- 4″ un-insulated DWV PVC septic line from home running 15′ to a septic tank buried 18″
- Concrete two-compartment septic tank with drain field buried 16″
Slow-Flow, Low-Volume Water Sources Can Lead To Frozen Septic Lines
Slow moving water sources added to a cold septic pipe can easily form ice. Our slow-moving water source was our furnace condensate.
However, there are many other potential problematic water sources. Leaky sinks and toilets, leaking shower heads, humidifiers and water intentionally left dripping to prevent supply freezing can all be problems.
Eliminate these problematic water sources to help avoid ice formation within your septic lines.
High Efficiency Furnace Condensate Drainage
High-efficiency condensing furnaces produce a lot of water. Our smallish high-efficiency furnace at our cabin produces 3 – 8 gallons per day!
Up until now, this water has been allowed to trickle into our septic system drop by drop. To fix this I plan to build a custom high-capacity condensate tank and pump.
Instead of a continuous trickle of water, the new custom condensate pump will discharge periodic large volume flushes of condensate water. These episodic dumps of water will mimic normal plumbing use, like showering or flushing to toilet; use that helps protect septic systems from freezing.
There are many commercially available condensate pumps. The problem I have with them is they are all very small volume. Most have total tank volumes of under 1 gallon. This means the pump will likely cycle after less than half of this volume is collected.
In addition, my condensate pump will be placed in a small pump house without a drain and will be run unsupervised for days to weeks at a time. Looking at the available condensate pumps, I was not confident this would be a safe system for my setup.
What I want for a high capacity furnace condensate pump:
- durable, industrial grade tank
- large volume tank and large volume discharge cycles
- reliable pump built to withstand corrosive condensate water (acidic)
- a fail safe design to prevent condensate water flooding or furnace shut down if the condensate pump system fails
So, how do I get all this? Build it!
Build A Large Capacity Furnace Condensate Tank And Pump System
For the tank, I looked for sturdy, thick-walled water tank. I found the perfect tanks after searching for water holding tanks. I found a variety of sized and shaped polyethylene tanks and decided on a used a 16 gallon rectangular tank. I needed a big enough tank, but one that would fit neatly next to my furnace and be the right dimensions for the needed plumbing connections.
For the pump, I looked for a small, well-built sump pump.
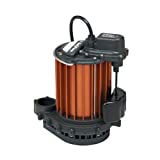
I selected a 1/3 hp powder-coated aluminum and polypropylene submersible sump pump by Liberty Pumps. I figured these materials would hold up to the acidic condensate water better than cast iron.
When selecting the pump, I also needed a pump that would fit and work well in the tank I planned to use. The Liberty model 237 also featured a compact magnetic trigger switch designed to operate in smaller pits, which is ideal for this project.
To put it all together, I needed access to the inside of the tank to install the pump and the plumbing fittings. Although the tank I purchased has a rather large capped opening, it was not large enough to pass the sump through and needed some modification.
For this access modification, I planned to cut a larger opening in the top of the tank. I also wanted a way to have a watertight cover for this new opening. After some searching online, I decided to use a marine deck plate for the cover. The deck plate offered a watertight cover for the tank and was large enough to allow passage of the sump pump.
To plumb the tank, I used flexible 3/4″ silicone tubing and related fittings. I sealed the fitting to the tank using beefy O-rings and a bit of silicone. To plumb the sump pump, I passed the required 1 1/2″ discharge circuit through a hole cut in the top of the tank.
Then, I connected the sump discharge plumbing to my existing drain circuit. I added a check valve installed upstream to prevent back flow of the rapidly discharged sump water.
The pump system was relatively easy to build with readily available parts. The custom unit did end up costing more than most commercially available condensate pumps, but the industrial-quality system I built, is incomparable to the off-the-shelf pumps you can buy at your local home improvement store.
If you have a high-efficiency furnace and are having similar problems with septic line freeze ups, consider building this type of system.
As a disclosure, I just finished the system today, Feb. 24th, 2015 and haven’t had much time to evaluate it. I will add feedback later. Enjoy.
OVERVIEW | Custom Cold Climate Condensate Pump
SUPPLIES LIST | Custom Cold Climate Condensate Pump


-
 Waterproof Deck Plate 10" Bomar Deck Plate 10in (not sure why these are now so expensive - 7/2021)


TOOLS LIST | Custom Cold Climate Condensate Pump
")


STEPS | Custom Cold Climate Condensate Pump
- Purchase and prepare a durable, large-capacity water tank.
Consider and pick a proper water tank to use for your HVAC system. I wanted a tank with the capacity to hold several days of condensate from my furnace and be large enough to discharge several gallons with each cycle of the sump pump. Select a tank with the capacity to hold several days or more of the output from your HVAC system. My compact high-efficiency gas furnace will discharge up to 5 gallons a day of condensate.
The tank will also need to fit within the space you are planning to place the tank. Consider the height of the tank in relation to the incoming furnace condensate line. The incoming furnace condensate line will typically need to drain downhill to enter the tank, so the tank height should consider this.
The tank I chose was just slightly higher than the level of the furnace condensate discharge circuit from the furnace. The location and height of the drain plumbing are less important as most sump pumps are designed to pump water up some height.
In addition to tank size and dimension, look for a tank that is durable and thick enough to hold many gallons of water safely. Using plastic storage totes or similar purchased at your local hardware store is a bad idea.
For my system, I purchased an industrial grade rotational molded water tank intended for heavy use and long life. You are building a system to store and discharge many gallons of water daily unsupervised, make it as sturdy and reliable as possible.

- Prepare water tank for use.
To use the water tank as a sump tank, you will need to install a sump pump in the tank. To do this, you will need an access large enough to pass a sump pump.
The tank I ordered has a rather large capped opening, but one that is not large enough to pass a sump pump through. To create an opening large enough for the sump, I cut out the old opening and installed a marine deck plate. The deck plate allows access to the tank for sump pump placement and cleaning, yet functions as a water tight lid.
Chose a deck plate that is large enough to accommodate the sump pump you plan to use. The deck plate I used (Bomar 10″ locking deck plate model G844W) has a 9 1/4″ diameter opening and requires a 10 1/2″ cut out. This plate was just big enough to allow my 9.6″ diameter sump pump to pass though if tilted.
To install the deck plate, cut the proper size hole in the tank based on the deck plate you plan to use. To cut the tank, I used a Dremel tool.
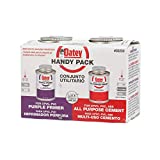
Once the hole is cut, sand the edges smooth. Then, apply a silicone-based caulk and screw the plate in place. I used stainless steel sheet metal screws (I used #12 3/4″ screws) after first drilling pilot holes through the plastic tank.
Once the deck lid is secured, check to ensure the sump pump you plan to use will fit into the tank through the deck lid.


- Plan and cut tank plumbing holes for water inlet, water outlet and water overflow.
Plan for the plumbing access to and from your tank. You will need an inlet for the condensate water coming from the furnace. You will need an exit hole for the discharge plumbing from the sump pump, and a smaller hole to pass the sump pump powercord.
I also added another outlet at the top of the tank to serve as an overflow outlet that will allow the tank to empty if the sump pump fails to operate.
To properly plan the locations of these holes, place your tank in it’s eventual resting spot. Look at your system and plan the best routes for the incoming condensate line, discharge plumbing, and the overflow line. Once you have decided on a plumbing plan, mark the location of the desired holes in the holding tank.
Next, using a drill and the proper size bits or hole saw, cut the desired holes in the tank. The proper hole sizes will depend on the fittings and plumbing you plan to use. Here is a breakdown of the fitting I used and the holes I drilled to accommodate these fittings and the needed plumbing:
Function Fitting / Plumbing Hole Size Notes Condensate Inlet 1/2″ NPT x 3/4″ Barb Fitting 7/8″ Inlet should be in upper part of tank above pump trigger level, but lower than furnace condensate line level to allow for gravity drainage into tank Sump Pump discharge Outlet 1 1/2″ PVC larger than pipe, depends on collar use Can use rubber pipe collar to seal pipe with top of tank. I just used a rubber elbow. Overflow Outlet 90° 1/2″ NPT x 3/4″ Barb Fitting 7/8″ Locate overflow at the top of the tank. Will server as path for water to drain if sump fails. Ideal location is above condensate inlet but below condensate outlet at furnace. For the sump pump discharge line, I simply cut a hole in the top of the tank and passed a rubber 90-degree elbow through it. Next to this hole, I drilled a small hole to accommodate the pump power cord.
The method I used to pass the discharge plumbing may be overly simple. There are a variety of plumbing (pipe) grommets you could use to pass this discharge plumbing if you prefer a more water tight seal at the top of the tank.
I choose just to use a hole. My reasoning is that any water nearing the level of the top of the tank will empty through the overflow circuit prior to leaking through these unsealed passages at the top of the tank.


- Find a mounting position for the water tank and begin installing inlet plumbing.
Position your tank and plan plumbing connections. Consider the desired height and alignment of the furnace condensate line and the overflow outlet. You may need to adjust the height of your tank to get the desired alignment. I raised my tank 1″ by placing a 1″ thick square of rigid foam insulation under it.
As a review, the condensate line should drain down to the tank. In general you should not need a water trap between the furnace and the water tank, as most furnaces will have a built in trap for condensate water.
Use flexible tubing, PEX or other to connect the furnace condensate outlet to your tank. I used 3/4″ flexible silicone tubing for this connection, connecting the condensate discharge from the furnace to the install barbed tubing fitting at the side of my tank. The condensate line should enter your tank somewhere close to or at the top of your tank.
Next connect your pump overflow circuit. I used 3/4″ flexible silicone tubing for this connection as well. Connect this fitting with your drain circuit.
As a reminder, this circuit is intended to drain the tank if the water level reaches it. It will keep the tank from overflowing if the pump fails.
This connection should drain (downhill) into a suitable drain. The purpose of this circuit is to drain the tank if the sump pump fails to operate (similar to the function of the overflow holes in a sink). I used a few 3/4″ barb connectors and a short piece of 3/4″ flexible tubing.

- Connect discharge plumbing and overflow circuit.
Prior to plumbing your discharge circuit, consider your options and decide where to direct the discharge water.
Check with local codes, when considering your path. It may be illegal some areas to dump furnace condensate into a municipal sewer systems. Also, if you have a private septic system, consider the additional load on the system by dumping many daily gallons of water into your septic system.
Of course, any decision you make regarding the discharge path of your condensate water must consider the pro and cons. I plan to route my discharge circuit into my sewer for reliability reasons (I do not what an independent to-the-yard circuit to freeze up when I am away) and for the beneficial flushing effects. The trade off is the extra load on my septic system.
Once you have discharge circuit plan, connect the discharge circuit of your sump pump to your drain path. Most sump pumps will have a 1 1/2″ or 1 1/4″ female normal pipe thread (NPT) fitting at the base of the pump to connect your discharge circuit to. Use a 1 1/2″ (or sized to your pump) male NPT fitting solvent welded to 1 1/2″ or 1 1/4″ pipe to plumb your discharge circuit.
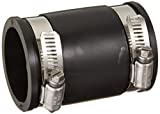
Pass this pipe out through the top of your tank and connect to your drain. It’s a good idea to use a flexible rubber coupling or elbow (Fernco or similar) to connect this circuit.
Flexible connectors allow for disconnection of the circuit and help to dampen pump vibrations. Install a union in the discharge plumbing if you do not use a flexible connector or coupling.
When plumbing your sump pump discharge circuit, you will usually need to install a check valve at or near the top of the tank to prevent backflow of water after pump cycles.
Consult the documentation for the pump you are using for more details. Many pumps also recommend drilling a small hole in the discharge pipe. This hole allows water to drain from the pump after a pump cycle and helps to prevent pump airlock. Again, check the documentation for your pump.
I also installed a check valve (one-way valve) on my drain circuit. This one-way valve was installed upstream from my sump pump connection to prevent the spread of the high-flow discharge water upstream in my drain circuit.
I have a few connections for my water softener upstream in this same drain circuit that I would like to protect. I also didn’t want the high flow from the sump pump to push up and out of the other drain connections in this circuit.


- Pass and connect sump pump power cord.
Pass the power cord from the sump pump through the top of the tank to a proper circuit (GFI). I used a small hole drilled next to the hole for the discharge plumbing to pass the power cord.
There are plumbing grommets made to seal power cords that pass through sump basin lids. You may choose to use one of these; I did not. I may use silicone to seal the cord and discharge plumbing.

- Test water tank and sump pump function.
Consider testing your tank and connections for leaks. I tested my tank in the shower before installing it. I wanted to be sure the two tank fittings I installed would not leak if the pump failed and the level in the tank rose to the level of the overflow outlet.
You can also test the tank once it is in place and installed. To test, unplug the sump pump and fill the tank with water from an outside source (five gallon bucket, hose, etc.). As the water approaches the top of the tank, plug the overflow outlet should allow water to drain out of the tank before the tank completely fills.
The overflow circuit should also allow the tank water to drain before the water level is high enough to flow backward in the furnace condensate circuit and into the furnace. Fix any leaks or adjust the tank level as needed prior to proceeding.
Once you are satisfied with the fill test of your tank, test the function of the sump pump and discharge plumbing. Before testing the sump pump, double check that your discharge plumbing is connected and tight. Then, plug in the sump pump. If you still have water in the tank from the leak and overflow testing, the pump should activate and drain the tank out the discharge plumbing.
You can refill the tank to check the trigger function of the sump pump. As the water level rises in the tank, the sump pump float trigger will activate and again the pump should cycle, emptying the tank water.
Water added to the tank should be pumped out of the tank by the pump once the water level is high enough to trigger the sump pump switch. In general, the pump should trigger once the tank is half full of water.
The timing of the pump trigger will depend on the switch setting of your pump and the size of your tank in relation to your pump. While the specific timing of your sump pump cycle is not important, it should cycle well before the water reaches the level of your condensate inlet plumbing and safely before water reaches the top of the tank.


- Secure deck lid cover and check for pluming leaks.
Once you are satisfied with the function of your system, install the deck lid cover and put the system in play. As with any plumbing project, double check your plumbing connection, ensuring PVC joints are cemented and tight.
Look for any plumbing leaks. Run the system and re-check for plumbing leaks.

- Additional details about my system.
Each furnace system and setup is different and may benefit from small tweaks of the above system. I did a few things that seemed to make sense with my system, but may not be needed or helpful for yours.
For one, I added a check valve upstream from the pump discharge circuit coming from the tank. I assume the flow rate of most sump pumps is enough to cause backflow of other connected drain circuits.
To further isolate the furnace, I also added a shut-off valve in the condensate line. This will prevent any backflow of discharge water back up into the furnace by way of the condensate drain circuit. Here is an image of the check valve and shut-off valve(s) (I also installed one on the A/C line too).
To add stability to the sump pump, I added a silicone pot holder under the pump. I was concerned that the plastic base of the sump pump would slip around inside of the poly water tank when the pump cycled. Placing a silicone pot holder under the pump seemed to provide “grip” for the pump.


IMAGE GALLERY | Custom Cold Climate Condensate Pump


FOLLOW UP | Custom Cold Climate Condensate Pump
Off the self solution from Liberty Pumps
I recently learned that the same company that makes the submersible pump I used for this, Liberty Pumps, makes a robust, all-in-one drain tank and pump. They offer a smaller residential 404L model and a larger commercial 405 model.
These drain pumps would be perfect for us as a large volume furnace condensate pump to avoid winter septic line freeze ups. If and when my current system needs replacement, I’ll likely use one of these.
The Liberty 404L residential drain pump

The Liberty Pumps 405 commercial drain pump

Leave a Reply
GIPHY App Key not set. Please check settings
8 Comments

Rainscreen Siding Construction

these are great instructions for exactly what I needed…..only the tank in the picture takes you to the wrong tank on amazon. offset tank is pictured in the article…… but a center holed tank is where it goes…..which i received and returned. try Ace Roto-Mold 16 Gallon Rectangle Flat Bottom Tank | SP0016-MM on ebay or direct from ace roto-mold Truly appreciate the article, Ron G
Hi all, I’m a HVAC contractor near Toronto Ontario. This problem has been a dilemma since the hi efficiency furnace came out. However you may want to find another location to discharge you condensate water. The acidic levels of the water do destroy the needed bacteria in your septic system. My eldest son has recently purchased a home on septic system and I am making a similar holding tank like yours Kirk, however i fill about half of the tank with acidic neutralizing rocks suspended half way up in order to remove the acidic content before it gets pumped into the septic system. You should consider doing the same the bacteria is extremely important to breakdown solid matter in order to have the septic work properly.
Manny
I want you to know your project is the best explanation I’ve found – and the most accurate. I built a replica of your system using several modifications to fit my specific application. I installed it this past week and look forward to the arrival of winter without the hassle of thawing my inlet to the septic field. The problem existed long before I bought the house from a couple of snow birds and I heard a plethora of explanations, none of which were right. In my specific application I had to add a separate drain line that tapped into the drain below the house because of space restrictions. I tapped in 8 feet from the tank and placed a y divert-er into the drain. I also left the existing drain applications for the humidifier and water softener – neither of which run when the house isn’t occupied. Thanks for the plans / engineering expertise. George
interesting system
Why did you decide on a water tight lid which adds expense and prep? If the pump fails water will still flow into the basement. Kirk Hill
Hi Kirk,
Good question. Knowing I needed to cut a fairly large hole to pass the sump pump, I decided for a few reasons to use the deck lid.
The sump, when activated releases some water spray from the small hole drilled in the discharge pipe. The water tight lid helps keep this spray in the tank. I also like the idea of a fairly tight fitting lid considering some the water will remain for long periods of time.
If the pump fails, the water should not overflow the tank, as the design incorporates an overflow drain circuit at the top of the tank that empties to the drain (see the image in step 6).
Gary
An excellent explanation! How has it worked? We have a house-cabin in northern Minnesota (Grand Rapids area) andI have had the high efficiency furnace condensate problem for years with a couple of floodings, the first quite bad. The problem is widely unrecognized by installers, plumbers, etc. We used to come north from Minneapolis about every 3 weeks and now go South for the winter. Last February cabin checkers we hired found that my Home Depot-bought pump stopped working but found the problem fairly soon and had the condensate dumped into a stock tank I had previously used for such emergencies. Your solution seems much better. Thanks for the best account of this whole matter on the internet! Kirk Hill
Hi Kirk,
Thanks for the nice comments.
You are so right about the lack of recognition and available solutions for the furnace condensate issue. I originally was looking for a large volume condensate sump that I could buy, but could not find one.
This system I put together above so far has worked without a hitch. I started using it mid February and had no more freeze-ups despite the continued cold weather and lack of snow. That said, I did add an automated warm air septic heating system in addition to the custom condensate pump described above.
If you are looking for a relatively inexpensive upgrade for your cabin system, I think it is totally worth the time and effort to build a pump as I did. Not only is the system large volume, but the components are exponentially better than those found in a off-the-shelf condensate pump.
Good luck. I would consider the Septic Heater I used (article on this site as well) if you find the high price manageable, it seems to have completely solved my freeze-ups.
Gary